
Installation Guide
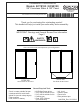


STEP 8 - Mount Second Puck on Opposite Wall:
* THIS STEP REQUIRES ASSISTANCE
- Carefully lift wall tube assembly and insert the open
tube end into the puck/collar already mounted on the wall
(high side).
- Take the second puck and hold it butted to the loose to
end of the header tube and against wall on the centerline.
- Level the tube with a level and mark the outline of the puck.
- Remove tube assembly and mark puck slot on the center-
line (keep slot vertical)
* Drill your mark with a 3/16" bit.
* Enlarge hole through tile with 5/16” carbide bit (to ensure
screw will not crack tile).
* Secure the Wall Puck (4) with one M6 X 50mm screw, (7a).
STEP 6 - Install Panel Connectors on Header Tube:
* Orient Header Tube (11) so that the two holes are facing up.
* Insert a screwdriver into the center hole of the tube.
* Slide a Plug into tube stopping it with the screwdriver.
* Manipulate the plug so that the hole in the plug lines up
with the hole in the tube.
* Put the screw through connector plate and into plug.
* Snug screws with the supplied Allen wrench.
* Repeat this procedure with the second hole closest to
the end of the tube. See Detail D.
D
Slide and manipulate plugs so
you can secure with connector
plates and screws.
Panel
Connector
Panel Connector (exploded)
Plug goes inside header tube.
Align threaded plug holes with holes in header
STEP 7 - Install Stoppers and Wall Collar on Header Tube:
* Carefully slide stopper to initial locations about 3” onto
the tube.
* Take care not to scratch the tube.
* Lightly tighten stopper set screw or secure with painter’s
tape so stoppers do not slide and scratch the tube.
* Final position will be determined during later steps.
* Opposite Side Wall Collar:
- Slide other wall collar onto the opposite side of tube.
See Detail E.
E
Stopper
Wall Collar
(orient cone
tipped set
screws into
puck)
Carefully slide stopper to initial locations about 3” onto the tube.
Take care not to scratch the tube.
Lightly tighten stopper set screw so they do not inadvertently slide.
Slide collar onto
tube and so
end is slightly
exposed
Orient the
slot in Puck
vertically
when
securing.
AlreadySecured
to wall
(High Side)
Position until level
and centered
Unit Centerline
Installation Instructions
Models: ECTE180 / ECSE180
3/8" Frameless Slider & 180° Panel
Page 5