
Installation & Assembly


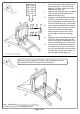

I. Insert the left front leg (#4)
with left leg support (#5) AND
the front leg support (#7).
Align the left front leg (#4)
with the pre-drilled holes of
the seat (#2).
II. Insert the right front leg (#3)
with the right leg support (#6)
AND the front leg support
(#7). Align the right front leg
(#3) with the pre-drilled holes
of the seat (#2).
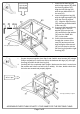
III. Prepare 4 bolt assemblies by
inserting FIRST the lock
washer (#B) onto the bolt
(#D) and then the flat washer
(#A) onto the SAME bolt
(#D), in that order.
IV. Insert the bolt assemblies
through the corners of the
seat (#2) and secure those
bolts using the Allen wrench
(#E) to lock them in with the
left front leg (#4) and the right
front leg (#3).
Page 5 of 5
ASSEMBLE EVERYTHING EXACTLY THE SAME FOR THE SECOND CHAIR
Turn right (clockwise) to tighten
I. Secure the parts together from Step 2 and 3 with 6 wood screws (#G) using a
Phillips screwdriver to lock them with in the backrest with legs (#1), the right
front leg (#3) AND the left front leg (#4).
II. Carefully turn the completed chair upright. Make sure the chair is rested on a
flat surface and it does not feel loose or wobbly. If it does, double check that
the bolts are secured and properly tighten.
#G x 6 pcs
#A x 4 pcs
#B x 4 pcs
#D x 4 pcs
Turn right (clockwise) to tighten