
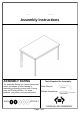
Installation & Assembly

Page 4 of 4
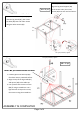
I. With the help of another person,
carefully place the table top (#2)
facing down on a protected surface.
II. Align the assembled leg stands (#1)
WRthe table WRS
tDEOHWRSKDVQRSUHGULOOHGKROHV
III Secure 6 screws (#B) through the 2
leg stands (#1) and 4 screws (#B)
through the 2 aprons (#3) using a
Phillips screwdriver to secure them
with the table top (#2).
IV. Carefully place the completed table
upright. Make sure the table is rested
on a flat surface and does not feel
loose or wobbly. If it does, double
check that the bolts/screws are
secured and properly tightened.
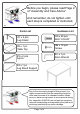
#A x 20 pcs
I. Align the 2 aprons (#3) with the
brackets of the leg stand (#1).
II. For each bracket of the leg stand
(#1), insert 2 bolts (#A) through the
bottom of the bracket and 2 bolts
(#A) through the side of the bracket
using the Allen wrench (#C) to
secure them with the apron (#3).
III. Align one end of the leg stand
support (#4) with the pre-drilled
holes on the center of the same leg
stand (#1).
IV. Insert 2 bolts (#A) through the
bracket of the leg stand support (#4)
using the Allen wrench (#C) to
secure them with the leg stand (#1).
V. Repeat the process above to
assemble the other leg stand (#1)
onto the other ends of the 2 aprons
(#3) and the leg stand support (#4).
Turn right (clockwise) to tighten
ASSEMBLY IS COMPLETED
Turn right (clockwise) to tighten
#B x 10 pcs
Insert each end of the aprons (#3)
onto the leg stands (#1), then insert
the bolts (#A) into each hole. Secure
using the Allen wrench (#C).
Note: As you assemble the aprons,
align the leg stand support (#4)
to the center holes, then insert
2 bolts (#A) into each end and secure.
1. Carefully place the table top (#2)
face down onto a protected surface.
2. Align the top of the leg stands (#1)
and aprons (#3) to the table top.
3. Use a power tool to secure screws
(#B). If using a screwdriver: use a
light hammer to tap on the screw,
then secure using the screwdriver.
Note: No pre-drilled holes created.