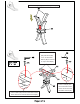
Insert the subjoin leg (#2) into the leg stand (#3). 1. Position the base A (#4) and base B (#5) in an "X" formation. Base A (#4) is inserted on top of base B (#5). 3. Insert a bolt (#F) into the center hole of the bases and secure with the Allen wrench (#E). 2. Insert 4 bolts (#A) into the inner holes of the bases and secure with the Allen wrench (#E).
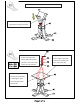
1. Carefully position the leg stand assembly upside down. 2. Insert the remaining two subjoin legs (#2) into the leg stand (#3). 2. Prepare 4 bolt assemblies by first inserting a lock washer (#B) onto the bolt (#A) then a flat washer (#C) onto that same bolt (#A). 3. Insert the bolt assemblies into the holes indicated in the diagram, then secure using the Allen wrench (#E). 1. Alight the pre-drilled holes on the support shelf (#6) with the pre-drilled holes on the leg stand (#3).
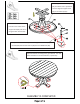
1. Carefully place the table top (#1) face down onto a protected surface. Align the support shelf (#6) to the table top (#1) 3. Insert the bolt assemblies into the corner holes of the support shelf (#6) and secure using the Allen wrench (#E). 2. Prepare 4 bolt assemblies by first inserting the lock washer (#C) onto the bolt (#D) then the flat washer (#B) onto that SAME bolt (#D). Adjust the leveler according to the ground level. Turn the leveler clockwise or counterclockwise, respectively.