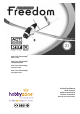
8460
Anti-Crash Technologie™ Prêt à voler Anti-Crash Technologie™ Fertigflugmodell Anti-Crash Technology™ Pronto al volo Anti-Crash Technologie™ Listo para volar Instruction Manual Mode d’emploi Bedienungsanleitung Manuale d’istruzione Manual de instrucciones
Congratulations on your purchase of the HobbyZone® Firebird Freedom™ RTF electric airplane. Your Firebird Freedom uses advanced Anti-Crash Technology™ (ACT) that allows you to safely train with a fully proportional 3-channel aircraft and radio system. The Firebird Freedom has built-in sensors that look for the sky and horizon, and thanks to the specially programmed software, it can temporarily “take over” in the event that your aircraft is put in danger from incorrect transmitter input.
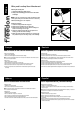
Step 1 Transmitter Needed for Step 1 “AA” Heavy-Duty Batteries (x8 included) 1. Remove the transmitter back cover by pushing down with thumbs, as indicated by the arrows. 2. Install the included “AA” batteries. Use eight fresh 1.5V “AA” batteries only. 3. Be sure to observe proper polarity when installing the batteries, and then replace the cover. 4. To test, switch on the transmitter. The LED should glow brightly. 5. Replace the batteries when you hear the low battery alarm (beeping sound).
Step 2 Motor Test and Battery Discharge 1. Turn on the transmitter. 2. Install the flight battery into the fuselage and plug it into the connector. 3. Move the slide throttle back all the way to arm it and then slide it full forward. The prop should spin at a high speed when you move the throttle forward. Keep everything clear of the propeller until it stops spinning. This is the indicator that the battery is fully discharged.
Step 3 Charging the Aircraft Battery Variable rate DC peak charger features: • Variable charge rate from 0.3–1.2A • Trickle charge • LED charge indicator • Charges 4- to 7-cell Ni-Cd and Ni-MH battery packs ��� �� �� 1. Select a charge rate of 1.2 amps for the included 8.4V 1000mAh Ni-MH battery. 2. Attach the battery to the charger. 3. Plug the charger into the 12V power outlet of an automobile. An adult should supervise children while they are charging the battery pack to avoid injury or possible fire.
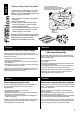
Step 4 Wing and Landing Gear Attachment Attaching the Landing Gear 1. Locate the landing gear within the box. 2. Simply insert the landing gear into the slot on the bottom of fuselage. NOTE: If you are only flying over grass and intend to land on the grass, and you do not have an X-Port™ accessory attached, landing gear is not required. Attaching the Wings 1. Locate the wing halves and wing spar. 2. Slide the spar carefully into one wing half. 3.
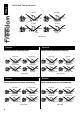
Step 5 Tail Control Test 1. 2. 3. 4. 5. Make sure slide throttle is “off” and then turn on transmitter. Install and plug in the flight battery. Move the stick side to side while observing that the tail flaps are moving as shown. Move the stick up and down while observing that the tail flaps are moving as shown. The small levers under and to the side of the stick are the trim levers and are used to adjust the “neutral” point of your control stick. These should be centered prior to performing the test. 6.
Step 5 Tail Control Test (continued) Down Elevator Right Rudder Moves Up Moves Down Left Rudder Up Elevator Moves Up Moves Up View from Rear Français Deutsch Stade 5. Contrôle de l’empennage (suite) Schritt 5.
Step 6 Choose a Large, Open Grass Field In order to have the most success, and to protect property and your Firebird Freedom™ from any damage, it is very important to select a place to fly that is very open.
Step 7 Choose a Calm day We know you want to have fun and fly your Firebird Freedom.™ However, flying in too much wind can place your airplane in jeopardy. On your first flight, make sure the winds are no stronger than 11 km/h. To check wind conditions: 1. Tie the included red ribbon to the end of your transmitter antenna. 2. Hold the transmitter so that the antenna is parallel to the ground. Always position yourself so that when you are flying, the airplane is UPWIND of you.
Step 8 Range Test Prior to your first flight you will need to do a range test. Two people are needed for this–one to hold the transmitter and one to hold the airplane. WARNING! The person holding the airplane should hold it so that the propeller does not come near any part of their body. 1. One person holds the transmitter while the other person walks 100 paces away with the airplane. 2. Be sure the throttle slider is in the “OFF” position. 3.
Step 9 Anti-Crash Technology (ACT) The latest breakthrough in RC flight, Anti-Crash Technology (ACT)™ makes teaching yourself to fly easier and safer than ever before. With ACT, anyone can fly. Your Firebird Freedom comes equipped with exclusive Anti-Crash Technology.™ This software helps prevent crashes due to overcontrol by pilots. The sensors included in the fuselage “see” the horizon. One sensor is above the canopy and faces forward. The other is at the bottom of the fuselage and faces backward.
Step 9 Anti-Crash Technology (ACT) The Firebird Freedom’s ACT™ software will help prevent you from crashing into the ground. If you enter a severe dive while flying with ACT engaged, you will notice the following things take place: • You will hear the motor speed reduce as the ACT programming overrides your input. This slows the descent of the aircraft to help prevent a crash. • The ACT software will give up elevator input to the aircraft’s electronics to help pull the plane out of a dive.
Step 10 Anti-Crash Technology (ACT) Flying Tips • Don’t fly at too low of an altitude and expect the ACT to save your Firebird Freedom.™ You must be at an altitude of at least 45 meters for the software to be able to help prevent crashes due to incorrect transmitter input. • Even when flying with ACT on, if you feel that your airplane is beginning to enter a steep dive, you may then apply some up elevator to aid recovery as well as reduce throttle.
Step 11 Using Elevator Your Firebird Freedom™ is equipped with a third channel for pitch control (elevator). Pulling back on the stick provides UP elevator that allows for shorter runway takeoffs, better flares for landing, a better climb rate, and more effective turns. However, giving too much UP elevator (pulling back on the stick) will cause the airplane to enter a stall, especially at slower speeds.
Step 12 Hand Launch On first flights, it is a good idea to have a second person, ideally an adult, help you launch your airplane. This will allow the pilot to focus entirely on the transmitter input. 1. Make sure the battery is fully charged. 2. Make sure that no one who is flying or preparing to fly is on the same channel, within approximately 805 meters, that you are on. When you are confident of this, turn on the transmitter. 3. Install and plug in the flight battery. 4.
Step 13 Runway Takeoff (ROG) Not recommended for inexperienced pilots. 1. Make sure your landing gear is properly installed and is securely in the slot on the fuselage before you attempt takeoff. 2. Stand behind the Firebird Freedom™ and point it directly into the wind on smooth asphalt or concrete. 3. Apply full power and adjust the right control stick as necessary to keep the Firebird Freedom headed directly into the wind. 4.
Step 14 Flying 1. After launching your Firebird Freedom™, it will begin climbing at full throttle. With the throttle all the way on, your Firebird Freedom should climb without any elevator input. 2. Make right- and left-hand adjustments to keep your airplane heading directly into the wind. Do not attempt a turn until you have reached a minimum of 15–30 meters of altitude. That’s about as tall as a 4- to 8-story building.
Step 14 Flying (continued) Sharp Turns: Move the stick in the direction you want to turn and add a bit of UP elevator at the same time (pull back on stick). The plane will make a sharper banking turn. Rudder Trim: If the Firebird Freedom™ seems to drift in one direction when the control stick is in the neutral (centered) position, gradually move the rudder trim lever below the control stick in the OPPOSITE direction of the drift. Adjust until the plane flies straight with the control stick at neutral.
Step 15 Throttle Adjustment 1. When launching, the throttle should be full on. 2. Once you have achieved the altitude where you want to fly you can reduce throttle to about 50% for cruising. This will also allow for longer flights. 3. If you want to reduce altitude, reduce throttle to less than 50%. 4. To increase altitude again, increase throttle to more than 50%. NOTE: If you’re flying with the motor off or at a low speed, allow the Firebird Freedom™ a bit more area for turns.
When you notice that your Firebird Freedom™ no longer climbs well under full power, normally after about 10–12 minutes, the battery is getting low and it is time to land. Line the airplane up directly into the wind toward the desired landing spot. At about 3-4 meters of altitude, reduce the throttle gradually until it is completely shut off. Your Firebird Freedom will glide in for a landing.
Step 17 Making Adjustments—Plane Turns to the Left or Right If you notice that your airplane wants to turn to either the left or right when the control stick is centered, some adjustments are needed as the control surfaces may not be at neutral. In most cases, a few clicks in the needed direction (right or left) on the trim lever will correct the problem. If you need even more adjustment do the following: Spool Molette Spule Avvolgicavo Carrete 1.
Step 17 Making Adjustments—Plane Turns to the Left or Right If you are certain the control surfaces are at neutral and the plane still “wanders” to the left: 1. Adjust the tail (see below) so that the left tail control surface is 1.6mm above the rest of the tail. 2. Test fly. 3. If it is still flying on its own to the left, repeat the above procedure until it flies straight. Français If the plane still “wanders” to the right: 1. Adjust the tail so that the right tail control surface is 1.
Step 17 Step 18 Adjusting the Climb Rate If your Firebird Freedom™ does not climb fast enough when at full throttle and with a full charged battery pack, you can adjust the climb rate by: 1. Tightening the front screw one full turn and loosening the back screw one full turn. 2. Test fly. 3. Repeat the above procedure until your plane climbs adequately under full power.
Step 19 Aerobatic Flight If a Crash Occurs Your Firebird Freedom™ comes out of the box with the controls set for beginning pilots, with the pushrod attached in the outer holes of the control surfaces. By adjusting the pushrods so they are attached in the holes on the tail that are closer to the control surfaces, you will give your Firebird Freedom more control response for more aerobatic maneuvers, such as loops and tail slides.
Warnings and Safety Checklist 1. Read and follow this manual and included video CD completely, observing all instructions and safety directions. If you do not do this, serious injury and damage can occur. Think safety first. 2. Keep propeller away from all body parts at all times! Beware of loose clothing or hair becoming entangled in the propeller. 3. Never fly when it is too windy or you may lose control of the airplane.
Italiano Sicurezza e precauzioni 1. Leggere e seguire quanto c’è scritto in questo manuale e visionare il video. Osservare tutte le istruzioni, i consigli sulla sicurezza. Non facendo questo c’è il rischio di danni o di ferite anche serie. La sicurezza deve venire al primo posto. 2. Tenere le’elica sempre lontana dagli oggetti e dalle parti del corpo! Fare attenzione ad indumenti che possano impigliarsi nell’elica. 3. Mai volare se c’è troppo vento per non rischiare di perdere il modello.
Troubleshooting PROBLEM Unit does not operate POSSIBLE CAUSE SOLUTION 1. Transmitter “AA” batteries are depleted or installed incorrectly as indicated by a dim or unlit LED on the transmitter or the low battery alarm 2. No electrical connection 3. Aircraft battery is not charged 4. Crash has damaged the radio inside the fuselage 1. Check polarity installation or replace with fresh “AA” batteries 2. Push connectors together until they click 3. Charge battery fully 4. Replace the fuselage 1.
Italiano – Ricerca dei guasti PROBLEMA CAUSA POSSIBILE SOLUZIONE Il modello non funziona 1. Se le pile “AA” della trasmittente sono esaurite o installate non correttamente il LED si illumina debolmente o rimane spento. 2. Manca il collegamento elettrico. 3. La batteria del modello non è carica 4. La caduta ha danneggiato la radio all’interno della fusoliera 1. Controllare la polarità delle pile o sostituirle con nuove pile di tipo “AA” 2. Schiaccia I connettori tra loro fino a sentire “click.” 3.
Success Tips 1. Do not fly in winds over 11 km/h, especially during first flights. Flying in too much wind is by far the number one reason for crashes and flyaways. 2. Choose the flying area carefully. A grassy field or soft ground that is about 180 meters in diameter is optimum. It’s also best to fly in an area with very few or no trees. 3. ALWAYS fly the airplane UPWIND! Never allow your Firebird Freedom™ to fly too far down wind, as it will get farther and farther away from you.
Italiano Consigli importanti 1. Non volare se il vento supera i 11 km/h, specie durante i primi voli! Volare con troppo vento è la causa principale degli incidenti di volo. 2. Scegliere il campo di volo con attenzione. L’ideale è un prato od un terreno morbido di circa 180 m di diametro libero da alberi ed edifici. 3. Fr volare il modello sempre CONTROVENTO. Non permettere mai al Firebird Freedom™ di allontanarsi sottovento poiché continuerà ad allontanarsi sempre più.
Warranty and Follow-Up Procedures Due to the nature and operation of this product, the warranty does not extend beyond the initial pre-flight testing. Carefully check the parts and operation BEFORE your first flight. Damage incurred during flying, landing, crashing or modification is not covered under the warranty. Warranty: Horizon Hobby, Inc. guarantees this product to be free of defects in material and workmanship.
Italiano Garanzia ed Assistenza A causa della natura e del funzionamento di questo prodotto, la garanzia non si estende oltre la verifica di prevolo iniziale. Controlla con attenzione le parti e il funzionamento PRIMA del primo volo. I danni subiti durante il volo, l’atterraggio, la caduta al suolo o la modifica non sono coperto dalla garanzia. Garanzia: Scorpio s.r.l.. garantisce che questo prodotto è privo di difetti di materiale e lavorazione.
Replacement and Optional Parts Keep your Firebird Freedom™ in the air! Spare parts are available from your dealer. By supporting your dealer, they’ll be there when you need them. PART# DESCRIPTION PART# DESCRIPTION HBZ1013 HBZ1026 HBZ1058 HBZ1059 HBZ2004 HBZ2016 HBZ2017 HBZ6057 HBZ7000 HBZ7010 HBZ7015 HBZ7016 HBZ7017 HBZ7018 HBZ7020 HBZ7021 HBZ7031 8.4V 1000mAh Ni-MH Battery DC Peak Charger (1.
Italiano Parti di Ricambio ed Opzionali Mantenete in efficienza il vostro Firebird Freedom™! Le parti di ricambio si possono acquistare presso il vostro negozio di fiducia o direttamente da www.scorpio.it. Vi consigliamo di consultare sempre per primo il vostro rivenditore che è anche in grado di darvi preziosi consigli. Per la lista dei rivenditori consultate la sezione relativa sul sito della Scorpio.
Replacement and Optional Parts (continued) X-Port Accessories Your Firebird Freedom™ comes with the ability to add to the excitement of flying. HobbyZone’s exclusive X-Port™ technology allows for such things as air-toair combat, dropping bombs, and even night flight. These items (sold separately) instantly add fun and excitement to X-Port equipped aircraft. Rule the air with the Sonic Combat Module™ (HBZ4020).
Replacement and Optional Parts (continued) Optional Parts and Accessories There are many optional parts and accessories that you can buy to make your flying experience more fun. In addition to X-Port™ items, you can also purchase additional battery packs to keep your downtime to a minimum. Your Firebird Freedom™ comes equipped with an 8.4V 1000mAh Ni-MH Battery Pack (HBZ1013).
Future RC Flight The Aerobird Challenger® is a great next step, but you could also try the Aerobird Xtreme™. Both of these aircraft are X-Port™ equipped, so you’ll still be able to have fun with the X-Port accessories you use with your Firebird Freedom™. Be warned, however, that the Aerobird Xtreme is much larger and heavier, and will therefore fly much faster than the Aerobird Challenger.
HobbyZone® products are distributed in the United Kingdom exclusively by: Helger Distribution Units 2-4, Ployters Road Staple Tye-Southern Way Harlow, Essex CM187NS ©2005 Horizon Hobby, Inc. Les produits HobbyZone® sont distribués en France exclusivement par: Avio & Tiger Z.I. Sud - B.P 27 84101 Orange, Cedex ©2005 Horizon Hobby, Inc. HobbyZone® Produkte werden exklusiv vertrieben von: JSB Marketing & Vertriebs GmbH Otto Hahn Str. 9a 25337 Elmshorn ©2005 Horizon Hobby, Inc.