
Carbon Cub S+ 1.3m Manual


®
Carbon Cub S+ 1.3M
EN
22
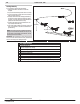
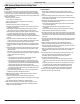
45º
Up
Aileron
Wind
Direction
Down
Aileron
Taxi 45 degrees into the direction of the wind.
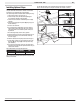
Flying With the Optional Float Set (HBZ7390)
To fl y this aircraft off water, install the optional HobbyZone
®
Float Set (HBZ7390, sold separately). Float struts, strut
brackets and 4 screws are included with the aircraft. Rear
bracket screws are included with the fl oats. Follow the
instructions included with the optional fl oat set to install
them to the aircraft.
Only install the fl oats if you are comfortable fl ying your
aircraft and have repeatedly taken off, fl own and landed with
success. Flying off water poses a higher risk to the aircraft
because the electronics can fail if fully immersed in water.
Always ensure the fl oats are correctly secured to the
fuselage prior to taxiing or attempting takeoff.
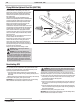
To take off from water, steer with the rudder to turn into the
wind and slowly increase the throttle. Keep the wings level
on takeoff. Hold a small amount (1/4–1/3) of up elevator
and the aircraft will lift off once fl ying speed is reached.
To land this aircraft on water, fl y to a couple of feet off the
surface of the water. Reduce throttle and add up elevator
to fl are the aircraft.
When taxiing, you must use throttle to move the aircraft
forward, but steer with the rudder stick.
Avoid taxiing cross wind if there is a breeze, as this can
cause the aircraft to fl ip over if wind gets under the
upwind wing. Taxi 45 degrees into the direction of the
wind (not perpendicular to the wind) and use aileron to
hold the upwind wing down. The aircraft will naturally try
to face into the wind when taxiing.
Always fully dry the aircraft after landing on water.
CAUTION: Never go alone to get a downed
model in the water.
CAUTION: If at any time water splashes in the
fuselage while fl ying from water, bring the airplane
to shore, open the battery hatch and immediately remove
any water that may have gotten in the fuselage. Leave the
battery hatch open overnight to let the inside dry and to
prevent moisture damage to the electronic components.
Failure to do so could cause the electronic components to
fail, which could result in a crash.
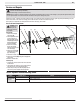
Deactivating GPS on the Ground
WARNING: Do not perform this or any other equipment test with the
propeller installed on the aircraft. Serious injury or property damage
could result from the motor starting inadvertently.
The GPS system is activated from the factory. If for any reason you wish to
deactivate the GPS system, such as to perform a control direction test indoors
or to simply enjoy the aircraft without GPS features, follow the directions below:
1. Ensure that your transmitter is bound to the aircraft. If necessary, refer to
the Transmitter and Receiver Binding section.
2. Power on the transmitter.
3. Power on the aircraft. After the aircraft fi nds the RF signal, the elevator will
start to move up and down slowly, indicating the GPS system is searching
for satellites.
4. Press and hold the HP/AL (bind) button and cycle the fl ight mode switch fully
3 times. The elevator will stop moving and the rudder will wag, indicating the
GPS system is deactivated.
To reactivate the GPS system, power cycle the aircraft.
IMPORTANT: When the GPS system is deactivated, the aircraft’s Holding Pattern,
AutoLand and Virtual Fence modes will not function.
Deactivating GPS
Deactivating GPS in the Air
If for any reason you wish to deactivate the GPS system while the aircraft
is airborne, such as if the GPS system is not calibrated correctly or is not
responding as expected, follow the directions below:
1. Press and hold the HP/AL (bind) button and cycle the fl ight mode
switch fully 3 times. The rudder will wag, indicating the GPS system is
deactivated.
2. Maintain control of the aircraft and return to the runway to land manually.
To reactivate the GPS system, power cycle the aircraft.
IMPORTANT: When the GPS system is deactivated, the aircraft’s Holding
Pattern, AutoLand and Virtual Fence modes will not function.