
Carbon Cub S+ 1.3m Manual


RTF/BNF Basic
Carbon Cub S+ 1.3M
EN
21
B
A
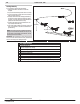
Fig. 1
Fig. 3
D
C
Fig. 2
Installing Optional Flaps
IMPORTANT: The optional fl aps for this aircraft require a
computer transmitter with at least 7 channels*. The RTF DXe
transmitter is not compatible with the optional fl aps.
The optional fl aps should be installed before installing the wing.
1. Slide a silicone tube on each clevis (Fig. 1).
2. Connect the fl ap servo (PKZ1090, sold separately) to a
servo extension (PKZ5403, sold separately).
3. Connect the servo extension to the AUX2 port of the fl ight
controller.
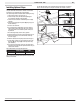
4. Install the fl ap servo (A) in the pocket (B) using hot glue or
double-sided tape.
5. Power on the transmitter.
6. In the Channel Input Confi guration menu of the Channel
Assign section of the System Setup list of your computer
radio, assign AUX2 to an available 3-position switch, usu-
ally switch D.
7. Move the assigned fl ap switch to the up position.
8. Install the servo arm on the servo at the angle shown (Fig. 2).
9. Install the fl ap linkage in the outermost hole of the fl ap
servo arm (Fig.B).
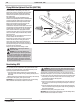
10. Attach the clevises to the fl ap torque rods as shown (Fig. 3).
11. On both fl aps, carefully cut a small amount of foam at the
fl ap hinge (C) and wing root (D) so the fl aps move freely
(see illustration).
12. Do a control test of the fl aps using your aircraft and trans-
mitter. Make sure both fl aps are symmetrical while they are
retracted and extended.
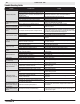
See the table below for the required fl ap throws:
1/2 or Takeoff Full
Flap Down 12mm down 25mm down
See the Spektrum RC website (www.spektrumrc.com) for avail-
able fl ap TX download.
The RTF DXe transmitter is not compatible with the optional fl aps. The optional
fl aps for this aircraft require a computer transmitter with at least 7 channels.