
User Manual

Vibration Isolation
By Lloyd Sullivan
Vibration isolation is a very important aspect of our hobby. Vibration is always trying it's best to take
your model back apart by loosening every screw, bolt, and set screw in the whole machine. It is also trying hard
to remove your covering, unglue your hinges, and destroy each and every component of the radio not to
mention doing a great job of causing any slop to become greater and turning slight control system operating
clearances into slop. Although the radios we use today are far more tolerant than they were a few years ago, we
still need to respect vibration as the destructive force it is. The source of this force is, of coarse, the engine. I
think I just had a Dr. Seuss moment. Single cylinder engines are counterbalanced for the rpm they will most
likely run at most of the time. At best, they can only be counterbalanced to achieve the least amount of
vibration. The only time your airplane or helicopter can be vibration free is when it is not running! Our job as
builders/pilots is to isolate the vibration to minimize the effect.
Every component of the radio with the possible exception of the switch should be properly isolated from
vibration with foam rubber or in the case of servos, rubber grommets. Components isolated with foam rubber
should be securely wrapped so as not to let any part of the component come in direct contact with the vibrating
airframe. Foam should not be compressed more than about 25% of its thickness for maximum benefit. I have
seen receivers and batteries wrapped in foam and then taped so tightly that the foam is compressed to nearly
nothing. This compression removes the foams ability to absorb the vibration. Other installations I have seen
have the receiver and/or battery wedged into a tight spot compressing the foam to nearly nothing, again,
eliminating the isolation. Do Not use friction (by wedging them tightly) to secure your receivers or battery
packs. You are inviting a failure when you do.
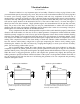
Servos installed either without the eyelets through the grommets and screws tightened so tight they
completely compress the rubber grommet, or the eyelet in upside down (flared part on top) are also common
mistakes made by many. The eyelets are designed to be slightly shorter than the thickness of the servo grommet.
When the screw is snugged against the eyelet it will compress the grommet only slightly thus allowing the
rubber grommet to provide maximum vibration isolation. If the eyelet is in the grommet with the flared end on
top, the straight end will sink into the servo rail allowing the grommet to be over compressed and preventing
isolation. See figure 1 below.
Over-tightning causes eyelet to dig into servo rail and
overcompress the rubber grommet which reduces or
eliminates vibration isolation.
Snug servo screw against eyelet ensures proper
grommet compression and vibration isolation.
Correct eyelet installation
Incorrect eyelet installation
Figure 1