
User Manual

This document was written by Chris Hansen.
For more information, or to purchase the products shown here, please visit our web site:
www.hansenhobbies.com
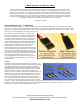
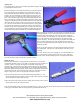
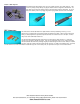
Inserting and Extracting Terminals:
Typically, the terminals will easily slide into the housings and snap in place.
Sometimes I find that when using thicker wire the rear set of wings on the
terminals sometimes out a tad too wide, and the terminal has trouble sliding into
the housing. When using our stiffer economy wire this doesn’t really matter
because the wire is stiff enough that the terminals can just be shoved in, but
when using a more flexible wire you might find trying to push a rope if you know
what I mean.
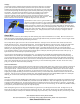
One solution is to just give the wings a little squeeze to reshape them as shown to
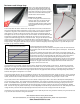
the right, but I prefer to leave the terminals alone and just push them into the
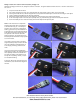
housing using a small tool. The simplest thing I’ve found around my workplace is a
hobby knife with a blunt tip (you can just break the tip off with some pliers).
Please be very careful if you do this – make sure the blade is dull enough not to
cut you. I keep a dulled blunted No. 11 blade in my connector kit just for this.
You could also use a very small screwdriver, or any number of other widgets. Push on the bottom part of the terminal until it slides all the way
in and the locking flap snaps in place. The previously uncooperative terminals end up nice and snug and happy.
To remove the terminals from the housing the little locking flaps have to be carefully lifted up while you slide the terminal back out. If you
don’t intend to reuse the housing you can go nuts and bend the flaps all the way back, but if you want to reuse it, bend them back only enough to
give the terminal clearance. To do this I revert back to my trusty hobby knife.
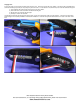
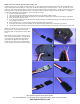
Making a connector with thin wire:
Both of our crimping tools give good results when crimping terminals onto our 28AWG wire. If you go smaller than that then I recommend you
make a crimp then perform a pull test to see if the wire can easily be pulled out of the terminal. If it can, then you’ll have to solder the wires
to the terminals. I would crimp it first, then quickly and neatly solder the copper strands to the terminal. It’s important to do it quickly and
with a minimal amount of solder so the solder doesn’t wick up the copper strands beyond the wings of the terminal, making the wire brittle
where it needs to be able to flex.
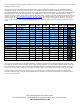
Making a connector with thick wire:
Our Economy Crimping Tool performs well down to 22AWG wire, but does not yield good results on 20AWG wire. Our Deluxe Crimping Tool
performs very well across the 20-30AWG range. All wire is different, so when in doubt the best thing to do is give it a try, then do a pull test
to see if the crimp is solid. Again, you should be able to yank on the terminal/wire pretty hard (I just grab the terminal with some pliers, which
crushes it and yields it unusable) before the crimp fails. When using our gold terminals on 20AWG wire you may find the conductor wings don’t
wrap completely around the copper strands. In pull tests I find that the results are not ideal, but the crimp is still very solid and trustworthy.
If you have concerns/problems, you can always revert to crimping then soldering.