
User Manual

This document was written by Chris Hansen.
For more information, or to purchase the products shown here, please visit our web site:
www.hansenhobbies.com
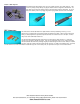
Crimping Tools:
We currently sell two tools to crimp terminals, again dubbed “Economy” and “Deluxe” crimping tools. Both tools have their pros and cons. Here’s
a straightforward review of each:
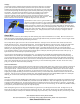
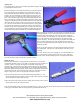
Economy Crimping Tool: The economy tool makes a good crimp but requires a
lot of squeezing power which translates into sore hands after a while. It
tends to bend the terminal a little when crimping so it has to be bent back
straight. Also, the terminal may not readily release from the teeth. This
tool has a wire cutter on it which can come in handy, and can also serve as
pliers. This tool makes a lousy looking crimp with JST/BEC terminals, but it
works. I’ve made over a thousand good crimps with this tool. Beware, there
is another red-handled tool made by the same manufacturer that looks nearly
identical to the one we sell, but it has 3 sets of teeth in the jaw instead of
two. This other tool was made for butt-insulated connectors, piercing spade
lugs, and open barrel connectors and gives poor results on servo connector
terminals. Often I have had people walk up to me at expo’s and groan about
“the red-handled tool” when they really should be groaning about the person
who sold them the person who sold them the “3-toothed red-handled tool”.
Deluxe Crimping Tool: The deluxe tool is much easier on the hands due to it’s
leveraging mechanism. It has a ratcheting jaw which is useful for locking the
terminal in place before making the crimp. I’ve never had a terminal get
stuck in the teeth. If it has any flaw it is that sometimes it crimps the rear
wings of the terminal too wide to slide easily into the connector housing
(more on that later). This tool makes a stronger crimp than the economy tool
due to its higher compression, and crimps JST/BEC connector terminals
perfectly. I’ve made thousands of good crimps with this tool, faster, and my
hands don’t get sore.
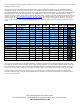
By the way, pay little attention to the wire gauge sizes listed on the side of
the crimping tools. Trial and error is the best way to decide how to crimp
something.
Of course, you don’t have to use a crimping tool. You could also solder the
wire to the terminals. Unless you have a special rig to do it, soldering is
probably a slower and less consistent process. An improperly made solder
joint is also much more likely to break due to vibration or flexing.
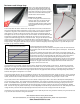
Making the Crimp:
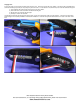
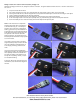
Both tools have two different crimping teeth for various wire sizes. The connector
terminals have two sets of wings – one is made to crimp onto the bare wire strands, and
the other is made to crimp onto the insulation; we’ll call them ‘strand wings’ and
‘insulation wings’. Also notice that the crimping tool has a deep gully for the insulation
wings and a shallower gully for the strand wings. For a good crimp, the insulation wings
should wrap tightly around the insulation, and the bare wire wings should roll inward very
tightly onto the strands. Notice the small ridge in the gully – that’s there to aid the
wings in curling around. There are two good ways to crimp the terminal:
a) Place the terminal on the wire first (the insulation wings should hold it on – if not,
squeeze the insulation wings together a little bit to make it hold on tighter) then hold
the wire between the crimper teeth and crimp.
b) Place the terminal in the crimper teeth first, lightly close the teeth to hold it in place,
then slide the wire into the terminal and crimp.
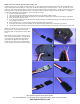
Crimp the terminal VERY tightly. The deluxe tool makes this easy – in fact you can’t even open the tool back up until it’s been fully closed (like a
turtle’s jaws, I understand). With the economy tool the jaws should close all the way.