
User Manual


Author: John Taylor, UK Page 2 of 4 Date: 7/2/2014
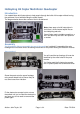
The next step was to assemble the fuselage.
Parts required
The assembled top fuselage, bottom
fuselage, green strengthening tubes and 8
of the longer bolts and nuts.
Align the bolt holes and fit all 8 bolts.
Note: Threadlock is not required as the nuts
are lock nuts.
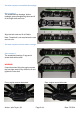
The next step was to fit the under carraige.
Parts required
The assembled fuselage, 2 legs and 4
shorter bolts with screws.
WARNING
I found that when fitting the engine mounts
the front legs made it very difficult to fit and
tightlen the inner bolt.
Front, engine mounts obstructed. Rear, engine mount bolts clear.