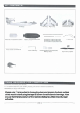
USER MANUAL INCLUDED: 1. Almost completely assembled EPO fuselage and wings. 2. 40A brushless power system - waterproof ESC W/BEC. 3. 9g waterproof servo x 4. 4. Nylon propeller (2pcs).
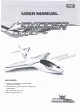
INSTRUCTION MANUAL THIS MODEL IS NOT R TOY! THESE INSTRUCTIONS SHOULD BE READ BY A SUPERVISING ADULT HobbyKing Skipper All Terrain Launching Airplane PNP Model No:40228 IMPORTANT: Before beginning assembly, please read and understand the warnings listed following. Failure to read and understand these warnings could lead to bodily harm and/or injury. 1. This model is not a toy. It is for beginner, intermediate and experienced modeller 2. Assemble the plane according to the instructions.
l
ASSEMBLIN.G YOUR Sl
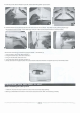
. Rip off right wing doulbe side tape, align carbon fiber tube with two holes on right wing side and press right wing to join fuselage. before they join together, make sure the servo extend wire get through the hole on fuselage. the servo extend wire can't be stuck when right wing join with fuselage. 6. plug in the two servo extend wire on wings with Y wire cord which has Aileron marking label. Noticing the servo wire correct polarity. 7. Insert left horizontal tail into left side of fuselage as show. 8.
8. Use two pcs of cohere sticker to join two horizontal tails together up and down. - 9. Insert Z shape end of pushrod into the outer hole of servo arm as show. The other end of pushrod get through the clevis and secure it with 1.5mm alien key as show. make sure horizontal tail are in neutral position. Servo wires connecting to Receiver (Apply to MODE 1 and MODE 2) 1. Plug in Aileron servo wire with Channel 1. 2. Plug in Elevator servo wire with Channel 2. 3. Plug in Throttle wire with Channel 3. 4.
STEP 2: CHARGING THE LIPO PACK (NOT INCLUDED) The following parts are optional purchasing parts. 11.1V 1300mAh 35C LiPo pack. 2S/3S Balance charger with adapter NOTE: Familiarize yourself with the charging procedure of the lipo battery. Read the charger Manual completely and fully charge the lipo battery. 1.Only use a LiPo approved charger. Never use a NiCd/NiMH peak charger! 2.Never leave the battery unattended during the charging process. Always keep this charger out of reach of children. 3.
STEP 5: TEST THE AILERON (Mode 2) 1. Move the aileron control stick to the left, the left aileron moves up and the right aileron moves down. 2. Move the aileron control stick to the right, the left aileron moves down and the right aileron moves up. NOTE: If the movement of aileron works in opposite position, please check the aileron reverse switch and make necessary adjustment. 3. Let Aileron control stick returns to its neutral position, the aileron returns to its neutral position.
FLIGHT MANUAL Choose a good flying site and day 1. The ideal location for flying has wide-open space in four directions with no people 2. Choose location carefully! Do not operate model near these areas: Houses or buildings, children's play areas, road traffic, railways, airports, overhead powerlines. 3. Fly in calm weather conditions with no winds or gentle winds. WARNING: If you lose control of your airplane , never wade into deep water or water with strong currents to retrieve it.
Command And Fly (Mode 2) Speed up Speed down Ascending ------ r-. ::::,,,__ • --�,!' 111<__"---=c:::::----=_- _ \ _�-- c=? - - - -- 01J� �ff r�p8 Left stick down Right stick down L� � ��� - Descending Nose tum right ��--1-[!-�·� t _//J-�J - q - - � 1 �1 - Right stick up Left stick right � � Nose turn left The Body incline to Right The Body incline to Left - , er -� �� ___ , 01�1iD 'tl fv • ·•�·� .
Adjusting trims during flight (Mode 2) ' 1. Let go of control sticks. If airplane moves left, adjust rudder trim to the right. r • i �� ,/1 � I . ,'"":--- .. {. 2. Let go of control sticks. If airplane moves upward, adjust elevator trim to downward. 3. Let go of control sticks. If airplane inclines to the left, adjust aileron trim to the right. 4.
., \..