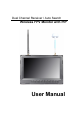
Dual Channel Receiver / Auto Search Wireless FPV Monitor with PIP User Manual
Product Overview Dual channel automatic frequency search at the same time wireless aerial LCD monitor is a new multi-function product, and adopts advanced integrated circuits and High-quality new HD LCD monitor. It integrates a high-sensitivity dual 5.8GHZ AV wireless receivers with auto searching, aerial receiver, high-definition and PIP function monitor.
Product Feature: ● Dual Channel RF1/RF2 receiver to receive at the same time, high-sensitivity, strong anti-interference. ● Combine wireless 5.8G receivers with the monitor, it is compact, and suitable for a variety of purposes. ● 5.8G wireless receiver, 32-channel selection, effectively to avoid the signal interference. ● Newest Channel Auto searching, selection via button to improve the accuracy and convenience of channel selection.
CONTENTS 1. Product Description ----------------------------------- 4 2. Power Supply ---------------------------------------------7 3. Wireless Transmission Receiver Operation --- 8 4. Operation Instruction --------------------------------- 12 5. Parameters ----------------------------------------------- 21 6.
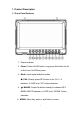
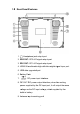
1. Product Description 1.1 Front Panel Features 1. Power Indicator 2. Power: Power On/Off button, long press this button for 5s to 8s to turn On/Off the power. 3. Mode: Input signal selection button. ∧/ CH2: Directly press RF2 button is for CH 1~8 selection. In OSD is for “UP” button selection. 4. ∨/ BAND2: Press this button directly for channel RF2 BAND A/B/C/D selection. In OSD is for “DOWN” button selection. 5. MENU: Menu key, enter or exit button in menu.
. >/CH1: Press this button directly for channel RF1 CH 1~8 selection . When enter into menu, namely enter into secondary menu, it is for items selection and settings adjustment. 7. </BAND1: Press this button directly for channel RF1 BAND A/B/C/D selection. When enter into menu, namely enter into secondary menu, it is for items selection and settings adjustment. 8. AUTO2: RF2 channel auto searching. 9. AUTO1: RF1 channel auto searching. 10.
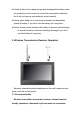
1.2 2 Rearr Panel Feature F es 1. : Headp phone jacck output port. 2. RX X2 OUT: RF2 A/V V signal output o porrt. 3. RX X1 OUT: RF1 A/V V signal output o porrt. 4. HDMI IN: Multimed M ia high-definition digital d sig gnal inputt port. 5. US SB data upgraded d port. 6. Ba attery Pa ack 7. : DC power input inte erface. C OUT: DC D powe er output interface, i , when th he working 8.
2. Power Supply There are two versions for power supply: 2.1 Supplied by city electricity with power adapter When the monitor connects the electricity by DC power adapter, light is red, means it is charging, after fully charged, the charging indicators will be off. You can choose the power adapter (optional) which matches to the monitor to charge the monitor. If you need to use other power adapter, please use the qualified power supply in DC9-18V, ≧1.5A. 2.
● Period of time to do a deep charge and discharge the battery under the protection circuit control to correct the consumption statistics, but it will not improve your battery's actual capacity ● Please place battery in a cool place to weaken the aestivation speed of battery, if you don’t use the battery for a long time. ● Please charge power stored in the battery to prevent self-discharge of excessive led to excessive discharge damage if you don’t use the battery for long time. 3.
signal. (Frequency range of each region are different, please check the unit’s paste instructions). This unit can automatically search for 32 receiver channels. When multi transmitters and receivers work together at the same time, please choose different transmission channels, to avoid co-channel interference.
3.2 Auto Searching: Confirm that the transmitter has entered a normal working condition. Confirm that build in battery monitor has been fully charges or has connected via DC power supply, long press “POWER” for 5s~8s, the monitor will enter the working state. Then press “MODE” and select “RF1” signal input.
3.3 Manual channel search and Settings. Confirm that the transmitter has entered a normal working condition.Turn on power of the monitor to the working state. Press “MODE” and select “RF1”, “RF1 BAND:X CH:X” will display on the upper left corner of the screen, then press “</BAND1” to switch RF1 channel BAND A/B/C/D, and press “>/CH1” to select RF1 CH1~8.
4. Operation Instruction 4.1 Button instruction MODE ∧/ CH2 Input Signal RF1/RF2/HDMI selection button RF2 CH1~8 channel switch; In OSD is for “UP” button selection. ∨/BAND2 Press this button directly for channel RF2 BAND A/B/C/D selection; In OSD is for “DOWN” button selection. MENU >/CH1 Menu key Press this button directly for channel RF1 CH1~ 8 selection . When enter into menu, it is for items selection and settings adjustment.
4.2 2 Menu In nstructio on P Press "ME ENU" to enter e the menu, us se the "∨/CH2” or "∧/BAN ND2 " buttton to se elect “ , , , ", after select it then pre ess ">/CH1 " button to con nfirm, nam mely corrrespondin ng menu items ope eration, and a presss the "∨/C CH2 ” or "∧/BAN ND2 " buttton to select the e adjustm ment item. After select adjus stment ite em, presss“>/CH1” or “</BAND1”” button to t adjust or select the conccrete para ameters.
※ Brigh htness: 0~100. 0 To ad djust the image's brightnes b ss ※ Saturration: 0~100. To ad djust colo or concen ntration ※ Tint: 0~100. N vide eo mode, the image color tint t difference is On NTSC adjussted by tint. ※ Sharp pness: 0~100. 0 To ad djust sha arpness of o the ima age ※ Colorr Temp. : 6500K, 7300K, 9300K, 9 U User. Image e Color Te emp. sele ection (prress>/CH H1 to entter into th he color Temp. T Intterface) Sele ect “User”” to choosse and ad djust R/G G/B accorrding to users’ habiits.
Me enu of Pa age Two ※ Pictu ure Mode e: Standa ard, Soft,, Vivid, User. U Selecct “user” to adjustt the imag ge of “Co ontrast, Brightness s, Saturation” acccording to the pra actical sittuation. ect Ratio: ※ Aspe S 4︰3, 4 16︰ ︰9, 14︰9 9, Zoom 1, Full Screen, Zoom m 2, Zoom m 3, Zoom 4. Imag ge height to width aspect ra atio selecction ※ Chec ck field: ono, Red, Green, Blue Off, Mo To sw witch Am mong Mon no, Red, Green, G Blue ※ H/V Delay: D On n, Off.
※ Volume: 0~1 100. To ad djust the volume ※ Balan nce : -1 10 ~ +10.
(Tota al 3 page es) Me enu of Pa age One ※ Video o System m: PAL, NTSC. N Aeria al video fo ormats se election. ※ Scree en Marke ers: off, 96%, 9 93% %, 90%, 85%, 8 80% %. Scree en marke ers range e selection. ※ Cente er Marke er: On, Off. Image e center marker m On/Off button. ※ Came era: Off, 480p, 10 080i. ※ Pixel to Pixel: On, Offf. d m mode thatt made th he resoluttion of the e The display imag ge consisttent with display of o the phyysical resolution.
o Page Two T Menu of ※ Image Flip: V, V H, V/H, Off. ge Flip fun nction. Imag ※ Language: 简体中文, 简 English nguage menu m sele ection. Lan ※ OSD Horizonttal Posittion: 0~1 100. djust the image display in Horizonta H al. To ad ※ OSD Vertical Position n: 0~100 0. djust the image display in Vertical.
※ Menu u Transparency: 0~10. To ad djust the level of transpare t ent. ※ OSD Timeoutt 5s, 10s,, 15s, 60s s. djust the clock. To ad M Menu of Page Three ※ Rese et: Press >/CH1 button to o select and con nfirm. Backk to origin nal setting g.
※ RF1 Band: B A,, B, C, D RF1 A, B, C, D band selection. s C : CH1~C CH8 ※ RF1 Channel RF1 1 CH1~C CH8 selection. ※ RF1 Auto A Sea arch: RF1cchannel auto a searrching. ※ RF2 Band:A B A, B, C, D RF2 A, B, C, D band selection. s C :CH1~ ~CH8 ※ RF2 Channel RF2 CH1~CH C H8 selection. ※ RF1 Auto A Sea arch RF2 channel c a auto searcching.
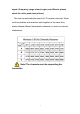
5. Parameters Panel Size 8. 0 inch Panel Type TFT LCD Resolution 800 X 480 Backlight LED Dot Pitch 0.0736(W) x 0.
Installation Method 1. 1/4-20 threads mounting holes in the monitor, easy to install on the tripod. Build-in Battery Li-ion 7.4V/2200mA/h Working Temperature -20℃~50℃ Storage Temperature -30℃~65℃ 6. Trouble shooting 6.1 Only black and white or monochrome picture ① please check saturation, brightness & contrast adjustment. ② please check monitor’s “ ” from the menu "Check Field" is in black and white or monochrome image or other condition.
③ Make sure to use the standard adapter to connect the monitor. If power supply by battery, please check if the battery is fully charged. 6.3 Images are not synchronized ① The RF signal is too weak. ② Find “ ” check if the input video color format matches accordingly, try other condition. 6.4 Playback the video without sound ① Volume control did not open, please enter menu,try to increase the volume. ② Check if the AUDIO input is workable 6.