
User Manual

Usage:
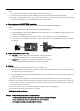
1) Turn on the power of transmitter, then set to PPM mode, and turn off the power;
2) Take down the original module, install RF-MFX600-F/J/H, then load antenna, ensure tightening the antenna;
3) Set SW5 on the RF-MFX600-F/J/H to OFF, and then turn on the power of transmitter. If the red LED on the module flashes,
it shows that RF-MFX600-F/J/H has detected the PPM signal of the transmitter.
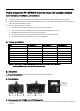
4、How to connect with SPEKTRUM transmitter:
RF-MFX600-F/J/H connects with SPEKTRUM transmitter wirelessly through SPEKTRUM’S SPM9545.
Usage:
1) Choose one SPM9545 which has been bounded with SPEKTRUM transmitter;
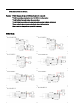
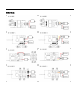
2) Connect SPM9545 to CON3 on the RF-MFX600-F/J/H according to figure 1, then fix SPM9545 according to figure 2, and
turn SW5 on RF-MFX600-F/J/H to ON;
3) Firstly turn on the SPEKTRUM transmitter power, and then connect the battery with CON1 on RF-MFX600-F/J/H;
4) If the red LED on RF-MFX600-F/J/H flashes, it shows RF-MFX600-F/J/H and SPEKTRUM transmitter connected
successfully.
5、Power ON and Power OFF order:
Power ON: Use in FUTABA, JR or HITEC transmitter: Transmitter Receiver,
Use in SPEKTRUM transmitter: Transmitter Module Receiver;
Power OFF: Use in FUTABA, JR or HITEC transmitter: Receiver Transmitter,
Use in SPEKTRUM transmitter: Receiver Module Transmitter.
6、Binding:
RF-MFX600-F/J/H can be bounded with a receiver or more at a time;
When RF-MFX600-F/J/H connects with FUTABA, JR or HITEC transmitter.SW1~SW5 are set to OFF after bounded, the
green LED oft en g oes out whe n pow er i s on;
When RF-MFX600-F/J/H connects with SPEKTRUM transmitter, SW1~SW4 are set to OFF after bounded, the green LED
is bright when power is on.
1) Fi rs t p ower on t he rec eiv er, af ter a bout 5s , th e recei v er c ome i nt o bi ndin g mod e (LE D tu rns fr om s lo w fl as h to s ki p f lash );
2) Powe r on the tra nsmit t er, pres s the bin d s witc h o n the module (first s et the prog ram swi t ch if neede d), when t he gre en LED
turns from dark to bright, then from bright to dark, loosen the bind switch, then module comes into binding mode, and the red
LED o n th e mod ule tu rns to fast fl as h;
3) I n about 3s , t he L ED on the rec eiver t urns from s kip fl as h to sl ow flas h, t hen to c ons t ant l ightin g;
4) If t he tr ans mit ter c an o perate t he rec ei ver, t h e n i t s uccee ds.
NOTE: Must be bind in the first time.
Warning: * Prohibit Binding operation when operating the model;
* Prohibit using these products in the high temperature and high humidity environment;
* Please notice the place of anode and cathode when pit in the batteries;
* Non-normal use damage is not responsible for warranty.