HGC20 & HGC20D GAS CONVECTION OVENS MODELS HGC20 HGC20D ML-114573 ML-114575 701 S. RIDGE AVENUE TROY, OHIO 45374-0001 937 332-3000 www.hobartcorp.com FORM 33580 Rev. E (Mar.
IMPORTANT FOR YOUR SAFETY THIS MANUAL HAS BEEN PREPARED FOR PERSONNEL QUALIFIED TO INSTALL GAS EQUIPMENT, WHO SHOULD PERFORM THE INITIAL FIELD START-UP AND ADJUSTMENTS OF THE EQUIPMENT COVERED BY THIS MANUAL. POST IN A PROMINENT LOCATION THE INSTRUCTIONS TO BE FOLLOWED IN THE EVENT THE SMELL OF GAS IS DETECTED. THIS INFORMATION CAN BE OBTAINED FROM THE LOCAL GAS SUPPLIER.
Installation, Operation, and Care of HGC20 AND HGC20D GAS CONVECTION OVENS SAVE THESE INSTRUCTIONS FOR FUTURE USE GENERAL The HGC20 Gas Convection Oven is a single cavity oven and features a solid state thermostat, 1-hour dial timer, and five racks as standard equipment. Additional oven racks are optional. Each oven is equipped with a 25,000 BTU/hr burner and a 1/2 HP (0.37 kw) electric motor. The oven comes standard with porcelain interior; stainless steel exterior.
INSTALLATION CODES AND STANDARDS Hobart ovens must be installed in accordance with: In the United States of America: 1. State and local codes. 2. National Fuel Gas Code, ANSI-Z223.1 (latest edition). Copies may be obtained from The American Gas Association, Inc., 1515 Wilson Blvd., Arlington, VA 22209. 3. National Electrical Code, ANSI/NFPA-70 (latest edition). Copies may be obtained from The National Fire Protection Association, Batterymarch Park, Quincy, MA 02269. In Canada: 1. Local codes. 2. CSA B149.
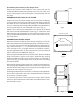
Assembling the Chimney to the Single Oven CHIMNEY Remove the chimney from inside the oven cavity and use the screws provided to fasten the chimney to the top rear of the oven (Fig. 2). The flanges on the chimney are to be positioned over the top cover. ASSEMBLING THE OVEN TO THE STAND Position the oven on its back, taking care not to scratch or damage it. The gas pipe connection protrudes beyond the back; provide for this when the oven is tipped back by resting it on suitable spacers (2 x 4's).
LEVELING Once the oven is in its permanent position, place a carpenter's level on the oven rack. If the oven is installed on legs, turn the adjustable feet in or out to level oven front-to-back and side-to-side. If the oven is installed on casters, loosen set screws and turn casters in or out to level oven front-to-back and side-to-side. Retighten set screws after leveling.
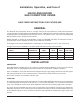
GAS CONNECTION GAS DATA INPUT / BTU/HR MANIFOLD PRESSURE MODEL Natural Propane Natural Propane HGC20, HGC20D 25,000 25,000 3.5" w.c. (0.8 kPa) 10" w.c. (2.5 kPa) For all gas supply connections, pipe joint compound must be resistant to the action of propane gases. The oven is provided with a regulator integral to the gas solenoid valve, and requires no regulator external to the device. A gas shutoff valve is supplied with each oven and is located at the bottom of the control panel.
FLUE CONNECTION Ventilation requirements will vary with each installation and must comply with Vapor Removal from Cooking Equipment, NFPA Standard #96 (latest edition) and with local codes. Considerations to be kept in mind include: • Flue connections should never be made directly to the oven. • The oven should be located under a hood which has an adequate connection to an exhaust duct and extends 6" (15 cm) beyond the oven sides.
LIGHTING THE HGC20 OVEN Open the manual valve. Turn the ON / OFF / COOL DOWN switch ON and turn the thermostat to its maximum setting. Both the ON and HEAT lights should be lit. If the HEAT light is not on, make sure the door is closed. After 5 seconds, the spark ignition system will initiate and the solenoid valve will open, allowing gas flow to the burner for a period of 7 seconds.
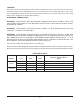
CONTROLS — MODEL HGC20D Built before October 1999 (Fig. 6) HEAT LIGHT TEMPERATURE KNOB COOK BUTTON THERMOSTAT TEMPE RATURE READY LIGHT HEAT READ Y HOLD BUTTON COOK HOLD THERMOMETER BUTTON TIMER TIMER KNOB TIME COOK BUTTON COOK START/STOP BUTTON PULSE BUTTON STAR T STOP PULS E ;;; ;; ; ;;; ;; ;;; ; ;;; POWER ON ON / OFF / COOL DOWN SWITCH OFF COOL DOWN LIG da;la ;la sjfd; ads;f HTING a jj;flPU IN SH MA STRUCT "ON" IONS STER PO FAILS STION. SWITC H TO TO LIG IF OV HT.
Cook Button Light (If On and not timing product). Indicates the cook mode is selected. This means: • The displayed temperature settings will be for the cook temperature except for the time that the light in the Thermometer Button is lit. • Rotating the Thermostat Knob will change the cook set temperature. • Cook time can be adjusted using the Timer Knob. • The time displayed is the initial set cook time. • It is possible to select the Hold mode using the Hold Button.
Pulse Button Selects the pulse time setting. A cook time must be set first. The pulse time can then be set equal to or less than the cook time. The pulse time will be the portion of cook time to operate in the pulse mode. Pulse mode will start first. When pulse time elapses, the remainder of the cook time will be in the nonpulse mode. Use when cooking delicate product, such as strudel, muffins, cupcakes, meringue pies, etc., to keep product from forming waves on the top.
BEFORE FIRST USE Before using the oven for the first time, it must be "burned in" to release any odors that might result from heating the new surfaces in the chamber. 1. Using a clean damp cloth, wipe the inside of the oven, including the racks. 2. Close the oven door, push the ON / OFF / COOL DOWN switch ON, turn the thermostat to 300°F (149°C) and allow the oven to cycle for 6 to 8 hours before turning the ON / OFF / COOL DOWN switch OFF. USING THE HGC20D OVEN Preheating 1.
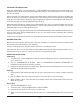
CONTROLS — MODEL HGC20D Built after October 1999 Always displays [HR:Min] when setting the Time. Displays [HR:Min] if the countdown Time is more than 1 Hour. Displays [Min: Sec] if the countdown Time is less than 1 Hour. Displays Temperature in °F. OVEN READY C&H MODE OVEN HEATING MENU SELECT SECONDARY 1 2 SET 1 3 5 3 2 4 6 Indicates the oven is in the Cook and Hold Mode. C&H MODE PRIMARY COOK & HOLD 4 START 5 STOP MENU Indicates the oven is preheated and ready for cooking.
MANUALLY SETTING THE TEMPERATURE AND COOK TIME To Set the Temperature • Press the SET button. Press the TEMPERATURE button; StPt displays to indicate Setpoint. • Use the Up and Down Arrow keys to increase or decrease the displayed Temperature value. • Press the SET button again to save the Temperature setpoint in the computer. To Set the Cook Time • Press the SET button. Press the TIME button. Tine displays to indicate TIME.
Always Set the Temperature Before Setting the Time • Press the SET button. Press the TEMPERATURE button; StPt displays. Use the Up and Down Arrow keys to increase or decrease the Temperature. To save, press the SET button again. At startup, the display will initially show a GROWING BAR . When the oven temperature reaches the Set Point, the set temperature displays.
COOK AND HOLD OPERATION — HGC20D OVEN Cook and Hold cooks the product in two stages. During First Stage Cooking, the oven temperature is regulated by the Cook thermostat for the amount of time set on the Cook Timer. After the lapsed time counts down to 00:00, Second Stage Cooking begins. During Second Stage Cooking, the burners are off as the temperature in the oven declines to the Hold Temperature. The doors should remain closed during Second Stage Cooking.
The convection oven is a bit faster than conventional deck-type ovens; temperature settings are lower and cook times are shorter. Since recipes and foods are subject to many variations and tastes, the guidelines regarding times and temperatures in this manual are SUGGESTIONS ONLY. Experiment with your food products to determine the cooking temperatures and times that give you the best results. CLEANING WARNING: DISCONNECT THE ELECTRICAL POWER TO THE MACHINE AND FOLLOW LOCKOUT / TAGOUT PROCEDURES.
MEAT & FISH PRODUCTS Product Temp. Prime Rib (20 lb. rare) (9.1 kg) Rolled Roast Beef Veal Roast Boned (15 lb.) (6.8 kg) Stuffed Pork Chops Lamb Chops Steamship Round (80 lb.) (36.3 kg) Meatloaf Hamburger Patties (4 oz.) (113 gr.) Meat Pot Pies Chicken Parts Fish Sticks Time (min.) No. Shelves (121) 2 3¦4 Hr. 2 (135) (135) (149) (190) (135) (163) (204) (177) (149 – 163) (177) 2 ¦2 Hr. 2 1¦2 Hr. 25 – 30 12 2 3¦4 Hr. 40 8-10 40 30 – 40 18 2 2 3 5 1 3 5 5 5 5 Time (min.) No.
MAINTENANCE WARNING: THE OVEN AND ITS PARTS ARE HOT. USE CARE WHEN OPERATING, CLEANING, OR PERFORMING ANY MAINTENANCE. WARNING: DISCONNECT THE ELECTRICAL POWER TO THE MACHINE AND FOLLOW LOCKOUT / TAGOUT PROCEDURES. LUBRICATION The fan motor comes with sealed bearings and requires no lubrication. The door hinges and mechanism require occasional lubrication with mineral oil.