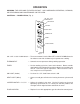
I N S T R U C T I O N S HEC20 & HEC20D ELECTRIC CONVECTION OVENS MODELS HEC20 HEC20D ML-114574 ML-114576 701 S. RIDGE AVENUE TROY, OHIO 45374-0001 937 332-3000 www.hobartcorp.com FORM 33579 Rev.D (Mar.
TABLE OF CONTENT GENERAL . . . . . . . . . . . . . . . . . . . . . . . . . . . . . . . . . . . . . . . . . . . . . . . . . . . . . . . . 3 INSTALLATION . . . . . . . . . . . . . . . . . . . . . . . . . . . . . . . . . . . . . . . . . . . . . . . . . . . . 3 Unpacking . . . . . . . . . . . . . . . . . . . . . . . . . . . . . . . . . . . . . . . . . . . . . . . . . . . Location . . . . . . . . . . . . . . . . . . . . . . . . . . . . . . . . . . . . . . . . . . . . . . . . . . . .
Installation, Operation, and Care of HEC20 & HEC20D ELECTRIC CONVECTION OVENS SAVE THESE INSTRUCTIONS GENERAL The model HEC20 Electric Convection Oven features a solid state thermostat,1-hour dial timer, twospeed 1⁄2 HP (.037 kw) electric motor, and five racks as standard equipment. Porcelain cavity with enamel blower baffle is standard; stainless steel is optional. Painted outer panel set is standard; stainless steel is optional. Painted back panel is standard; stainless steel is optional.
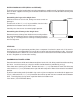
INSTALLING BASIC OVEN (HEC20 and HEC20D) The basic oven must be installed on legs or be mounted on a modular stand. Installations on concrete bases or other supports restricting air circulation underneath the oven are not advisable and may void the warranty. Assembling the Legs to the Single Oven CHIMNEY Position the oven on its left side, taking care not to scratch or damage it. Thread each of the 4" (10 cm) leg assemblies into the holes provided on the bottom corners of the oven.
ASSEMBLING THE OVEN TO THE STAND FRONT OF TOP OVEN Unpack the oven and stand. Position oven on its back, taking care not to scratch or damage it. Install the two locating studs (included in the stand carton) into the screw plates on the underside of the oven ( Fig. 2). LOCATING STUDS BOTTOM Attach each of the four leg assemblies to the bottom of the stand with the 24 bolts and lockwashers (6 per leg). KNOCK OUT WELDED PLATE FOR FLUE EXTENSION INSTALLATION Mount the oven on top of the stand.
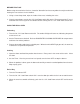
OPERATION WARNING: THE OVEN AND ITS PARTS ARE HOT. USE CARE WHEN OPERATING, CLEANING, OR PERFORMING ANY MAINTENANCE ON THE OVEN. CONTROLS — MODEL HEC20 (Fig.
BEFORE FIRST USE Before using the oven for the first time, it must be "burned in" to release any odors that might result from heating the new surfaces in the chamber. 1. Using a clean damp cloth, wipe the inside of the oven, including the racks. 2. Close the oven doors, turn the On / Off / Cool Down switch ON, turn the Thermostat to 300°F (149°C) and allow the oven to cycle for 6 to 8 hours before turning the On / Off / Cool Down switch OFF. USING THE HEC20 OVEN Preheating 1.
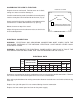
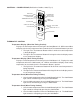
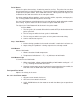
CONTROLS — MODEL HEC20D (Built before October, 1999, Fig. 4) HEAT LIGHT TEMPE RATURE TEMPERATURE KNOB COOK BUTTON THERMOSTAT HEAT READ Y READY LIGHT HOLD BUTTON COOK HOLD THERMOMETER BUTTON TIMER TIMER KNOB TIME COOK BUTTON COOK START/STOP BUTTON PULSE BUTTON START STOP PULS E ; ;; ; ;; ;;; ;;; POWER ON FAN HII OFF ON / OFF / COOL DOWN SWITCH 2 SPEED FAN - HI / LO COOL DOWN LOW WAR NING TURN PUSH GAS VA LV MAST "ON" ER SWE "ON" POST ION.
Cook Button Light (If On) - (While Not Timing Product) Indicates the cook mode is selected. This means: 1. The displayed temperature settings will be for the cook temperature except for the time that the light in the Thermometer Button is lit. 2. Rotating the Thermostat Knob will change the cook set temperature. 3. Cook time can be adjusted using the Timer Knob. 4. The time displayed is the initial set cook time. 5. It is possible to select the Hold mode using the Hold Button.
Pulse Button Selects the pulse time setting. A cook time must be set first. The pulse time can then be set equal to or less than the cook time. The pulse time will be the portion of cook time to operate in the pulse mode. Pulse mode will start first. When pulse time elapses, the remainder of the cook time will be in the non-pulse mode. Use when cooking delicate product, such as strudel, muffins, cupcakes, meringue pies, etc., to keep product from forming waves on the top.
BEFORE FIRST USE Before using the oven for the first time, it must be "burned in" to release any odors that might result from heating the new surfaces in the chamber. 1. Using a clean damp cloth, wipe the inside of the oven, including the racks. 2. Close the oven doors, push the On / Off / Cool Down switch ON, turn the Thermostat to 300°F (149°C) and allow the oven to cycle for 6 to 8 hours before turning the On / Off / Cool Down switch OFF. USING THE HEC20D OVEN Preheating 1. Close oven doors.
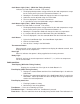
CONTROLS — MODEL HEC20D (Built after October, 1999) Always displays [HR:Min] when setting the Time. Displays [HR:Min] if the countdown Time is more than 1 Hour. Displays [Min:Sec] if the countdown Time is less than 1 Hour. Displays Temperature in °F. C&H MODE OVEN READY C&H MODE Indicates the oven is in the Cook and Hold Mode. OVEN READY Indicates the oven is preheated and ready for cooking. OVEN HEATING Indicates the oven is preheating.
MANUALLY SETTING THE TEMPERATURE AND COOK TIME To Set the Temperature • Press the SET button. Press the TEMPERATURE button; StPt displays to indicate Setpoint. • Use the Up and Down Arrow keys to increase or decrease the displayed Temperature value. • Press the SET button again to save the Temperature setpoint in the computer. To Set the Cook Time • Press the SET button. Press the TIME button. Tine displays to indicate TIME.
Always Set the Temperature Before Setting the Time • Press the SET button. Press the TEMPERATURE button; StPt displays. Use the Up and Down Arrow keys to increase or decrease the Temperature. To save, press the SET button again. At startup, the display will initially show a GROWING BAR. When the oven temperature reaches the Set Point, the set temperature displays.
COOK AND HOLD OPERATION — Model HEC20D Cook and Hold roasts the product in two stages. During First Stage Cooking, the oven temperature is regulated by the Temperature setpoint and the Time setting. After the time counts down to 00:00, Second Stage Cooking begins. During Second Stage Cooking, the heating elements are off as the temperature in the oven declines to the Hold Temperature. The doors should remain closed during Second Stage Cooking. When the Hold temperature is reached, the display flashes HOLD.
PROPER UTENSILS The use of proper utensils can enhance oven operation. Medium- and lightweight pans are recommended since it is more economical to bake with lighter pans. Meats should be roasted in shallow pans deep enough to hold all juices and allow free air circulation. CONSERVING ENERGY • • • • Turn off unused equipment. Adjust menu patterns and cooking/baking schedules for optimum equipment use. Preheat only to required cooking temperature for specific food - not higher.
SUGGESTED COOKING GUIDELINES The following cooking time and temperature guidelines will vary depending on product temperature, size, shape, etc. They are SUGGESTIONS ONLY and should be adjusted to suit your operation. PRODUCT BREAD PRODUCTS Hamburger Rolls Bread - 1 Lb. (454 gr.) Loaves Rolls Baking Soda Biscuits PASTRIES Sheet Cake (21/2 Lb. per Pan) (1 kg) Frozen Fruit Pies (46 oz.) Frozen Fruit Pies (26 Oz. [1.3kg] 8" [223mm] Diam.) Sugar Cookies Danish Rolls Fruit Cakes Cake - 1 Lb. (454 gr.
ROLLED BEEF ROASTS — MODEL HEC20D COOK TEMPERATURE 200 °F (93°C) 300°F (149°C) 150 °F (65.
MAINTENANCE WARNING: THE OVEN AND ITS PARTS ARE HOT. USE CARE WHEN OPERATING, CLEANING, OR PERFORMING ANY MAINTENANCE ON THE OVEN. WARNING: DISCONNECT THE ELECTRICAL POWER SUPPLY AND PLACE A TAG AT THE DISCONNECT SWITCH INDICATING THAT YOU ARE WORKING ON THE OVEN BEFORE PERFORMING ANY MAINTENANCE. FUSE HOLDERS Replace fuses with appropriate type described on control panel. LUBRICATION The fan motor comes with sealed bearings and requires no lubrication.
SERVICE Contact your local Hobart-authorized service office for any repairs or adjustments needed on this equipment. Long-term service contracts are available on this and other Hobart products. FORM 33579 Rev.D (Mar. 2001) – 20 – PRINTED IN U.S.A.