INSTRUCTION MANUAL … with Replacement Parts MODELS FD3-150, FD3-200 & FD3-300 FOOD WASTE DISPOSERS ML-110301 ML-110305 ML-110309 A product of HOBART CORPORATION 701 RIDGE AVENUE FORM 19307 Rev.
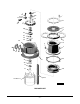
37 36 38 1 33-34-35 39 2 31 32 3 30 4 29 28 27 26 5 25 6 8 7 24 23 22 9 21 11 20 19 18 10 12-13 14 THUR 17 PL-22349-1 DISPOSER UNIT –2–
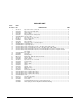
DISPOSER UNIT ILLUS. PART PL-22349-1 NO.
Installation, Operation, and Care of MODELS FD3-150, FD3-200, & FD3-300 FOOD WASTE DISPOSERS SAVE THESE INSTRUCTIONS GENERAL The disposer features removable hardened steel components and reversible rotation with grinding in both directions. The disposer is self-feeding, making it unnecessary to force the food waste into the grinding mechanism. The FD3 Series disposers utilize hardened steel cutter blocks (1, Fig. 1) mounted to a rotating flywheel (4, Fig. 1) and a stationary shredder ring (2 Fig.
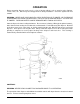
For an accessory group D installation, use the mounting flange (1, Fig. 3) included with accessory group D. See Fig. 3 and the accessory group data sheet. Fig. 2 Fig. 3 WARNING: HAZARDOUS MOVING PARTS — DO NOT OPERATE DISPOSER UNTIL PROPERLY INSTALLED TO CONE. Use one of the following: Part No. 204006 or 204007 (15 inch diameter cone) or Part No. 204003 or 204004 (18 inch diameter cone). For custom-built installations — minimum thickness of stainless steel cone shall be .
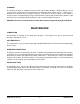
Water Connections Connect disposer (1, Fig. 5) from a 3/4" IPS cold water supply line. Install the eight gallon per minute flow control supplied with the disposer (2, Fig. 5). If the water line pressure exceeds 60 psig, a pressure reducing valve (6, Fig. 5) (not supplied) should be installed. The minimum flow pressure for the disposer to function properly is 16 psig. Install a shut-off valve (not supplied) for proper servicing of the disposer. All control groups are supplied with a solenoid valve (4, Fig.
OPERATION Before operating disposer make sure it is clear of foreign objects such as metal or wire clippings, screws, nails, etc., which may have dropped into it during installation. Check the flywheel for free rotation. WARNING: NEVER USE YOUR HAND TO CHECK ROTATION OF FLYWHEEL OR TO REMOVE FOREIGN MATTER FROM THE DISPOSER. USE A STICK OR SIMILAR OBJECT TO TURN THE FLYWHEEL. FOREIGN MATTER CAN BE REMOVED WITH TONGS OR PLIERS. Start the disposer before feeding food waste. Be sure water is flowing.
CLEANING The food waste disposer should be kept in a clean and sanitary condition. Allow the disposer to run a few minutes after disposing of all food waste to completely flush out the interior. If food waste is allowed to accumulate due to improper clean-up, it will give off offensive odors. If this happens, cleaning can be accomplished by using a stiff brush with a strong soap and hot water solution. Light cleaning can be accomplished by grinding ice and a lemon through the disposer.