
Daim Ntawv Qhia Tus Neeg Siv

In-the-Ear Custom Rechargeable (ITE R) PRODUCT GUIDE
Charging Your Hearing Aids
Your hearing aid uses a rechargeable battery as its power source.
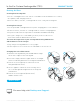
To charge the battery:
1. Plug your charger into an outlet.
2. Place your hearing aids in the charger with the
charging contacts touching the charging posts.
3. Your hearing aids will turn off automatically and begin to charge.
• The front of the charger is equipped with two LED indicators
to provide information about hearing aid charging. The front
LED indicators will glow green to indicate successful charging.
• When the hearing aids are fully charged (approx 3.5 hrs charge time),
the front LED indicators will be solid green.
• Your hearing aids will automatically power on when removed from the charger.
Battery Indicator
You will hear an indicator
through your hearing aid
when battery voltage
is low and the battery
needs charging.
How-to Video
2
3
1
4
5
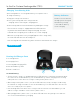
Hearing Aid Charger Parts
1. Cleaning Brush
2. Charging Posts
3. Hearing Aid Charging LEDs
4. On-board Battery LEDs
5. Power Cord Port
On-board Battery:
• The back of the charger is equipped with four LED indicators to provide information about
the status of the on-board battery. The on-board battery allows charging of the hearing
aids up to three times while the charger is away from a power source.
• When away from a power source, the back LED indicators will be solid green indicating
the amount of charge available for the on-board battery. The LED indicators will turn off
after 10 seconds to preserve power.
• One blinking LED on the back of the charger indicates that the on-board battery is low
and the charger should be connected to a power source.
• When plugged into a power source, the back LED indicators will glow green to indicate
successful on-board battery charging.