
Installation Guide


3.1.7 Check the condition of the door gasket and seal area on the
housing. Ensure that no damage exists that could affect seal
integrity.
3.1.8 Check the interior of the housing and door for evidence of
damage or potentially hazardous conditions.
WARNING
FOR REPLACEMENT OF ANY DAMAGED
COMPONENTS, ESPECIALLY THOSE THAT MAY
PREVENT THE PROPER SEALING OF THE FIXTURE
(CONTACT HOLOPHANE FIELD SERVICE
DEPARTMENT). FAILURE TO DO SO MAY RESULT
IN SIGNIFICANT PROPERTY DAMAGE.
3.1.9 Wipe the gasket and seal area clean with a clean, dry rag
and ensure that no dirt or debris will prevent an adequate seal
during closing.
3.1.10 Close the door. Tighten captive door screws to 55 in. lbs.
torque. This is required for watertight door seal.
3.2 Door Replacement/Repair.
3.2.1 De-energize the floodlight.
3.2.2 Wipe off the exterior of floodlight to remove dirt or debris
that could enter when the door is opened.
3.2.3 Loosen the captive door screws attaching the door to the
housing. Open the door.
3.2.4 Detach the power disconnect.
3.2.5 Remove the cotter pin from the hinge pin.
3.2.6 Slide the door hinge pins out of the housing.
3.3 Electrical Component Replacement. Electrical
components mounted on the door can be replaced as follows:
3.3.1 Tag electrical leads for use when installing the new
components.
3.3.2 Break electrical connections.
3.3.3 Remove the attaching hardware and retain for reuse.
3.3.4 Remove the electrical component.
3.3.5 If needed during installation, remove any electrical or heat
insulating components from the removed electrical component.
Install them onto the new component.
3.3.6 Place the new component into position.
3.3.7 Install the attaching hardware. Tighten securely.
3.3.8 Make electrical connections in accordance with wire tags
and approved wiring practices.
3.4 Door Installation.
3.4.1 Slide the door hinge pins into the housing.
3.4.2 Insert the cotter pin through the hinge pin.
Insert the door disconnect plug into the disconnect receptacle in
the housing.
3.4.4 Check the condition of the door gasket and seal area on the
housing. Ensure that no damage exists that could affect seal
integrity.
3.4.5 Check the interior of the housing and door for evidence of
damage or potentially hazardous conditions.
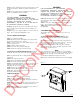
Figure 2
WARNING
FOR REPLACEMENT OF ANY DAMAGED
COMPONENTS, ESPECIALLY THOSE THAT MAY
PREVENT THE PROPER SEALING OF THE FIXTURE
(CONTACT HOLOPHANE FIELD SERVICE
DEPARTMENT). FAILURE TO DO SO MAY RESULT
IN SIGNIFICANT PROPERTY DAMAGE.
3.4.6 Wipe the gasket and seal area clean with a clean, dry rag
and ensure that no dirt or debris will prevent an adequate seal
during closing.
3.4.7 Close the door. Tighten captive door screws to 55 in. lbs.
torque. This is required for watertight door seal.
3.4.8 Energize the floodlight. Check its operation and for proper
area illumination.
4. OPTIONS OR ACCESSORIES
The following options or accessories may be present on your
installation.
4.1 Visor Installation and Maintenance. When
installed, the visor limits the vertical spread of emitted light.
4.1.1 Attach the clips to the shield, one in the center and one on
each corner at approximately the location of the holes. The shield
goes into the narrow side of the clip. See Figure 2.
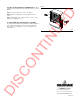
4.1.2 Fasten the shield with the clips to the door assembly. A
small screwdriver can be used to spread the leg of clips to start
them over the cast rib on the door.
NOTE
Three 3/16" diameter holes in shield can be used as a template if
the installer chooses to drill holes through the casting rib and fasten
the shield to the door with screws (not provided). Screws are
recommended in high wind and rough service areas.
4.1.3 Clean accumulated dust and dirt from visor when relamping.
GR423
DISCONTINUED