
Instruction Manual

Copyright HK Instruments 2021 www.hkinstruments. Installaonversion7.02021
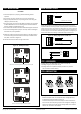
SCHEMATICS
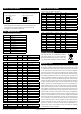
DIMENSIONAL DRAWINGS
INSTALLATION
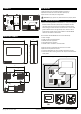
STEP 1: MOUNTING THE DEVICE
1)Mountthedeviceinthedesiredlocaon(seestep1).
2)Routethecablesandconnectthewires(seestep2).
3)Thedeviceisnowreadyforconguraon.
WARNING!Applypoweronlyaerthedeviceisproperlywired.
Figure 1a - Surface mounng
1)Selectamounnglocaononthewallat1.2–1.8m(4–6)above
theoorandatleast50cm(20in)fromtheadjacentwall.Do
notblockdeviceairventsfromanydireconandleaveatleast
20cm(8in)gaptootherdevices.Locatetheunitinanareawith
goodvenlaonandanaveragetemperature,whereitwillbe
responsivetochangestotheroomcondions.TheRHT-MOD
shouldbemountedonaatsurface.
DonotlocatetheRHT-MODwhereitcanbeaectedby:
•Directsunlight
•Drasordeadareasbehinddoors
•Radiantheatfromappliances
•Concealedpipesorchimneys
•Outsidewallsorunheated/uncooledareas
2)Usethedeviceasatemplateandmarkthescrewholes.
3)Mountthewallplatewithscrews.
•Incorrectinstallaonmaycauseashiintemperatureoutput
•Securethelidwithalockingscrew,iftherelayisconnectedtothe
mainspower
Display locking
jumper
Jumpers
Contact pins for
relay terminal
Contact pins for
terminal block
Terminal block
Terminal block for relay
99.0
90.0
83.0
49.5
14.0
45.0
18.0
Ø 4.0
32.0
YES NO NO
Figure 1b - Mounng orientaon