INSTRUCTION MANUAL
Table of Contents Introduction ................................................................................................. 3 Warnings and Safety Notes......................................................................... 4 Charger Layout ............................................................................................ 8 Specifications ............................................................................................... 9 Features ................................................
Introduction Congratulations on your choice of the Hitec X1 charger from Hitec RCD USA. The Hitec X1 is a high-performance, microprocessor controlled charger/discharger with battery management capabilities that are suitable for use with most popular battery types. The X1 also features integrated balancing for six-cell, Lithium-Polymer (LiPo), Lithium-Ferrite (LiFe) and Lithium-Ion (Li-Ion) batteries. Please read this entire operating manual before using the X1 Charger.
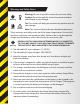
Warnings and Safety Notes Warning: Be sure to read this section for your own safety. Warning Tip Caution: Be sure to read this section to prevent accidents and damage to your charger. Tip: This section will help you maximize the performance of your charger. Note Caution Note: This section will provide more detailed explanations. These warnings and safety notes are of the utmost importance. You must follow these instructions for maximum safety.
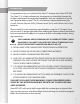
Warnings and Safety Notes A Never attempt to charge or discharge the following types of batteries: • • A battery fitted with an integral charge circuit or a protection circuit • A battery that is already fully charged or just slightly discharged and non-rechargeable batteries (these pose an explosion hazard) • • A faulty or damaged battery • Batteries that are not expressly stated by the manufacturer to be suitable for the currents the charger delivers during the charge process A battery pack whi
Warnings and Safety Notes Standard Battery Parameters Nominal Voltage Max. Charge Voltage Storage Voltage Min. Discharge Voltage Warning LiPo LiIon LiFe NiCd NiMH 3.7V/cell 3.6V/cell 3.3V/cell 1.2V/cell 1.2V/cell 4.2V/cell 4.1V/cell 3.6V/cell 1.5V/cell 1.5V/cell 3.8V/cell 3.7V/cell 3.3V/cell n/a n/a 3.0-3.3V/cell 2.9-3.2V/cell 2.6-2.9V/cell 0.1-1.1V/cell 0.1-1.1V/cell Pb 2.0V/cell 2.46V/cell n/a 1.
Warnings and Safety Notes Always refer to recommendations from your battery manufacturer for your specific battery type and size before initiating a charge or discharge process. Do not attempt to disassemble or modify Lithium or Lead-Acid battery packs. Discharging The X1 discharging functions are for two specific purposes: • Refreshing the capacity of a Nickel-based battery that has lost capacity over time (NiMH or NiCd). • Reducing the voltage of a Lithium battery for safe storage.
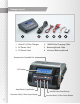
Charger Layout 1. Hitec X1 AC Plus Charger 4. 18AWG Wire Charging Cable 2. AC Power Cord 5. Balancing Board Cable 3. DC Power Cord 6.
Charger Layout DC Input (11-18V) AC Input (100-240V, 50/60HZ) Balance Socket Charging Output Temperature Sensor Port Specifications AC Input 100 - 240 Volts DC Input 11-18 Volts Charge Circuit Power 50 Watts Charge Current Range 0.1 - 1.0 Amps Discharge Current Range 5 Watts Discharge Current Power 0.1-1.0 Amps Current Drain for Balancing LiPo 300mA per cell NiCd/NiMH Battery Cell Count 1-15 Cells LiPo/LiFe/Lilon Cell Count 1-6 Cells Pb Battery Voltage 2-20V Net Weight 15 oz.
Features Optimized Operating Software The X1 “auto” feature sets the charge and discharge current for you automatically, preventing overcharging which can damage your battery. In the event of an error, the X1 instantly disconnects the circuit and sounds an alarm. This feature can be set by the user and controlled through the two-way link for maximum safety.
Features Processing Time Limit Protect your battery by setting a maximum time limit for charging and discharging. Input Power Monitoring The X1’s input voltage is monitored to protect the battery from becoming damaged. The process ends automatically if it drops below the limit. Data Store/Load A maximum of five setting profiles can be stored for your convenience. The X1 will store the data pertaining to a program’s settings and you can call up data at anytime.
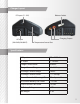
Charger/Battery Connections TO AVOID SHORT CIRCUITS, ALWAYS CONNECT THE CHARGE LEADS TO THE CHARGER FIRST, AND THEN TO THE BATTERY. REVERSE THE Warning SEQUENCE WHEN DISCONNECTING THE PACK. Battery Connection With Balance Adaptor. X1 CHARGER BALANCE ADAPTOR 2S BALANCE SOCKET DC 11-18V 3S 4S 5S 6S 1 2 3 4 5 6 BALANCE LEAD BATTERY X1 CHARGER DC 11-18V Battery Connection Without Balance Adaptor. BALANCE SOCKET BATTERY 12VDC Battery/DC Power Supply Connection.
Lithium This program is only suitable for charging/discharging Lithium (LiPo/LiIon/LiFe) batteries. Charge Modes The X1 offers the following lithium charge modes: Charge, Balance Charge, Fast Charge, Storage and Discharge. BEFORE SELECTING A CHARGE MODE, IT IS CRITICAL THAT YOU SELECT THE CORRECT TYPE OF LITHIUM BATTERY TO BE CHARGED. Warning FAILURE TO DO SO CAN RESULT IN DAMAGE TO THE BATTERY AND POSSIBLE EXPLOSION.
Lithium Lithium Charge Mode (cont.) Press the ► button once to enter the “CHARGE” screen. Press the ► button again and the amp rate value will begin flashing. Use the ✚ or ▬ buttons to adjust the value to the desired rate. Follow the instructions provided with your battery when setting the amp rate. LiPo CHARGE 0.1A 3.7V(1S) Press the ► button again and the voltage value will begin flashing. Use the ✚ or ▬ buttons to adjust the value to the desired rate.
Lithium Lithium Balance Charge Mode This function is for balancing the voltage of individual Lithium-polymer battery cells while charging. In order to use the Balance Mode, the battery must have a balance lead. Charging in this mode is different from the normal modes because the built-in processor monitors the voltage of each individual cell and controls the input current fed into each cell in order to equalize the voltage.
Lithium Lithium Balance Charge Mode (cont.) Once charging has commenced, the charger will display the following real-time information: Battery type/cell count, charging current, battery voltage, charging time and charged capactiy. Li3s 1.2A 12.69V BAL 022:43 00682 DURING CHARGING, THE BATTERY SHOULD BE PLACED INSIDE A FIRE PROOF/RETARDANT BAG AND ON A FIRE PROOF SURFACE, AWAY Caution FROM OTHER COMBUSTIBLE OBJECTS. 4.09 4.09V 4.09V 0.00 0.00V 0.
Lithium Lithium Fast Charge Mode (cont.) First, select the correct battery type by following the instructions on page 13. Once you have set the correct battery type, press the ■ button once to return to the “USER SET PROGRAM->“ screen. Press the ■ button again to enter the “PROGRAM SELECT“ screen. On this screen you should PROGRAM SELECT LiPo BATT see the type of battery you have selected. Press the ► button once to enter the “CHARGE“ screen.
Lithium Lithium Storage Mode This function is for charging/discharging batteries that will not be used immediately. The program is designed for charging/discharging batteries up-to or down-to safe storage levels. The program will automatically begin to discharge if the current state of the battery exceeds the voltage level for storage. BEFORE YOU BEGIN CHARGING/DISCHARGING YOUR BATTERY, MAKE SURE YOU HAVE READ AND UNDERSTAND ALL OF THE WARNINGS AND Warning SEFETY INFORMATION CONTAINED ON PAGES XX-XX.
Lithium Lithium Storage Mode (cont.) DURING CHARGING/DISCHARGING, THE BATTERY SHOULD BE PLACED INSIDE A FIRE PROOF/RETARDANT BAG AND ON A FIRE PROOF SURCaution FACE, AWAY FROM OTHER COMBUSTIBLE OBJECTS. 4.09 4.09V 4.09V 0.00 0.00V 0.00V If you are using a balance adapter, you may press the ✚ button to view the voltage of each individual cell. Once the battery is fully charged the screen will read “FULL” and the charger will emit a chiming sound. Press the ■ button to stop charging.
Lithium Lithium Discharge Mode (cont.) See page 12 for the appropriate charging connections setup for this operation. First, select the correct battery type by following the instructions on page 13. Once you have set the correct battery type, press the ■ button once to return to the “USER SET PROGRAM->“ screen. Press the ■ button again to enter the “PROGRAM SELECT“ screen. On this screen you should PROGRAM SELECT LiPo BATT see the type of battery you have selected.
NiCd/NiMH This program is only suitable for charging/discharging NiCD/NiMH batteries. Charge Modes The X1 offers the following NiCd/NiMH charge modes: Charge, Discharge and Cycle. BEFORE SELECTING A CHARGE MODE, IT IS CRITICAL THAT YOU SELECT THE CORRECT TYPE OF BATTERY TO BE CHARGED. FAILURE TO Warning DO SO CAN RESULT IN DAMAGE TO THE BATTERY.
NiCd/NiMH Lithium NiCd/NiMH Charge Mode (cont.) Press and hold the ► button to begin charging. Once charging has commenced, the charger will display the following real-time information: Battery type, charging current, battery voltage, charging time and charged capactiy. NiMH 1.4A 5.98V CHG 022:43 00384 Once the battery is fully charged the screen will read “FULL” and the charger will emit a chiming sound. Press the ■ button to stop charging.
NiCd/NiMH NiCd/NiMH Cycle Mode The X1 makes cycling of NiCd/NiMH batteries easy. The process of discharging and recharging (cycling) can be achieved automatically with one simple step and will improve the performance of NiCd/NiMH batteries. We strongly recommend cycling any battery that has been discharged and then stored for a preiod of time. This will increase battery life and improve performance.
Pb (Lead-Acid) Lithium This program is only suitable for charging Pb (lead-acid) batteries with nominal voltages of 2 to 20V. A Pb (lead-acid) battery is significantly different from NiCd/NiMH batteries. Pb batteries can only deliver current lower in comparison to their capacity. The same restriction applies to the charging process. Consequently, the optimum charge current can only be 1/10 of the capacity.
Pb (Lead-Acid) Pb Charge Mode (cont.) Press and hold the ► button and charging will begin. Once charging has commenced, the charger will display the following real-time information: Battery type, charging current, battery voltage, charging time and charged capactiy. Pb-6 0.4A 14.70V CHG 003:10 00029 When charging is complete the X1 will chime. Pb Disharge Mode After selecting the correct battery type (see pg.
Lithium Data Save/Load Save/Load Data Programs The Save Data and Load Data programs make it easy to store and load charge and discharge profiles for up to 5 batteries. Data can be saved for each battery type and each charge mode available with the X1. This allows you to call back data for each battery when charging or discharging without having to set up the program over again. You can also edit settings for each saved battery.
Save/Load Data Lithium Save Data Program (cont.) Press the ► button again and the voltage rate value will begin flashing. Use the ✚ or ▬ buttons to set the voltage rate and cell count. The cell count will change automatically as you change the voltage. The voltage and cell count should match the battery label. LiPo CHARGE * 5.4A 7.4V(2S) Press and hold the ► button and this profile will be saved. Load Data Program Press the ■ button repeatedly until you reach the “LOAD DATA“ program.
Lithium Features & Settings Additional Overview USER SET PROGRAM-> Press the ■ button repeatedly until you reach the “USER SET PROGRAM->“ screen. Battery Type Press the ► button once to advance to the “V.Type“ screen. This screen will allow you to choose the type of lithium battery you wish to charge. Instructions for setting the battery type can be found on pg. 13. LiPo V.Type 3.7V Each time you press the ✚ button you will advance to the next setting.
Additional Features & Settings Lithium Overview (cont.) Safety Timer Press the ✚ button once to advance to the “Safety Timer“ screen. This screen will allow you to set the maximum charge time in order to prevent accidental overcharging. Safety Timer ON 120min Capacity Cut-off Press the ✚ button once to advance to the “Capacity Cut-off“ screen. This screen will allow you to set the maximum charge capacity in order to prevent accidental overcharging.
Lithium Features & Settings Additional Battery Check Timer (cont.) Press the ► button once to and the timer value will begin flashing. Use the ✚ or ▬ buttons to change the timer value. The timer can be set between 5 and 60 min. We strongly recommend that the timer be set to 10 minutes or less. LiPo/LiIo/LiFe CHK Time 10min Press ► to set the Battery Check Timer. NiMH Sensitivity NiMH Sensitivity shows the cutoff voltage for the automatic charge termination of a NiMH battery.
Lithium Features & Settings Additional USB Temperatre Cut-off The Temperature Cut-off is turned on or off with the use of the optional temperature probe by contacting the surface of the battery. If it is on, set the maximum temperature that the charger should allow the battery to reach during charging. Once the battery reaches this temperature, the process will be terminated to prevent damage to the battery. USB/Temp Select Temp Cut-off 80C See pg.
Lithium Features & Settings Additional Safety Timer When the charge process starts, the integrated safety timer starts to run simultaneously. If an error occurs or the termination circuit cannot detect whether the battery is fully charged or not, the X1 is programmed to prevent overcharging and will terminate the charging process. Safety Timer Calculation When charging NiCd or NiMH batteries, divide the capacity by the current, then divide the result by 11.9.
Additional Lithium Features & Settings Key Beep & Buzzer A beep sounds to confirm the user’s operation every time a button is pressed. The buzzer or melody sounds at various times during an operation to confirm a different mode change. These functions can be switched on or off. See pg. 28 for instructions on accessing the “Key Key Beep Buzzer ON ON Key Beep Buzzer OFF OFF Beep“ and “Buzzer“ screen. Press the ► button once and (Key Beep) “ON” will begin flashing.
Warnings and Error Messages REVERSE POLARITY CONNECTION BREAK Reverse Polarity The battery/charger connections (red/black) are reversed. Connection Break The battery connection has been diconnected. Short Circuit There is a short circuit in one of the leads or plugs. If no short is found in one of the leads or plugs you may have a faulty battery, which should not be charged any further. SHORT ERR Input Voltage Error The input voltage is incorrect.
Warnings and Error Messages (cont.) TEMP OVER ERROR CONTROL FAILURE Over Temperature Error The internal temperature of the charger is too high. Allow the charger to cool down. Control Failure The charger has malfunctioned. Contact Customer Service at 858.748.1767 or at service@hitecrcd.com. Warranty and Service LIABILITY EXCLUSION This charger is designed and approved exclusively for use with the types of batteries stated in this Instruction Manual.
Warranty and Service (cont.) THIS WARRANTY IS IN LIEU OF ANY AND ALL OTHER WARRANTIES, WHETHER FOR MERCHANTABILITY OR FITNESS FOR A PARTICULAR PURPOSE AND WHETHER EXPRESS OR IMPLIED. REPAIR OR REPLACEMENT AS PROVIDED UNDER THIS WARRANTY IS THE EXCLUSIVE REMEDY. HITEC RCD, INC. SHALL NOT BE LIABLE FOR ANY INCIDENTAL OR CONSEQUENTIAL DAMAGES FOR BREACH OF ANY EXPRESS OR IMPLIED WARRANTY RELATING TO THIS PRODUCT, EXCEPT TO THE EXTENT PROHIBITED BY APPLICABLE LAW.