
Instruction Manual


9
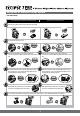
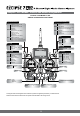
Non-telemetry RXs (MINIMA & MICRO Series)
Telemetry RXs (OPTIMA Series)
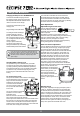
Switch on both.
Wait for the system to boot and control over the model.
Release the link button when LED is turned off.
You will see that both RED & BLUE LEDs will start blink-
ing.
BLUE LED will glow steady once the setting
process is completed during above 8sec.
RED LED will glow steady once the setting
process is completed during above 5sec.
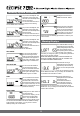
Both RED & BLUE LEDs will blink alternately for 8sec.
During that time, move concerned transmitter sticks to
the desired FAIL-SAFE positions.
Both RED & BLUE LEDs will blink alternately for 5sec.
During that time, move concerned transmitter sticks to
the desired FAIL-SAFE positions.
Release the link button when LED is turned off.
You will see that both RED & BLUE LEDs will start blink-
ing.
Push the link button for 6 sec.
Turn off both transmitter and receiver to save the Fail-Safe position. Now, Fail-Safe process is completed.
6Sec.
Push
Channel
Receiver
2
.
4
G
H
z
6
C
h
a
n
n
e
l
A
i
r
c
r
a
f
t
R
e
c
e
i
v
e
r
6Sec.
Push
2
.
4
G
H
z
6
C
h
a
n
n
e
l
A
i
r
c
r
a
f
t
R
e
c
e
i
v
e
r
C
h
a
n
n
e
l
R
e
c
e
iv
e
r
1Sec.
Wait
2Sec.
Wait
C
hannel
R
eceiver
Fail-Safe position
8Sec.
Blinking
Fail-Safe position
5Sec.
Blinking
6
C
h
a
n
n
e
l
R
e
c
e
iv
e
r
2
.
4
G
H
z
6
C
h
a
n
n
e
l
A
i
r
c
r
a
f
t
R
e
c
e
i
v
e
r
2
.
4
G
H
z
6
C
h
a
n
n
e
l
A
i
r
c
r
a
f
t
R
e
c
e
i
v
e
r
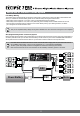
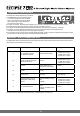
Set-up Use of the Hitec 2.4GHz System
FAIL-SAFE Setup