
User's Manual


Change to ‘Mode 1’ Configuration
All Optic 6 Sport 2.4 systems sold in US are in ‘Mode 2’ format. However, you may wish to use Optic 6
Sport in ‘mode 1’ format. There is a menu choice for this option in the Initial Set-Up function menu
described on Page 15.
After selecting ‘Mode 1’ in the Initial Set-Up Menu, you must do the following hardware set-up in order
to change the transmitter
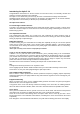
1. Carefully remove the plastic side panels from the transmitter.
2. Remove all the six philips screws from the back of the case.
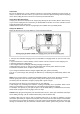
3. Unscrew a hex screw to remove the Copper Ratchet from where it is located and move it to the
other side.
4. Allocate the “Mode Selection Jumper” to be connected with the other two.
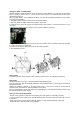
4. Tighten up the tension spring hex screw on the new location, and try control the stick and feel it first
if you like the tension of control stick.
5. Loosen up the tension spring hex screw on the original location.
6. Re-assemble the case.
Flying Safety
To ensure your own safety and the safety of others, please observe the following precautions:
Flying field
We recommend that you fly at a recognized model airplane flying field.
You can find model clubs and fields by asking the nearest hobby dealer, or contacting the Academy of
Model Aeronautics.
Always pay particular attention to the flying field's rules, as well as the presence and location of
spectators, the wind direction, and any obstacles on the field.
Be very careful flying in areas near power lines, tall buildings, or communication facilities as there may
be radio interference in their vicinity.
Once you arrive at the flying field...
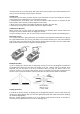
- Before you fly, perform a range check to confirm your radio system is responding correctly.
- To do a range check, Power-up the aircraft and either ask a friend to help hold the aircraft or secure
it somehow.
- Walk away from the aircraft until the aircraft "glitches" or you notice intermittent control loss.
- Walk back to the aircraft, pacing out the distance.