
User's Manual


not transmit the radio signal as long as the trainer cable is connected properly.
NOTE: There is no sign of recognition on the LCD screen of the Transmitter using the DIN jack.
4. Between the Transmitter having a DIN jack as INSTRUCTOR and a Transmitter having a STEREO
jack as STUDENT.
1) Connect the INSTRUCTOR or DIN Jack adapter marker "Master" with #58320 stereo jack Trainer
cable.
2) Power on the INSTRUCTOR transmitter.
3) Plug the combined trainer cable into the INSTRUCTOR transmitter DIN jack connection.
4) The STUDENT transmitter should be turned off.
5) Plug the trainer cable into the STUDENT transmitter with the stereo jack. The power to the
STUDENT transmitter will turn on automatically and you will see "SLV MODE" on the LCD screen
which means the transmitter is recognized as STUDENT or "Slave".
6) Though the STUDENT transmitter is powered on automatically, it will not transmit a radio signal as
long as the trainer cable is connected properly.
NOTE
1) Do NOT turn on the power of the STUDENT transmitter having the STEREO Jack. Once you plug
the trainer cable into the STUDENT Transmitter using the STEREO Jack, it will be powered on
automatically.
2) All Transmitters in the trainer system use their own batteries. Both batteries in both the Instructor
and Student Transmitters should be properly charged and installed when flying in the trainer mode.
3) You may wish to use a simple "contractors cord" knot on the cable to adaptor connection to keep it
from coming "unplugged" when using it. Heat shrink tubing or electrical tape can also be used.
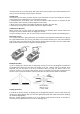
Stick Length Adjustment
Hands come in all sizes so to accommodate everyone we use a two piece stick “top” that can be
adjusted to fit a wide variety of users.
Separate the top from the bottom piece and adjust the top piece to the length required.
Screw the bottom up against the top piece to “jam” lock everything into position.
Stick Lever Tension Adjustment / Mode Change
Stick Lever Tension Adjustment
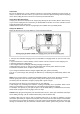
You may adjust the stick tension of your sticks to provide the "feel" that you like for flying. To adjust
your springs, you'll have to remove the case of the transmitter. Using a screwdriver, remove the six
screws that hold the transmitter's rear cover into position, and put them in a safe place. Now, place
some padding under the front of the transmitter and set it face-down on the pad.
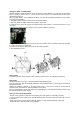
Gently ease off the transmitter's rear cover. Now you'll see the view shown. Use a small cross-point
screwdriver, rotate the adjusting screw for each stick for the desired spring tension.
The tension increases when the adjusting screw is turned clockwise, and decreases for
counterclockwise motion.
Note: Please use M2 (2mm) or 5/64inch Hex key for tension adjustment and mode changes.
When you are satisfied with the spring tensions, you may close the transmitter. Very carefully reinstall
the rear cover. When the cover is properly in place, tighten the six screws.