
User's Manual


No. #58320 TRAINER CABLE (between 6 cell transmitter battery systems) or #58321 TRAINER CABLE
FULL PACKAGE
(#58320 + Slave DIN + Master DIN) - For use between a 6 cell transmitter battery
system and 8 cell transmitter battery system.
Operating with a Trainer Cord
NOTE:
1. WHEN USING THE TRAINER SYSTEM IN THE STEREO JACK TO STEREO JACK FORMAT AS
NOTED IN THE NEXT SEVERAL PARAGRAPHS, BOTH TRANSMITTERS ARE GOING TO
TRANSMIT.
2. IF THE SLAVE TRANSMITTER HAS A REMOVABLE MODULE, REMOVE IT.
THEN, IT WILL NOT BE TRANSMITTING. OTHERWISE, IF YOU ARE FLYING AT A CLUB FIELD
USING FREQUENCY CONTROL, BE SURE YOU HAVE THE OK TO USE BOTH FREQUENCIES.
3. IF THERE IS NO REMOVABLE MODULE ON THE SLAVE TRANSMITTER, BOTH
TRANSMITTERS MUST BE ON DIFFERENT FREQUENCIES.
1. To use the trainer system between STEREO Jack Transmitter and STEREO Jack Transmitter
(Needs #58320 between 6 cell Battery Radios)
1) Set up both the student's and instructor's transmitter to have identical trim and control motions. If
the instructor's transmitter is on a different frequency than the student's, use the student's transmitter
as the master transmitter, and the other transmitter as the student's.
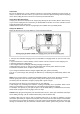
2) Turn on the instructor's transmitter and DO NOT turn on the student's transmitter power.
Plug Trainer Cord (#58320 Stereo Jack) accordingly into each transmitter. The trainer jack is on the
back of the transmitter.
Then you can see "MAS MODE" on the LCD screen of Instructor's transmitter and "SLV MODE" on
the Student's transmitter screen.
3) Move the controls on the instructor's transmitter, and verify each control moves the proper direction.
Now verify that the student's trims and control travels match the instructor's by using the trainer button
(the momentary ENG CUT/TRAINER button on the top right of the transmitter case) and switching on
and off while leaving the control sticks and trims alone, then moving the control sticks.
4) The instructor's transmitter has normal control over the model unless the trainer button is pressed,
passing control to the student's transmitter.
If the student loses control, the instructor can quickly "take over" by releasing the trainer button and
then controlling the model.
2. To use the trainer system between a STEREO Jack Transmitter and a DIN Jack Transmitter.
(Needs trainer cable package #58321 between 6 cell Battery Radio and 8 cell Battery Radio system)
ease read the following instruction carefully for using transmitters with DIN Jack and/or stereo jack for
the trainer system. You will need the Trainer cable full package (#58321).
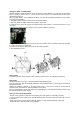
This full package is consists of a STEREO Jack trainer cable(#58320), Instructor DIN Jack and
Student DIN Jack Adapter.
This package allows the proper connection between a 6 cell battery system radio (ex. Optic 6 Sport
2.4, Aurora 9) and 8 cell battery system radios (ex. Optic 6 2.4 / Eclipse 7 2.4).
NOTE
This section tells you how to connect the transmitters only.
Please read the prior sections for the full information needed to properly operate the trainer cable
system.
3. Between the Transmitter having a STEREO jack as INSTRUCTOR and Transmitter having DIN jack
as STUDENT.
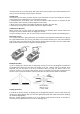
1) Power on the INSTRUCTORS Transmitter having the STEREO Jack.
2) Plug the STEREO Jack trainer cable (#58320) into the Master, or INSTRUCTORS transmitter.
Note: you will see "MAS MODE" on LCD screen which means the transmitter is recognized as the
INSTRUCTOR or "Master".
3) Connect the DIN Jack adapter marked "STUDENT" from the cable package #58320 to the other
end of the stereo connector cable.
This combination enables you to connect the cable to the STUDENT transmitter with a DIN Jack
connector.
4) Plug the DIN connector into the socket on the STUDENT transmitter.
5) Finally, power on the STUDENT transmitter. Though it is powered on, the STUDENT transmitter will