
User's Manual


Mounting
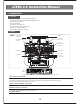
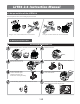
B. Equipment Mounting
When you mount each servo, use the supplied rubber grommets and insert an
eyelet up through the bottom. Be sure not to over tighten the screws.
If any portion of the servo case directly contacts the fuselage or the servo rails,
the rubber grommets will not be able to attenuate vibration, which can lead to
mechanical wear and possible servo failure.
Servo Throw
Factory Repair Service Information
Once you have installed the servos, operate each one over its full travel and
check that the pushrod and output arms do not bind or collide with each other,
even at extreme trim settings.
Check to see that each control linkage does not require undue force to move
(if you hear a servo buzzing when there is no transmitter control motion,
most likely there is too much friction in the control or pushrod).
Even though the servo will tolerate loads like this, they will drain the battery pack
much more rapidly.
Please read the warranty card supplied with your system and return it. Before you decide to have your system repaired, if there is no apparent physical
damage, read this instruction manual again and check to be sure that you are operating the system as it was designed to be operated.
If you are still having trouble, pack up your system in its original shipping materials and send it to the nearest authorized Hitec R/C Service Center.
Be sure to include a note in your package that describes the trouble in as much detail as possible, including: symptoms of the problem in as much detail
as you can provide, including any unusual mounting conditions or equipment orientation, a list of items you are sending, and what you want to be repaired.
Make sure you also provide your name, address and telephone number.
Pushrod
90
Vibration and Water
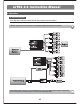
C. Vibration and Water (OPTIMA & MINIMA Series)
The receiver contains precision electronic parts. Be sure to avoid vibration, shock, and temperature extremes.
For protection, wrap the receiver in the "Flight Preserver" foam rubber, or use some other vibration-absorbing materials.
If you are flying near bodies of water, it's also a good idea to protect the receiver by placing it in a plastic bag and securing the open end of the bag with a
rubber band before wrapping it with foam. If you accidentally get moisture inside the receiver, you may experience intermittent operation or a possible crash.
Switch Harness Installation
When you are ready to install the receiver's switch harness, remove the switch cover and use it as a template to cut screw holes and a rectangular hole
slightly larger than the full stroke of the switch.
Choose a switch location on the opposite side of the fuselage from the engine exhaust, and choose a location where it can't be inadvertently turned on
or off during handling or storage. Install the switch so that it moves without restriction and "snaps" from ON to OFF and vice versa.
Sponge Pad
Cyanoacrylate
or
or
2.4GHz 6 Channel
Aircraft Receiver
7
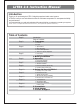
LITE4 2.4 Instruction Manual