
User's Manual


- The trim levers associated with each control stick are used to correct or (trim-out) the
tracking of the aircraft.
- (Caution) Make sure the trims will move the surface past neutral when moved to their extremes.
This will assure you have adequate trim control.
- After your plane's first test flight, note the positions of the control surfaces that required trim.
Next, center the trims and turn the receiver off. Now adjust the control linkage on the plane
so the surfaces are in the same position before the trim levers were re-centered.
- Turn on the radio and receiver and recheck the control surfaces to ensure that all
the corrections were applied in the proper direction.
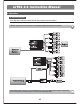
-There is one indicator lights on the face of the radio marked High and Low (blinking).
-These relate to the condition of your transmitter battery and the other setups.
Please pay attention to these LED lights and stop flying when the LED light is blinking.
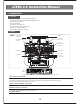
2. BATTERY INSTALLATION
- The transmitter requires four and the receiver battery pack needs four AA size batteries.
These can be Alkaline cells
- When loading the batteries, make sure the receiver and transmitter switches are in the "off" position.
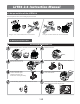
- Open the battery door in the back of the transmitter by pressing the tab on the
bottom of the battery door and lifting up.
- Load batteries into the appropriate slots, taking care to install according to the
proper polarity.
- Replace the battery door and turn the power "on".
5
BATTERY COVER
4 AA SIZE BATTERY.BE
CAREFUL TO LOAD RIGHT
DIRECTION OF BATTERIES (+ -)
TO OPEN THE BATTERY COVER
OF THE LITE4 2.4 YOU NEED TO
PRESS THIS AND PUSH IT DOWNWARD.
LITE4 2.4 Instruction Manual
G. Trim Levers
H. Reading the LED Battery Indicator