PROJECTION COLOR TV 43GX01B OPERATING GUIDE TABLE OF CONTENTS IMPORTANT ..............................................................................................................................2 SAFETY TIPS.............................................................................................................................3 PICTURE CAUTIONS ................................................................................................................6 ACCESSORIES...............................
IMPORTANT SAFEGUARDS IMPORTANT Follow all warnings and instructions marked on this projection television. CAUTION: TO REDUCE THE RISK OF ELECTRIC SHOCK, DO NOT REMOVE COVER (OR BACK). NO USER SERVICEABLE PARTS INSIDE. REFER SERVICING TO QUALIFIED SERVICE PERSONNEL.
paragraph 15.119 of the FCC rules. CAUTION: Never remove the back cover of the television as this can expose you to very high voltages and other hazards. If the television does not operate properly, unplug the television and call your authorized dealer or service shop. SAFETY TIPS IMPORTANT SAFEGUARDS SAFETY POINTS YOU SHOULD KNOW ABOUT YOUR HITACHI PROJECTION TELEVISION CAUTION: • Read all of these instructions. • Save these instructions for later use.
7 If the television has been dropped or the cabinet has been damaged, unplug this television from the wall outlet and refer servicing to qualified service personnel. 8 If liquid has been spilled into this television set, unplug it from the wall outlet and refer service to qualified service personnel. 9 Do not subject your television to impact of any kind. Be careful not to damage the picture tube surface. 10 Unplug this television from the wall outlet before cleaning. Use a damp cloth for cleaning.
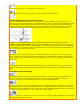
• Never place the set near or over a radiator or heat generator. • Never place the television in a built-in enclosure unless proper ventilation provided. PROTECTION AND LOCATION OF YOUR TELEVISION 16-1 If an outside antenna is connected to the television , be sure the antenna system is grounded so as to provide some protection against voltage surges and built up static charges. Section 810 of the National Electrical Code, NFPA No.
IF THIS TELEVISION DOES NOT OPERATE PROPERLY 22 If you are unable to restore normal operation by following the detailed procedure in your operating instructions, do not attempt any further adjustment. Unplug the television and call your dealer or service technician. 23 Whenever the television is damaged or fails, or if there is a distinct change in performance that indicates a need for service, unplug the television and have it checked by a qualified service technician.
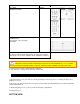
PART NAME PART NO. CLU-436UI REMOTE CONTROL HL00728 43V TELEVISION STAND SP-43G (Not included, order separately) OPTIONAL H530041 ILLUSTRATION CUSTOM HITACHI TELEVISION STAND Excellent for VCR and video-tape storage. Special features include smoked glass doors and an adjustable shelf. Available in shark grey. CAUTION: Television stand model SP-43G is designed for use with 43GX01B only.
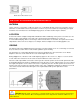
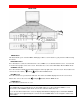
Slide out to remove back cover. HOW TO SET UP YOUR NEW HITACHI PROJECTION TV ANTENNA Unless your TV is connected to a cable TV system or to a centralized antenna system, a good outdoor color TV antenna is recommended for the best performance. However, if you are located in an exceptionally good signal area that is free from interference and multiple image ghosts, an indoor antenna may be sufficient.
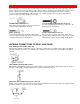
HOOK-UP CABLES AND CONNECTORS Most video/audio connections between components can be made with shielded video and audio cables that have phono connectors. For best performance, video cables should use 75-Ohm coaxial shielded wire. Cables can be purchased from most stores that sell audio/video products. Below are illustrations and names of common connectors. Before purchasing any cables, be sure of the output and input connector types required by the various components and the length of each cable.
FRONT PANEL CONTROLS FRONT VIEW MENU Button This button allows you to enter the MENU, making it possible to set TV features to your preference without using the remote. INPUT/EXIT button Press this button to select the current antenna source, VIDEO: 1, 2, or alternate antenna source. Your selection is shown in the top right corner of the screen. This button also serves as the EXIT button when in MENU mode.
POWER light You will see a red light when the TV is turned on. AI (Artificial Intelligence) sensor The artificial Intelligence sensor will make automatic picture adjustments depending on the amount of light in the room to give the best picture. (See page 48.) REMOTE CONTROL Sensor Point your remote control at this area when selecting channels, adjusting volume, etc. DIGITAL ARRAY Use this button to enter Digital Array mode. This will allow you to adjust your picture quality to optimum performance.
INPUT 2 provides Y-CB-CR jacks for connecting equipment with this capability, such as a DVD. NOTES: DO NOT connect standard VIDEO or S-VIDEO to INPUT 2 when using Y-CB-CR input. When using the Y-CB-CR input jacks, connect your components audio output to the TV's INPUT 2 Left and Right Audio input jacks. Your component outputs may be labeled Y, B-Y, and R-Y. In this case, connect the components B-Y output to the TV's CB input and the components R-Y output to the TV's CR input.
TIPS ON REAR PANEL CONNECTIONS S-Video connections are provided for high performance laserdisc players, VCRs etc., that have this feature. Use these connections in place of the standard video connection if your device has this feature. If your device has only one audio output (mono sound), connect it to the left audio jack on the TV. Refer to the operating guide of your other electronic equipment for additional information on connecting your hook-up cables.
NOTE: To prevent damage to the speaker and distorted sound, set the volume control of the audio amplifier lower and adjust the sound using the remote control fo the TV set. CONNECTING EXTERNAL VIDEO SOURCES The exact arrangement you use to connect the VCR, camcorder, laserdisc player, DVD player to your TV set is dependent on the model and features of each component. Check the owner's manual of each component for the location of video and audio inputs and outputs.
3. Press the INPUT button to view the program from the VCR or laserdisc player. The VIDEO mode disappears automatically after approximately eight seconds. 4. Press the INPUT button to return to the previous channel. CONNECTING A STEREO VCR OR STEREO LASERDISC PLAYER 1. Connect the cable from the AUDIO OUT of the VCR or the laserdisc player to the INPUT (VIDEO) jack on the TV set below. 2. Connect the cable from the AUDIO OUT R of the VCR or the laserdisc player to the INPUT (AUDIO/R) jack. 3.
will be abnormal if the connection is loose. If you have an S-VHS VCR, use the S-INPUT cable in place of the standard video cable. A single VCR can be used for VCR #1 and VCR #2, but note that a VCR cannot record its own video or line output. (INPUT 1 in example on page 11) Refer to your VCR operating guide for more information on line inputoutput connections. 1. Connect the cable from the Y OUT of the Laserdisc or the DVD player to the INPUT 2 (Y) jack as shown on the TV set below. 2.
The television's internal speakers. These speakers are connected to a separate audio amplifier. Use the "AUDIO TO HI-FI" output on the TV. (3) These speakers are connected to the rear speaker 8 Ohm output on the TV. SURROUND FEATURE OFF MATRIX EXTERNAL SPEAKERS SURROUND SWITCH* REQUIRED CONNECTION OPTIONAL CONNECTION EFFECT Sp. Matrix Surround (1) (2) Receive mono and stereo sound. Sp. Matrix Surround (1) (3) (2) Receive Movie Theater-like sound. EXT.
To operate your TV, point the remote control at the remote sensor of the TV and press the TV button. The remote will now control your television. To operate your VCR, point the remote at the remote sensor of the VCR and press the VCR button. The remote will now control your VCR. (See page 25 for instructions on how to program the remote to control your VCR.) To operate your cable box, point the remote at the remote sensor of the cable box and press the CABLE button.
(1) POWER Button Press this button to turn the TV set on or off when the remote is in TV mode. If a SPECIAL EVENT REMINDER is set, it will be displayed when the TV is first turned on. (See page 52). (2) PICTURE-IN-PICTURE buttons See separate section on pages 22 for a description. (3) PIP CH Button Use the PIP CH button to select between main picture and sub-picture tuning. The channel number which is highlighted indicates which channel is being controlled.
(5) LAST CHANNEL (LST-CH) Button Use this button to select between the last two channels viewed. (Good for watching two sporting evens, etc.). (6) VOLUME, MUTE Buttons Press the VOLUME up ( ) or down ( ) button until you obtain the desired sound level. To reduce the sound to one half of normal volume (SOFT MUTE) to answer the telephone, etc., press the MUTE button. Press the MUTE button again to turn the sound off completely (MUTE).
When an S-VIDEO Input is connected to VIDEO: 1. When an COMPONENT VIDEO: Y-CB-CR Input is connected to VIDEO: 2. (9) MENU, CURSOR Buttons All the On-Screen Display features can be set or adjusted by using these buttons. The MENU button will start the On-Screen Display. The CURSOR buttons will highlight functions or adjust and set different features. (10) SLEEP Button Press this button to display the sleep timer in the lower left corner of the screen.
and PIP sub-picture tuning, press PIP CH button on the remote. Every press of the PIP CH will highlight the main or sub-PIP source. The top channel display is the main picture and the bottom display is the sub-picture. This method of picture tuning is the same for one antenna input (ANT A only) and two antenna inputs (ANT A and ANT B) The Picture-in-Picture feature is convenient when you want to watch more than one program at the same time.
NOTE: 1. If no buttons are pressed when in SURF mode, auto-scanning will continuously scan. 2. If a channel is tuned during this SURF scanning, sub-pictures will be removed from the screen. 3. If PARENTAL CONTROL MOVIE/TV RATINGS setting is ON, PIP Surf Mode is deactivated. 4. You must be in ANT A mode for SURF PIP to operate. (2) SWAP Button If you wish to switch what is being shown on the main picture to the sub-picture, press the SWAP button. NOTE: 1.
STROBE FREEZE Press the FRZ button to freeze four frames of the picture you are currently viewing. Press this button again or PIP to return to normal viewing. This feature is useful for viewing a moving picture that has many details, for example, a close play in a sporting event of golf swing. CAUTION: A pattern burn may develop if the Sub-Picture is left in the same corner permanently. If the PIP feature is used frequently, occasionally MOVE the Sub-Picture to a different corner.
(1) VCR Button This button allows the remote to control your VCR by setting it to VCR mode. (2) PRECODED VCR Buttons These buttons transmit the chosen precoded VCR codes. For some VCRs, you must press the RECORD button twice to record a program. (3) EXCLUSIVE TV Buttons These buttons are for operating the TV. NOTE: Refer to instruction manual of the VCR for operation of the buttons exclusively for the VCR.
used for more than one component. NOTES: 1. If your cable box cannot be operated after performing the above procedures, your cable box code has not been precoded into the remote. 2. In the unlikely event that your cable box cannot be operated after performing the above procedures, please consult your cable box operating guide. 3. The remote control will remember the codes you have programmed in until the batteries are removed from the remote control.
CABLE/SATELLITE, VCR, AUDIO AND DVD CODES (CLU-436UI) VCR BRAND ADVENTURA AIWA AMERICAN HIGH AUDIOVOX BELL & HOWELL CALIX CAPEHART CCE COLT CYBERNEX DAYTRON ELECTROHOME EMEREX 00 00 07 09 38 09 03 33,66 33 20,51 03 09 04 AIKO AKAI ASHA BEAUMARK BROKSONIC CANON CARVER CITIZEN CRAIG DAEWOO DYNATECH ELECTROPHONIC EMERSON FISHER FUNAI GERRARD GOLDSTAR GRUNDIG HARMON/KARDON HEADQUARTER HITACHI JVC KENWOOD KODAK LLOYDS’S LXI MAGNIN MARTA MEI 17,22,29,38 00,55 00,55 09,10 00 10,34 16 00,13,28,61,62,63 02,13,3
PORTLAND PULSAR QUARTZ RADIO SHACK RANDEX 03 11,20 16 00,09,55 09 PROTEC QUARTER QUASAR RADIX RCA REALISTIC 00,07,09,16,17,18,27, 29,38,51 11 15,20,21,51 13,31,52 14,16,40,43,47,48,49 RICOH SHARP SHOGUN SONY SUNPACK SYMPHONIC TEAC TEKNIKA TORVISION UNITECH VECTOR RESEARCH VIDEOSONIC 18,27 20,51 04,05,06,07,65 65 00,55 00,13 00,07,09 09,51 51 10,12 SHINTOM SINGER STS SYLVANIA TATUNG TECHNICS TMK TOSHIBA VECTOR VIDEO CONCEPTS 51 WARDS XR-1000 XR-1002 ZENITH 00 33 05,06,11 XR-1001 YAMAHA` 00,07,1
CABLE BRAND ABC Archer Cable Star Cableview Citizen Comtronics Dae Ryung Everquest Garrard Gemini Gold Star Hitachi Jasco Linsay Memorex Novaplex Oak Panther Philips Popular Mechanics RCA Recoton Regency Runco Scientific Atlanta Signal Sprucer Stargate Tandy Texscan Tocum Tusa Unika United Cable Videoway Zentek 00, 02, 04, 05, 07, 08, 11 23, 25, 43 42 43 23, 29 18 04 10,18 23 10 18,22 05 23,29 31 09 38 12,44 39 15,16,17,23 31 13 31 01 09 03,04,11,34,63 10,18 13 10,18 27 00 06,07 10 23,25,43 02 16,20,27 31
AUDIO BRAND Jerrold 51 Scientific Atlanta 32 ULTRATEC OSD 1. Press MENU on the remote control to display the different features on your HITACHI Projection TV. 2. Press the CURSOR to highlight a different feature. 3. Press EXIT on the remote control to quickly exit from a menu. 4. Press HELP on the remote control when a menu is displayed, and text will appear giving a description of that menu. This part of the screen shows what selections are available.
CHANNEL ID VIDEO ID. FAMILY FAVORITES PARENTAL CONTROL 4 EVENT PROGRAM AUTO LINK CLOSED CAPTION MENU BACKGROUND FIRST TIME TOUR Label channels PAY 1, ABC, etc. Label video inputs VCR1, DVD1, etc. Allows you to set and view favorite channels. Block channel picture and sound. Turn TV on and off once, daily, or weekly. Automatically turn TV on with any VIDEO input. Feature to display dialogue/text. Select from three types of backgrounds. Introduces you to basic TV functions.
NOTE: To see an auto-demonstration of the on-screen displays with HELP text displayed, press and hold the POWER button on the TV set for approximately five seconds. Press the POWER button on the TV again to end the autodemonstration. MENU LANGUAGE This feature will allow you to select any one of three different languages for all on-screen displays. Use CURSOR or to select the MENU LANGUAGE of your choice. Press EXIT to quit menu or CURSOR to return to previous menu.
Press CURSOR Press CURSOR or to highlight the correct answers to all three questions. to display the graphic guide. Press EXIT to quit menu or CURSOR to begin AUTO CHANNEL SET. (See page 33). SIGNAL SOURCE Select ANTENNA if you are using an indoor or outdoor antenna. Select CATV if you have cable TV. Press CURSOR or to highlight and select the correct SIGNAL SOURCE mode. Press EXIT to quit MENU or CURSOR to return to previous menu.
RECEPTION BAND Reception channels for each mode are shown at the left. Refer to your cable or TV guide for channel identification standards. If certain CATV channels are poor or not possible in CATV1 mode, set SIGNAL SOURCE to CATV2. AUTO CHANNEL SET This feature will automatically store active TV channels in CHANNEL MEMORY. This will allow you to skip ).
Add or erase additional channels while in CHANNEL MEMORY using CHANNEL to change the channel. Press EXIT to quit menu or CURSOR or or the number buttons to return to previous menu. CHANNEL LIST Use this function allows you to review which channels are labeled in CHANNEL ID (ID.), which have been added to CHANNEL MEMORY (SCAN), and which are protected by PARENTAL CONTROL (LOCK). Add CURSOR or to review more channels. Press EXIT to quit menu or CURSOR to return to previous menu.
NOTE: Each touch of CURSOR or will display the next eight channels. CLOCK SET The time must be set before you can use the CALENDAR, 4 EVENT PROGRAM, SPECIAL EVENT REMINDER or TV TIME OUT. Use CURSOR Press CURSOR or or to set the time, date, and year. to change position. Press EXIT to quit menu or CURSOR to return to previous menu when the CURSOR is in the first position. DIGITAL ARRAY Your HITACHI Projection TV has three color projection tubes: one for red, one for green, one for blue.
Use the number buttons to select which point to adjust: (1) - Upper Left, (2) - Upper Middle, (3) - Upper Right, (4) Center Left, (5) - Center, (6) - Center Right, (7) - Bottom Left, (8) - Bottom Middle, (9) - Bottom Right. Press the CURSOR buttons to move the displayed color up, down, left, or right. Press MENU to change the color you want to adjust. Press the front panel DIGITAL ARRAY button or the remote control MOVE button when adjustment is done. This will save your adjustment into memory.
Press CURSOR to select CHANNEL LIST. Press CURSOR Press CURSOR to select preset CHANNEL LIST. to scroll through the preset CHANNEL LIST. Press CURSOR to select desired CHANNEL ID. To customize CHANNEL ID, select CUSTOM CH. Press CURSOR or to select letter. Press CURSOR or to change character position. (*) represents a blank space. Press CHANNEL or and the number buttons to label additional channels. Press EXIT to quit menu or CURSOR to return to previous menu when the CURSOR is in the first position.
Press CURSOR Press CURSOR Press CURSOR to select VIDEO LIST. to select preset VIDEO LIST. or to scroll through the preset VIDEO LIST. to select desired VIDEO ID. Press CURSOR To customize VIDEO ID, select CUSTOM. Press CURSOR or to select letters. Press CURSOR or to change position. Press EXIT to quit menu or CURSOR to return to previous menu when the CURSOR is in the first position. (*) represents a blank space. Select RESET to set VIDEO ID to original condition.
To rename the categories, use the CURSOR buttons to highlight the category you would like to rename. Use THUMB STICK or to change a letter and CURSOR to select the next character to change. To enter a channel into a category, highlight the channel location to be stored. or or the number buttons to enter the desired channel. Repeat until category has been Press CHANNEL set with your favorite channels. The channel to be added is displayed in the top right corner of the screen.
Use CURSOR , , or to highlight a favorite channel and the TV will automatically tune to that channel. Press EXIT to remove FAMILY FAVORITES OSD from the screen. NOTE: 1. If a category has some blank channel entries, these channels will appear as black sub-pictures. 2. If PARENTAL CONTROL MOVIE/TV RATINGS settings is ON, FAMILY FAVORITES surf mode is deactivated. PARENTAL CONTROL This function will block out the picture and sound of the selected channel or video input.
Press EXIT to quit menu or cursor to return to the previous menu. NOTE: 1. If ANT A and ANT B are in the same SIGNAL SOURCE mode (see page 32), when a channel is locked, it is locked on both antenna inputs. 2. When using TV TIME OUT make sure the clock is set (see page 36). 4 EVENT PROG. This function will automatically turn the TV on and off, one time only, every day or once a week. Press CURSOR Press CURSOR Use CURSOR to select PROGRAM 1, 2, 3, or 4.
1. The OFF Timer will only activate if the TV was turned on or tuned with the ON Timer and no channel selection was made after this time. If you change the channel after the ON Timer has been activated, the OFF Timer will deactivate. 2. If no remote control button is pressed after ON Timer is activated, the TV will automatically turn off after three hours. CAUTION: Do not use your TV as a deterrent when away from home by using the ON and OFF TIMERS.
DISPLAY: ON/OFF will turn the display on or off. MODE: C.C. (Closed Caption) is for the program you are viewing. TEXT is for additional information such as news reports or a TV program guide. This information covers the entire screen and viewing the TV program is not possible. TEXT may not be available with every program. CHANNEL: Use CURSOR 1 is used for the primary language (usually English). 2 is sometimes used for a second language (may vary by region).
Use CURSOR or then CURSOR to select ON or OFF. Press EXIT to quit MENU or CURSOR NOTE: to return to previous menu. 1. When TV set is turned on, the FIRST TIME TOUR will always appear if it is set to ON. 2. To exit during the FIRST TIME TOUR, press the MENU button. Select VIDEO to adjust picture settings and improve picture quality. Use the CURSOR or or Press the CURSOR Press EXIT to quit menu. buttons to highlight the function to be adjusted. buttons to adjust the function.
SHARPNESS Use this function to adjust the amount of fine detail in the picture. RESET When RESET is selected, press CURSOR to return video adjustments to factory preset conditions. ADVANCED SETTINGS Your HITACHI Projection TV has an Ultra AI (Artificial Intelligence) function which will automatically adjust picture settings to produce the highest quality picture possible. When AI is highlighted, use CURSOR to turn the AI on or off. Use CURSOR or to select function.
Turn on SUPER CONTRAST to improve picture detail in areas of high brightness. COLOR TEMPERATURE Set this to WARM for hotter colors with more red, or set to COOL for less intense colors with more blue. Select AUDIO SETTINGS to adjust the TV to your preference and to improve the sound quality. Use CURSOR or to highlight the function to be adjusted. Press CURSOR or to adjust the function. Press EXIT to quit menu. NOTE: If BASS is selected you are adjusting BASS.
Press CURSOR function has an " or to highlight the function. Press CURSOR " in the box, it is ON. to change the function setting. When the MTS MODE Multi-Channel Television Sound will allow you to select STEREO (a stereo broadcast), MONO (monaural sound) used when receiving a weak stereo broadcast or SAP (second audio program) which may be a secondary language, weather report, etc. The sources received will be displayed at the top center edge of the TV.
This function will automatically adjust volume so each channel has the same average volume level. Use this function to choose picture and audio settings for a true home THEATER experience. THEATER MODES Use this function to choose from automatic picture and audio settings to optimize your TV's performance. Use CURSOR or to change THEATER MODES settings. When TV mode is chosen, the following are automatically set: CONTRAST almost maximum, SUPER CONTRAST -OFF, COLOR TEMP.
SPECIAL EVENT REMINDER Use this function to set up to six special events into memory. These events can then be viewed in CALENDAR mode. Press CURSOR Press CURSOR to select EVENT 1 to 6. or to select a letter. Press CURSOR to change position. Set Special Day of reminder using cursor buttons. Highlight the day of START REMINDER using CURSOR, then press CURSOR To erase SPECIAL EVENT, select DELETE then press CURSOR Press EXIT to quit menu or CURSOR to select. . to return to previous menu.
Press CURSOR or to change the month. Press EXIT to quit menu or CURSOR to return to previous menu. If the clock is not set, you can not use this function and the next screen will appear. NOTES: 1. Dates of SPECIAL EVENT REMINDER will appear blinking. Special event message will be displayed only if current date is within the day of Start Reminder Specifications as chosen in SPECIAL EVENT REMINDER. (see page 52) 2. A special icon appears next to "CALENDAR" when a Special Event Reminder is set.
Do not subject the remote control to shocks such as dropping it on the floor, etc. Physical damage to the precision parts may result. Avoid placing the remote control in a high humidity place or getting it wet. Do not leave it on or near a heater. Excessive heat or moisture may cause the unit to cease operation. When the batteries run down, remote control operation will become erratic or possibly stop altogether. Replace the old batteries with two new "AA" size batteries.
USEFUL INFO SYMPTOMS Check these items and try these adjustments Be sure Be sure Be sure Try external power cord TV is another connection is is plugged switched channel correct in "ON" (station trouble) Check antenna Check Check connections antenna for outside (back of TV) broken antenna lead-in wire Check Adjust for local contrast intercontrol ference Adjust brightness control Adjust Adjust Adjust color tint volume control control control No picture, no sound Sound OK, picture poor Picture OK, sound
VHF-Band..............................................2 ~ 13 UHF-Band............................................14 ~ 69 CATV Mid Band...........................A-5 ~ A-1 ................................................................... A-1 Super Band...............................................J-W Hyper Band................................W+1 - W+28 Ultra Band.................................W+29 - W+84 • Video..................................1.0Vp-p, 75 Ohm • S-Video Luminance (Y)....................
San Diego, CA 92154 In Canada, please contact 1-800-HITACHI (1-800-448-2244) During business hours Monday-Friday EST 9:00AM-7:00PM Saturday EST 9:00AM-5:00PM HITACHI Canada Inc Digital Media Division 6740 Campobello Road Mississauga, Ont.