INSTRUCTION MANUAL Rear Projection Color TV C43-FD7000 C50-FD7000 z Thank you for your purchasing HITACHI projection TV products. z In order to use the Rear Projection TV properly, please read this instruction manual carefully before using it.
CONTENTS SAFETY TIPS ·································································································································3 BEFORE USING THIS REAR PROJECTION TV ·······································································7 Note ··········································································································································7 Location ································································································
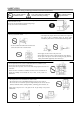
SAFETY TIPS In order to use this TV safely, you must pay attention to the notice shown below. This symbol indicates forbidden actions. This symbol indicates additional cautions (including warning). This symbol indicates required actions. Refer to the Power Supply as indicated on the rating label pasted at the back of the TV set. Do not use the TV outside the specified voltage range. It may cause a fire or an electric shock. Never insert or remove the power plug with wet hands.
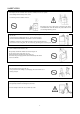
SAFETY TIPS not place the TV near heat source (such as a radiator, stove etc.) or a place gDo where sunlight shines directly on the screen. Overheating will cause failure of the TV. g gDo not place the TV in a dusty place or exposed to rain. Since accumulated dust inside the chassis may cause failure of the set when high humidity persists. gDo not place containers filled with liquids or other objects, e.g. house plant, vase, tea sets, etc.
SAFETY TIPS gIn order not to damage the parts in the set, please unplug and remove the outdoor antenna connection during lightning storms. gWhen going out or your TV is set to remain unused for a long periods of time, please turn off the television and unplug it from the wall outlet. Accumulated dust on the plug or the humidity may cause a fire or electric shock due to reduced insulation on it.
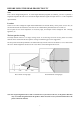
SAFETY TIPS Moisture Condensation If the room temperature suddenly rises or falls (e.g. the TV is moved from a cool place to a warm place), condensation may occur on the screen or lenses resulting in picture fading or color distortion. In such case, please wait a while, and the condensation will evaporate, meanwhile the sound and picture will be restored to normal. gPrecautions on stationary images The aspect ratio of this TV set is 4:3.
BEFORE USING THIS REAR PROJECTION TV Note This is not an integrated digital TV. To watch digital broadcast programs (if available), you have to purchase a Digital Set-Top Box that will receive and decode digital broadcast signals and input to the TV via the component input terminals. Location Select an area where sunlight or bright indoor illumination will not fall directly on the picture screen.
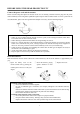
BEFORE USING THIS REAR PROJECTION TV Connect the power cord and the antenna Please read the rating label pasted at the back of the TV set carefully, and then insert the plug into the power outlet conformity to the rating label. Optimum reception requires that an outdoor aerial or CATV system must be used. Meanwhile, please note that a good antenna adaptor is necessary. See the following diagram.
FUNCTIONAL PARTS Control panel and side panel POWER button MAGIC/MANUAL FOCUS POWER indicator button HEADPHONE jack Remote control sensor Side panel input jacks PROGRAM UP/DOWN buttons (When the menu appears on the screen, press PROGRAM UP/DOWN buttons to select the menu up and down.) VOLUME UP/DOWN buttons (When the menu appears on the screen, press VOLUME UP/DOWN buttons to select the menu right and left.
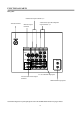
FUNCTIONAL PARTS Rear panel Audio/Video input terminals 3, 4 Antenna terminal Audio/Video input & Component input terminals 1,2 Monitor output terminals MONITOR OUT INPUT 4 INPUT 3 INPUT 2 INPUT 1 Y/ VIDEO Y/ VIDEO PB CB PB CB PR CR PR CR (MONO) (MONO) S-VIDEO VIDEO (MONO) (MONO) IR BLASTER L TV AS CENTER AUDIO R FIXED/ VARIABLE TV AS CENTER input jacks Fixed/Variable Audio output terminals IR BLASTER output jacks Note: Before using these rear panel jacks, please refer to the INSTRU
FUNCTIONAL PARTS On the remote control unit PICTURE mode button ˄Page 47˅ AUDIO mode button ˄Page 47˅ POWER button (Page 12) $9 1(7 TV/VIDEO selector button ˄Page 48˅ 79 6&$1 RECALL button PinP POSITION button ˄Page 32˅ SWAP button ˄Page 31,32˅ MENU button˄Page 13˅ 08/7, 3,& AV NET button ˄Page 47˅ TV SCAN button ˄Page 33,34˅ Stereo/Mono/ Bilingual (I/II) button ˄Page 48˅ MULTI PICTURE button ˄Page 31,32˅ A/B button ˄Page 31,32˅ RETURN button ˄Page 13˅ See the remark.
GETTING STARTED Power on/off TO TURN THE POWER ON Press the POWER button on the TV set. The power indicator will light up to indicate that the power is on. POWER button POWER indicator WHEN THE SET IS AT STANDBY The TV will be in standby mode and the blue power indicator becomes dimmer if the TV set is turned off using the button on the remote control unit. This indicates that the TV is not powered off completely and is in low power consumption mode, waiting for your new command at anytime.
GETTING STARTED Instructions for operating menu ƽBefore watching the TV, please familiarize yourself with this method to use the menu function of this TV. ƽInstructions in this manual are based on using the remote control unit. The words or symbols with frames refer to the buttons on the remote control unit. ƽThe Chinese characters on the TV screen are supplied by Rico Company.
GETTING STARTED Selecting the on-screen display language You can choose from two different languages (Chinese and English) for the on-screen displays. When necessary, you may change display language following the procedures below. 1 Press the MENU button to display menu as shown on the right. 2 Press the Ÿ ź cursor buttons to select the Setup option as shown on the right.
GETTING STARTED Easy Preset It becomes convenient for the customers to program the TV using the remote control unit and detailed OSD of the TV set. Please follow the procedures below to start tuning. 1 Press the MENU button to display menu. Press the Ÿ ź cursor buttons to select the Setup option. 2 Press the ENTER button to enter the Setup menu.
ON-SCREEN DISPLAY MENUǏPICTURE MENUǐ Picture Menu Picture menu allows you to adjust various picture settings such as brightness, color, contrast and sharpness, including the settings of color temperature, dynamic contrast, etc. Follow the steps below. 1 Press the MENU button to display menu. Press the Ÿ ź cursor buttons to select the Picture option as shown on the right.
ON-SCREEN DISPLAY MENUǏPICTURE MENUǐ 3 Press the ź cursor button until the second page in the 3LFWXUH ź Picture menu appears shown on the right. These settings allow you to enhance or improve the visual condition of the picture. )LOP 0RGH Ź 2Q 1RLVH 5HGXFWLRQ /RZ 90 2II '\QDPLF &RQWUDVW 2Q %ODFN 6WUHWFK /RZ &7, /RZ &RORU 0DQDJHU 5HVHW 6HOHFW 6HW 5HWXUQ Note:˄1˅If Noise Reduction is set to High or Lowˈthe item of Sharpness can not be adjusted.
ON-SCREEN DISPLAY MENUǏAUDIO MENUǐ Audio Menu Audio menu allows you to adjust various sounds, for example, treble, bass, balance and headphone volume, etc. including the settings of surround effect, perfect volume, etc. Follow the steps below: 1 Press the MENU button to display menu. Press the Ÿ ź cursor buttons to select the Audio option (shown on the right).
ON-SCREEN DISPLAY MENUǏTIMER MENUǐ Timer Menu The Timer function for this TV uses a countdown timer system. It features On Timer, Off Timer and Auto Off. 1 Press the MENU button to display the menu. Press the Ÿ ź cursor buttons to select the Timer option as shown on the right. 3LFWXUH $XGLR Ź 7LPHU )XQFWLRQ 6HWXS 6HOHFW 6HW 2 7LPHU ź Press the ENTER button to enter the Timer menu as shown on the right.
ON-SCREEN DISPLAY MENUǏFUNCTION MENUǐ Function Menu Function menu allows you to select scan mode, decorative light on the front panel and multi picture mode, etc. Follow the steps below: 1 Press the MENU button to display the menu. Press the Ÿ ź cursor buttons to select the Function option shown on the right. 3LFWXUH $XGLR 7LPHU Ź )XQFWLRQ 6HWXS 6HOHFW 6HW )XQFWLRQ ź 6FDQ 0RGH Ź 3URJUHVVLYH 2 Press the ENTER button to enter the Function menu.
ON-SCREEN DISPLAY MENUǏSETUP MENUǐ ǏPreset: TuningǐYou can perform search, skip, color system, sound system, program name,etc. on the Tuning menu. When the Easy Preset tuning is not desirable, you can adopt the following method to select programs. 1 Press the MENU button to display menu. Press the Ÿ ź cursor buttons to select the Setup option as shown on the right. 2 Press the ENTER button to enter the Setup menu.
ON-SCREEN DISPLAY MENUǏSETUP MENUǐ 4 Press the ENTER button to enter the Tuning menu as shown on the right. Press the Ÿ ź cursor buttons to select Tuning Mode. Select the channel receiving mode in your region using the Ż Ź cursor buttons. For example, in Singapore, please select CCIR on the menu. Note: If without CCIR and China, you can select Freq. to tune.
ON-SCREEN DISPLAY MENUǏSETUP MENUǐ 7 The Sound System option in the Tuning menu allows you to select between various sound systems i.e. Auto, 4.5, 5.5, 6.0 or 6.5 (Note: Here the unit MHz is omitted.). Press the Ÿ ź cursor buttons to select the Sound System optionˈthen press the Ż Ź cursor buttons to select various sound systems as shown on the right. Auto is recommended, as this will automatically determine what system is being broadcast.
ON-SCREEN DISPLAY MENUǏSETUP MENUǐ 10 If the noise in the picture are bigger resulted from the weaker RF signals from some channels, you can reduce such occurrence by using TV NR function. Press the Ÿ ź cursor buttons to select the TV NR option and then press the Ż Ź cursor buttons to select Off, Low and High these three options for turning off noise reduction function, low noise reduction range and high noise reduction range. Different channels can set independently.
ON-SCREEN DISPLAY MENUǏSETUP MENUǐ ǏPreset˖Fine TuningǐIt is unnecessary to fine tune in normal receiving condition. However, fine tuning is required in some areas where the broadcasting signals are weak. Follow the steps shown below. 1 Follow the steps on page 21 to enter the Preset menu, as 3UHVHW ź 7XQLQJ shown on the right.
ON-SCREEN DISPLAY MENUǏSETUP MENUǐ ǏPreset: Prog.ExchangeǐThe menu allows you to adjust program to your desired sequence. Please perform the following steps. 1 Follow the steps on page 21 to enter the Preset menu, 3UHVHW ź then select the Prog. Exchange option as shown on the right.
ON-SCREEN DISPLAY MENUǏSETUP MENUǐ ǏPreset˖Antenna Att.ǐIn some cases, the quality of picture may be impaired resulted from strong RF signal from the antenna terminal. You can set the antenna attenuation to avoid such occurrence. Please perform as follows. ź 3UHVHW Follow the steps on page 21 to enter the Preset menu, then 7XQLQJ select the Antenna Att. option as shown on the right. )LQH 7XQLQJ Press the Ż Ź cursor buttons to set the Antenna Att.
ON-SCREEN DISPLAY MENUǏSETUP MENUǐ ǏAuto Linkǐ Use this function to automatically switch on the TV and switch it to AV1 or AV5 mode when it detects a video signal from INPUT1 or INPUT5 terminal of the TV. It provides you ease when using with your external equipment. Connect external equipment to INPUT1 or INPUT5 terminal of the TV. Refer to CONNECTION WITH OTHER EQUIPMENT on page 50, 51 for more information. Follow the steps on page 21 to enter the Setup menu and select the Auto Link option.
ON-SCREEN DIPLAY MENUǏSETUP MENUǐ ǏSpeakerǐ Follow the steps on page 21 to enter the Setup menu, then select the Speaker option as shown on the right. Press the Ż Ź cursor buttons to set the Speaker option On or Off to turn on or off the speakers of the TV.
MAGIC FOCUS Over a period of time, the picture tubes can drift out of alignment due to abnormal bumps and vibrations or shifting of the TV. You may then notice that there are color rings or halos around the objects in the picture. You may have to converge (align) the colors (refer to note*1). If the picture on the screen is very clear, you may skip the below procedures. The TV provides two modes of convergence adjustment (AUTO CONVERGENCE and MANUAL CONVERGENCE).
MULTI PICTURE The Multi Picture function on this projection TV provides two modes, Split and P in P. To use the Multi Picture function allows you to enjoy the programs easily and comfortably. In normal picture mode, press the MULTI PIC. button to enter the Split or P in P mode. ǏSplitǐ Follow the steps on page 20 to enter the Function menu, then select the Multi Picture option as shown on the right. Press the Ż Ź cursor buttons to set Multi Picture option to Split mode, then quit the menu.
MULTI PICTURE ǏP in Pǐ Follow the steps on page 20 to enter the Function menu and then select the Multi Picture option as shown on the right. Press the Ż Ź cursor buttons to set the Multi Picture option to P in P mode, then exit from the menu. ƽIn normal TV mode, press the MULTI PIC. button to enter the P in P mode as shown below. The picture A and B will show two programs of two channels respectively.
TV SCAN FUNCTION The TV Scan function on this TV provides two modes, mode 3 and mode 12. To use this function allows you to enjoy the programs easily and comfortably. While in a normal picture mode, press the TV SCAN button to enter mode 3 or mode 12. ǏMode 3ǐ )XQFWLRQ ź Follow the steps on page 20 to enter the Function menu and then select the TV Scan option as shown on the right. Press the Ż Ź cursor buttons to set the TV Scan option to mode 3, then quit the menu.
TV SCAN FUNCTION ǏMode 12ǐ Follow the steps on page 20 to enter the Function menu and then select the TV Scan option as shown on the right. Press the Ż Ź cursor buttons to set the TV Scan option to mode 12, then quit the menu. )XQFWLRQ ź ƽIn this mode, you can press the Ÿ ź Ż Ź cursor buttons to select one of the pictures, and the program No. of the selected picture will turn from white to green. Then, press the ENTER button to quit, and the selected picture will fill the entire TV screen.
AV NET The TV has the AV NET function. This function enables you to control your audio/video equipment such as VCR, DVD player, Set-Top-Box, etc with the remote control function. You can control your equipment with the applied remote control unit of the TV after using this function. The rear panel of the TV has two IR BLASTER output jacks. The TV comes with two IR BLASTER cables. Each IR BLASTER cable can control two audio/video equipments.
AV NET ǏSetting up the type codes and the input terminals of the external audio/video equipmentǐ You must set up the Type and Input of the corresponding audio/video equipment after the audio/video equipment and the IR BLASTER cable are connected to the TV so that you can control your external equipment with the AV NET function.
AV NET 4. Press the Ź cursor button to enter the Input item of DVD as shown below. Press the Ÿ ź cursor buttons to select the terminal connected to your external audio/video equipment. You can choose Off, AV1, AV2, AV3, AV4 or AV5. AV1 is chosen as the DVD player in the example is connected to the INPUT1 terminals. $9 1(7 Notes: As for DVD, AVR, CD, STB, DVD2, AVR2, CD2 and STB2, you can choose the Input item from Off, AV1, AV2, AV3, AV4, AV5.
AV NET ǏUsing the AV NET functionǐ You can use the AV NET function if the test succeeded. The DVD player which is connected to the INPUT1 terminals is used as an example to illustrate how to use the AV NET function. 1. Press the AV NET button to display the menu as shown on the right. Press the Ÿ ź cursor buttons to select DVD if you want to control the DVD player that is connected to the INPUT1 terminals.
AV NET ǏHow to learn the remote code of the external audio/video equipmentǐ It enables you to realize the AV NET function by using this function if your external audio/video equipment’s brands are not in the type code list. Please make sure that the IR BLASTER cable is connected as shown in ǏConnection of the external audio/video equipmentǐbefore you learn the remote codes.
AV NET 4. Press the Ź cursor button to enter the Input item of Custom option and then press the Ÿ ź cursor buttons to select AV1. Notes: As for DVD, AVR, CD, STB, DVD2, AVR2, CD2 and STB2, you can choose the Input from Off, AV1, AV2, AV3, AV4 or AV5. As for VCR, CBL, VCR2 and CBL2, you can choose the Input from Off, AV1, AV2, AV3, AV4, AV5 or TV(0P). When using this function, the TV will switch to the AV1~AV5 mode automatically to the chosen Input item accordingly.
AV NET 8. The Succeeded will be displayed on the lower left corner of the screen if you get pass, and the outer frame of the item will show yellow, indicating this item has been passed. The Failed will be displayed on the lower left corner of the screen if you fail to pass. Please make sure your operation right and re-do according to the above steps. The Not Available will be displayed on the lower left corner of the screen if the set is lack of enough internal memory’s capacities.
AV NET ǏExternal audio/video equipment type codeǐ '9' &2'( $0: $IUHH\ $LZD $NDL $OED $OOHJUR $PRLVRQLF $SH[ 'LJLWDO
AV NET ǏExternal audio/video equipment type codeǐ *UXQGLJ +&0 +, 4 +DQVHDWLF +DRMLH +DUOH\ 'DYLGVRQ +DUPDQ .
AV NET ǏExternal audio/video equipment type codeǐ 7HPHL 6KHQJ 7RVKLED 9LFWRU
AV NET ǏExternal audio/video equipment type codeǐ *1, *DOD[L *HKXD *HPLQL *HQHUDO ,QVWUXPHQW *ROG6WDU *RRGPLQG +LWDFKL +ZDOLQ ,((&
TELETEXT Name of buttons TV/TEXT INDEX SUB Operation Switches the receiver between TV mode and TELETEXT mode. Selects the index page. Allows receiving of a sub page. The sub page number and the color key will be displayed. Each of these buttons selects a link page displayed on the lower part of the screen. RED˄POSITION˅ GREEN˄SWAP˅ YELLOW˄A/B˅ BLUE˄MULTI PIC.˅ Changes the screen display mode through the following. U.N.
OTHER FUNCTIONS AV NET button Press the AV NET button to turn AV NET menu on or off. Refer to page 35-45.
OTHER FUNCTIONS CH I/II button Mode will exchange among I (MAIN), II (SUB) and FM(MONO) when bilingual broadcast is being received. TV/VIDEO button Press the TV/VIDEO button to select the input mode. 4 AV1 NICAM [I] AV2 $9 1(7 79 6&$1 NICAM [II] When stereo broadcast is being received, mode will exchange between STEREO and MONO. NICAM AV3 08/7, 3,& AV5 When A2 stereo broadcast is being received, mode will exchange between STEREO and MONO.
OTHER FUNCTIONS ASPECT MODE ǏWhen non HD component signal is received:ǐ You may set different aspect modes to view the image with different signal formats. You can change between four different modes including lj4:3NJ, lj4:3 ZoomNJandlj16:9NJ, lj16:9 ZoomNJ. Please do not watch TV at non full screen size, this may cause damage to your PRT. Please see the following on each of four modes for details.
CONNECTION WITH OTHER EQUIPMENT Jacks and connections of side panel The side panel jacks are provided to allow you to conveniently connect a camcorder, VCR, etc. ǏThe typical connection of video camera or VCR, etc.ǐ I N P U T 5 I N P U T 5 Side panel jacks or ˄Outputs from VCR, DVD, S-VHS video camera, etc˅ Note˖ 1.Insert connection cord plugs completely when connecting to side panel jacks, and ensure that they are properly connected. S.
CONNECTION WITH OTHER EQUIPMENT Jacks and connections of rear panel ǏThe typical connection of rear panelǐ 䚼㒓 ᳝㒓⬉㾚⬉㓚㒓 Outside antenna or CATV coaxial cable ᇘ乥 RF adapter ߚ䜡఼ or or or IR BLASTER ,5 %/$67(5 cable 䖲㒓 L R VIDEO L S-VIDEO VIDEO L R OUTPUT ䷇ડ Stereo system CB Y PB or R INPUT INPUT Y Laserdisc player, VCD player, ▔ܝଅᴎ9&' camcorder,etc ᕅᴎᨘڣᴎㄝ ᔩڣᴎ VCR #2 CR L R L R OUTPUT PR OUTPUT DVD/PDVD player, '9' 3'9'ᕅᴎ HDTV SET TOP BOX, etc 催⏙᱄ᑺ⬉㾚ᴎ乊Ⲧ
CONNECTION WITH OTHER EQUIPMENT ǏThe typical connection of 79 $6 &(17(5ǐ ᴀᴎⱘৢ䴶ᵓ MONITOR OUT INPUT 4 INPUT 3 INPUT 2 INPUT 1 Y/ VIDEO Y/ VIDEO PB CB PB CB PR CR PR CR (MONO) (MONO) S-VIDEO VIDEO (MONO) (MONO) L TV AS CENTER AUDIO R FIXED/ VARIABLE CENTER OUT Stereo ䷇ડ'9'᪁ᬒᴎㄝ system, DVD player, etc L R L R FRONT OUT CENTER OUT Stereo system, ䷇ડ'9'᪁ᬒᴎㄝ DVD player, etc REAR OUT R L LFE/SUB OUT SUB WOOFER S S 52
CONNECTION WITH OTHER EQUIPMENT About the jacks and connections of rear panel 1. Refer to the operation manual of your electronic equipment for additional information on connections. 2. If your device has only one audio output (mono sound), please connect it to the left channel jack (MONO/L). 3. Audio and video signal from the same source should be connected to the same group of terminals. Do not mix them. 4.
ADDENDA A guide to simple problem solving gBefore calling up the service personnel, please check the following chart for a possible cause to the problem you are encountering. Symptom Possible causes No picture,no sound,power/standby indicator is OFF. gThe power cord is not plugged in. No picture,no sound,power/standby indicator is ON. gThe TV is in standby mode. No sound gThe volume control is set to minimum. gThe Speaker option in Setup menu is set to Off.
ADDENDA Specifications Model Screen size & )' & )' FP FP Power supply Refer to the values as indicated on the rating label pasted at the back of the TV set. Power consumption 3$/ % * , ' . 6(&$0 % * ' .
Exemptions ƵHitachi is not liable for any damage caused by natural calamities, uses by third person, accidents, owner’s intentional misuse, or uses in other improper conditions. ƵHitachi is not liable for incidental damages (such as profit loss or interruption in business, modification or erasure of record data, etc.) caused by use or misuse of product. ƵHitachi is not liable for any damage caused by neglect of the instructions described in the instruction manual.