
Operation Manual


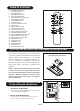

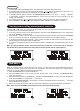

REMOTE CONTROL
1. STANDBY/ON BUT TON
2. iPod/CD BUT TON
3. DAB/FM BUTTON
4. AUX/USB/SD BUT TON
5. PLAY/PAUSE BUT TON
6. SKIP/SCROLL DOWN BUT TON
7. STOP/MENU BUTTON
8. PROGRAM BUTTON
9. INTRO BUTTON
10. CLOCK DISPLAY BUT TON
11. EQ BUTTON
12. BACKLIGHT BUTTON
13. VOLUME UP
BUTTON
14. OPEN/CLOSE BUTTON
15. PS/FOL/MENU UP BUTTON
16. VOLUME DOWN BUT TON
17. PS/FOL/MENU DOWN BUTTON
18. SELECT/REPEAT BUTTON
19. SKIP/SCROLL UP BUTTON
20. RANDOM BUTTON
21. SLEEP BUTTON
22. TIMER BUTTON
23. X-BAS S BUTTON
24. MUTE BUTTON
25. SURROUND BUTTON
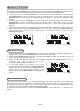
Press down the compartment cover, and slide the
cover off to open the compartment. Place the two
(UM4), (AAA), (R03) batteries in the remote
control according to the polarity markings ("+"
and "-”) inside the compartment and on the
batteries. Place the cover over the compartment,
press down lightly, and push
it upward until it
snaps on.
NOTE : Remove the batteries from the remote
control if not in use for long period of the time.
Do not mix normal batteries with rechargeable
batteries, when the batteries become weak,
remote control will not function and replace
with new batteries.
**BATTERIES NOT INCLUDED**
1
3
5
7
9
11
2
4
6
8
10
12
13
15
19
21
23
25
17
24
22
20
18
16
14
UK-6
PUTTING THE BATTERY INTO THE REMOTE CONTROL UNIT
R
L
AC Cor d
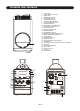
1. Speakers Connection
Extend the SPEAKER WIRES and connect them
to the SPEAKER TERMINALS.
2. Power Cord Connection
Before using , connect the AC Po w e r Cord to
the AC outlet . Standby light.
indicator
INSTALLING THE SPEAKER WIRE
TO THE SPEAKER TERMINALS