LCD Colour Television Model 17LD4200 USER'S MANUAL MANUEL UTILISATEUR BEDIENUNGSANLEITUNG MANUAL DE USUARIO MANUALE D'USO BRUKSANVISNING READ THE INSTRUCTIONS INSIDE CAREFULLY. KEEP THIS USER'S MANUAL FOR FUTURE REFERENCE. For future reference, record the serial number of your monitor. SERIAL NO. The serial number is located on the rear of the monitor. This monitor is ENERGY STAR® compliant when used with a computer equipped with VESA DPMS.
Chapter 1 Introduction......................................................................................................1 1.1 Important Safety Precautions........................................................................................................... 1 1.2 Some Dos And Don'ts On The Safe Use Of Equipment.................................................................. 3 1.3 Important Notices .....................................................................................................
ENGLISH Overloading—Do not overload AC outlets or extension cords. Overloading can cause fire or electric shock. Entering of objects and liquids—Never insert an object into the product through vents or openings. High voltage flows in the product, and inserting an object can cause electric shock and/or short internal parts. For the same reason, do not spill water or liquid on the product. Servicing—Do not attempt to service the product yourself.
ENGLISH 12) Unplug this apparatus during lightning storms or when unused for long periods of time. 13) Refer all servicing to qualified service personnel. Servicing is required when the apparatus has been damaged in any way, such as power-supply cord or plug is damaged, liquid has been spilled or objects have fallen into the apparatus, the apparatus has been exposed to rain or moisture, does not operate normally, or has been dropped.
ENGLISH 1.3 Important Notices Please use the product under a normal environment 1. Try to avoid the following circumstances. * Heat or direct sunlight places * Places that are unstable or subject to vibration * Location with large magnetic field * Exposure to rain or moisture 2. For the unauthorized person, please don't serve this product: otherwise the damage caused by unauthorized servicing is not covered by warranty. 3.
ENGLISH 3. Remove the protective label. (See figure 1-4) Figure 1-4 1.8 Viewing Angle Adjustment This product is designed to allow users to have a comfortable viewing angle. The viewing angle can be adjusted from -5°to +25°. (See Figure 1-5). Figure 1-5 When you want to close the base and body to 90°, you need to release a button from 25°. (See fig. 1-6) Figure 1-6 Warning: Do not force the LCD Monitor over its maximum viewing angle settings as stated above.
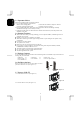
ENGLISH Chapter 2 Installation 2.1 Product Description 2.1.1 Front view of main body Figure 2-1 Figure 2-2 1 Indicator for Power 2 IR receiver LED lights Green colour --- Power is ON. LED lights Orange --- Monitor is in "Power Saving Mode". LED is off --- Power is OFF. IR receiver. 3 Power Turn on or off the main unit. 4 Menu Open or Close the OSD menu. 5 Channel 6 Volume 7 Source Select the next lower channel / higher channel (TV/AV mode) ; OSD function for selecting (PC mode).
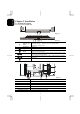
Please refer to the example closest to your configuration Please turn off the power of all devices before connection. For audio connection, please use RCA audio (L+R) connector. For video connection, please choose either RCA video connector or s-video connector. Moreover, for connection to monitor alone please omit those connections associated with PC. Scart to 3 phono lead (supplied) can be used to connect devices with a scart socket to the LCD TV via AV2.
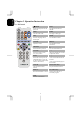
ENGLISH Chapter 3 Operation Instruction 3.1 IR Control TEXT POWER Switch between power-on and power-off. Turn the Teletext function ON/OFF MUTE INDEX Turn the sound on/off. Turn page to index page. MPX MODE Select the language and the sound output Turn ON/OFF list mode. VOLUME REVEAL Adjust the volume. Turn ON/OFF conceal information CHANNEL Select channels up or down. Turn on/off the OSD menu. TV/AV/PC Select input sources of TV, AV1, AV2, and PC.
Teletext is a free service broadcast by most TV stations which gives up-to-the-minute information on news, weather, television programs, stock prices and many other topics. The teletext decoder of this TV can support the SIMPLE, TOP and FASTEXT systems. SIMPLE (standard teletext) consists of a number of pages which are selected by directly entering the corresponding page number. TOP and FASTEXT are more modern methods allowing quick and easy selection of teletext information.
ENGLISH Page selection 1. Press the “INDEX ” button to select the index page. 2. You can select the pages which are colour coded along the bottom line with the same coloured buttons. 3. Corresponding to the SIMPLE teletext mode, you can select a page by entering its three-digit page number with the NUMBER buttons in FASTEXT mode. 4. The ↑ / ↓ button can be used to select the previous or next page. REVEAL Press this button to display hidden information, such as solution of riddles or puzzles.
PICTURE BRIGHT 1. Press "MENU" (on main body) or "►" (on remote control) button. 2. Press " " (on main body) or "→" (on remote control) button to select PICTURE. 3. Press " " (on main body) or "↑, ↓" (on remote control) button to select BRIGHT. 4. Press " " (on main body) or "←, →" (on remote control) button to increase or decrease the screen brightness. CONTRAST 1.Press "MENU" (on main body) or "►" (on remote control) button. 2.Press " " (on main body) or "→" (on remote control) button to select PICTURE.
ENGLISH SETUP CH. SEARCH 1. Press "MENU" (on main body) or "►" (on remote control) button. " (on main body) or "→" (on remote control) button to select SETUP. 3. Press " " (on main body) or "↑, ↓" (on remote control) button to select CH. SEARCH. 4. Press " " (on main body) or "←, →" (on remote control) button to select NO or YES. If you select YES, the TV will scan program channels automatically. CH. MEMORY 1. Press "MENU" (on main body) or "►" (on remote control) button. 2.
control) button. “ (on main body) or “→” (on remote control) button to select SETUP. 3. Press “ “ (on main body) or “↑, ↓” (on remote control) button to select RECALL. 4. Press “ “ (on main body) or “←, →” (on remote control) button to select NO or YES. If you select YES, the TV will recall all the picture settings to default. SYSTEM 1. Press “MENU” (on main body) or “►” (on remote control) button. 2. Press “ “ (on main body) or “→” (on remote control) button to select SETUP. 3.
ENGLISH NICAM 1. Press "MENU" (on main body) or "►" (on remote control) button. 2. Press " " (on main body) or "→" (on remote control) button to select SYSTEM. 3. Press " " (on main body) or "↑, ↓" (on remote control) button to select NICAM. 4. Press " " (on main body) or "←, →" (on remote control) button to select ON or OFF. You can select ON if your set is equipped with the receiver for NICAM reception. The high quality NICAM (Near Instantaneous Companded Audio Multiplex) digital sound can be received.
ENGLISH 3.2.3 PC OSD function description Icon Function Function Description BRIGHTNESS This function increases or decreases the brightness of the image. CONTRAST This function increases or decreases the difference between the dark and light content. H-POSITION This function shifts the entire display image left or right. V-POSITION AUTO ADJUSTMENT PHASE This function shifts the entire display image up or down. CLOCK PICTURE IN PICTURE SOURCE AUDIO SCALE H-POS. V-POS.
ENGLISH Chapter 4 Technical Information 4.1 Specifications LCD Panel Size Display Type Resolution Display Dot Display Area (mm) Display Colour Brightness Contrast Ratio Response Time Lamp Voltage Lamp Current Viewing Angle Display colours CVBS/S-Video Inputs S-Video 17" (43 cm) Active matrix colour TFT LCD 1280 x 768 1280 x (RGB) x 768 369.6 x 221.7 (H x V) 262K 400 cd/m2 (typical) 400:1 (typical) Ta=25°C T on=15ms T off=10ms 630 Vrms (typical) 10.5 mA rms.
Separate TTL compatible horizontal and vertical synchronization Positive and negative Supports VESA DDC1 and DDC2B functions Plug & Play External Connection Power Input (AC input) Video Cable AC socket 1.
ENGLISH resolution, the text may look not so sharp, and the Graphics may look not so proportional. Chapter 5 Other Information 5.1 Specifications POWER IN VIDEO INPUT S-VIDEO INPUT AUDIO INPUT PHONE IN RF IN VGA INPUT Power Consumption Operating Temperature Operating Humidity IR Control Dimensions Net Weight Gross Weight 12VDC 5A Composite /Component video RCA connector S-Video 4-pin mini DIN Stereo L+R RCA connectors Phone Jack 3.
19 ENGLISH Also, if the signal cable is not connected to LCD monitor at all or properly, the monitor screen will display a message “No Signal ”.
Your Guarantee of Excellence Thank you for purchasing this Hitachi Television. In the unlikely event that this product should develop a fault, we undertake to replace or repair any part that of the product which fails due to a manufacturing defect within 12 months of the date of purchase provide that: i) The product has been installed and used only in accordance with the instructions supplied with the product.
Hitachi, Ltd. Tokyo, Japan International Sales Division THE HITACHI ATAGO BUILDING, No. 15 –12 Nishi Shinbashi, 2 – Chome, Minato – Ku, Tokyo 105-8430, Japan. Tel: 03 35022111 HITACHI EUROPE LTD, Whitebrook Park Lower Cookham Road Maidenhead Berkshire SL6 8YA UNITED KINGDOM Tel: 01628 643000 Fax: 01628 643400 Email: consumer -service@hitachi-eu.com HITACHI EUROPE S.A. 364 Kifissias Ave. & 1, Delfon Str. 152 33 Chalandri Athens GREECE Tel: 1-6837200 Fax: 1-6835964 Email: service.hellas@hitachi-eu.