Contents Brief introduction....................................2 Important safety instructions..................2 Installing your new appliance.................4 Installation clearance requirements........6 Parts identification..................................7 Reversing the door swing...................... 8 Leveling the wine cooler.........................9 Handle installation.......................... .......10 Operation........................................... ...11 Using your appliance..........
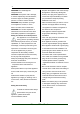
WARNING-Do not damage the refrigerant circuit. ●Unpack the appliance and check through the appliance. Should any damage be WARNING-If the power cord is damage, it must be replaced by the manufacturer, its service agent or similarly qualified persons in order to avoid a hazard. evident, don’t plug in the appliance, but contact the shop immediately from which you purchased it. Keep all packing Materials in this case.
●Make sure that the plug is not squashed or damaged. Damage may cause short circuit, electric shock or overheat and even cause a fire. ●Do not insert the main plug and use the appliance if the socket is damaged. There is a risk of electric shock or fire. ●Switch off the appliance and disconnect it from the main power before you clean or move it. ●Never unplug the appliance by pulling on the electrical cord.
* Keep your appliance in a dry place to avoid high moisture. * Keep the appliance out of direct sunlight, rain, or frost. Keep the appliance away from heat source such as stoves, fires, or heaters. Do not move the product without emptying the content and securing the door in a closed position. Use two or more people to move and install. Do not install next to ovens, grills, or other high heat sources. Install your appliance in a location (floor, etc.) strong enough to support the total loaded weight.
- Installation Clearance Requirements When installing the wine cooler under a counter,follow the recommended spacing dimensions shown. •To ensure proper service access and ventilation, allow at least 1/2” clearance at the back, 1/4”at top and 1/4” at sides. The installation should allow the unit to be pulled forward for servicing, if necessary.
Parts Identification Front View Model:RW54N1SSD Upper Right Hinge Control panel Fan Door Glass Shelf Shelf LED light Reed Switch Lower left Hinge Magnet Bottom Grill Model:RW46N1DSD Upper Right Hinge Fan Door Control panel Shelf LED light Reed Switch Lower left Hinge Magnet Bottom Grill Hisense Wine Cooler
Back View Tip:Gather the model and serial number from the rating label , write them down before installing the wine cooler. Reversing The Door Swing 1 Follow the instructions below to reverse the door swing. IMPORTANT:Before you begin, unplug the wine cooler. To reverse the door from right swing to left swing: 1.Open the door and remove two screws in the right bottom hinge. 2 3 4 2.Remove the door from the cabinet slowly.Place the door aside with appropriate protection to prevent damage. 3.
5 5.Pull out the door axis and put it into the hole of the other side of the door.The door revolves 180 degrees.Carefully insert the door into the upper left hinge,slide the door to the lower left hinge,then adjust and align the position of the door axis and lower hinge.Secure the door by instaLling the lower screws. Leveling The Wine Cooler It is important for the wine cooler to be leveled in order to work properly.
Handle installation Open the door and carefully pull out the door gasket only at the area where the handle is to be installed. You will be able to see two screws inside the door. Align the handle with the screws and tighten using a Phillips head screwdriver until the handle is flush against the door frame. CAUTION:Do not over-tighten the screws as this may cause damage to the handle or to the stainless steel door. Carefully press the door gasket into its original position.
Operation Before plugging in you cooler for the first time remove all packaging, clean the cooler with a soft rag and a mixture of lukewarm water and baking soda(2 tablespoons baking soda in 1 quart of water works well). Wipe dry with soft cloth. Note: Let stand upright for at least 4 hours before plugging in, to avoid potential damage to the compressor. Temperature Control RW46N1DSD Note:The set temperature range for both upper and lower compartments is 39 deg F to 64 F (4 deg C to 18 deg C). ①.
⑫.“ ” Turn The Interior Light ON/OFF Turns the interior light ON or OFF .If this button is used ,the light is no longer controlled by the door switch, and remains ON. (Light button deactivated when energy saver button is on.) Setting the temperature When pressing the or button, the system will enter the set-up mode in the upper or lower compartment automatically. The LED will flash and display the setting temperature.
Setting the temperature Use the / buttons to set the desired temperature of the appliance. Each time the buttons are pressed, the temperature will increase / decrease by 1°F(or 1°C). The temperature can be set between 39°F to 64°F(4 deg C to18 deg C). / Setting Temperature Memory Function If the power failure happens, the set temperature will be saved by the unit. Once the power is back on, the unit will resume cooling at the same set temperature.
RW54N1SSD To prevent damaging the door or gasket , make sure to open the door enough to clear the racks when pulling them out. To handle the bottles, it is necessary to extend the rack at least 1/3. The sides of the racks are equipped with protective stoppers which prevent bottles from falling from the shelves.
Helpful hints and tips Wine serving temperature guidelines Energy saving tips We recommend that you follow the tips Below to save energy. •Try to avoid keeping the door open for long periods in order to conserve energy. Ensure the appliance is away from any sources of heat(Direct sunlight, electric oven or cooker, etc). •Don’t set temperature colder than necessary. •Don’t store anything warm in the appliance. •Place the appliance in a well ventilated, Humidity free, room.
Troubleshooting If you experience a problem with your appliance or are concerned that the appliance is not functioning correctly, you can carry out some easy checks before calling for service, please see below. Warning! Don’t try to repair the appliance yourself. If the problem persists after you have made the checks mentioned below, contact a qualified electrician, authorized service engineer or the shop where you purchased the product.
Disposal of the appliance It is prohibited to dispose of this appliance as household waste . Packaging materials Packaging materials with the recycle symbol are recyclable .Dispose of the packaging into a suitable waste collection container to recycle it. Before disposal of the appliance 1.Unplug the wine cooler from the socket. 2.Cut off the power cord and discard with the main plug. Warning! Coolers contain refrigerant and gases in the insulation.
Warranty Two‐YEAR LIMITED MANUFACTURER’S IN-HOME SERVICE WARRANTY This Warranty, provided by Hisense U.S.A. Corporation (hereinafter “Hisense”) covers Full-size Refrigeration product (hereinafter “Product”) in the United States of America, Puerto Rico, Guam and the U.S.
Exclusions and Limitations: This Warranty covers manufacturing defects in materials and workmanship encountered in the normal, noncommercial use of the Product, and does not cover consumer instruction, delivery, installation, set-up, adjustments, cosmetic damage or damage due to acts of nature, accident, misuse, abuse, negligence, commercial use or modification of or to any part of the Product.
below. When calling, please know the purchase date and the complete model and serial number of your appliance. This information will help us to better respond to your request. If you need to order replacement parts, we recommend that you use only factory-specified replacement parts. Factory-specified replacement parts will fit right and work right because they are made with the same precision used to build every new.
MANUAL DE INSTRUCCIONES Antes de poner en marcha la unidad, lea atentamente el manual y consérvelo para referencia futura.
Tabla de Contenido Breve introducción..........................................22 Funcionamiento......................................... 31 Instrucciones importantes de seguridad.........22 Utilización del electrodoméstico ............... 33 Instalación del nuevo electrodoméstico..........24 Sugerencias y consejos de ayuda ...........35 Requerimientos del espacio de la instalación..26 Guía de temperatura para servir el vino....35 Identificación de las partes..............................
ADVERTENCIA-No dañe el circuito refrigerante. ADVERTENCIA-Si el cable de alimentación está dañado, lo debe reemplazar el fabricante, el agente de servicio o una persona similar calificada para evitar peligros. ADVERTENCIA-Mantenga libres las aberturas de ventilación en el electrodoméstico o construya una estructura libre de obstrucciones. ADVERTENCIA-No almacene explosivos o sustancias como latas de aerosol con carburante inflamable en el electrodoméstico.
* Mantenga el aparato en un lugar seco para evitar alta humedad. * Mantenga el aparato lejos de la dirección del sol, la lluvia o las heladas. Coloque el aparato lejos de fuentes de calor como cocinas, estufas o calentadores. No mueva el producto sin vaciar el contenido y sin asegurar la puerta en posición cerrada. Necesita dos o más personas para mover e instalar. No instale al lado de hornos, parrillas u otras fuentes de mucho calor. Instale el electrodoméstico en un lugar (piso, etc.
Requerimientos del espacio de la instalación Siga las dimensiones de espacio recomendadas cuando instale la cava de vinos bajo un mostrador. • Para garantizar un servicio correcto y una buena ventilación, deje al menos 1/2" de espacio libre en la parte trasera, 1/4" en la parte superior y 1/4" en los lados. En caso de ser necesario realizar un mantenimiento, la instalación debería permitir mover la unidad hacia adelante.
Identificación de las partes Vista frontal Modelo: RW54N1SSD Bisagra superior derecha Panel de control Ventilador Puerta Estante de vidrio Estante Luz LED Interruptor de láminas Bisagra inferior izquierda Imán Parrilla inferior Modelo: RW46N1DSD Bisagra superior derecha Ventilador Puerta Panel de control Estante Luz LED Interruptor de láminas Bisagra inferior izquierda Imán Parrilla inferior Cava de vinos Hisense
Vista trasera Consejo: Busque el modelo y el número de serie de la etiqueta de clasificación y anótelos antes de instalar la cava de vinos. Inversión de la abertura de la puerta 1 Siga las siguientes instrucciones para invertir la abertura de la puerta. IMPORTANTE: Antes de comenzar, desenchufe la cava de vinos. Para invertir la abertura de la puerta desde la derecha hacia la izquierda: 1. Abra la puerta y quite los dos tornillos en la bisagra inferior derecha. 2 3 4 2.
5 5. Retire el eje de la puerta y colóquelo en el orificio del otro lado de la puerta. La puerta gira 180 grados. Inserte cuidadosamente la puerta en la bisagra izquierda superior. Deslice la puerta a la bisagra izquierda inferior y, luego, ajuste y alinee la posición del eje de la puerta y la bisagra inferior. Ajuste la puerta instalando los tornillos inferiores. Nivelación de la cava de vinos Para que funcione de manera correcta, es importante que la cava de vinos esté nivelada.
Instalación de la manija Abra la puerta y tire cuidadosamente el sello de la puerta hasta el área donde se instalará la manija. Podrá ver dos tornillos dentro de la puerta. Alinee la manija con los tornillos y ajústela utilizando un destornillador Phillips hasta que la manija quede al ras del marco de la puerta. PRECAUCIÓN: No sobreajuste los tornillos ya que esto puede dañar la manija o la puerta de acero inoxidable. Presione cuidadosamente el sello de la puerta a su posición original.
Funcionamiento Antes de enchufar la cava por primera vez, quite todo el empaque, limpie la cava con un paño suave y una mezcla agua tibia y bicarbonato de sodio (2 cucharadas de bicarbonato de sodio en 1 litro de agua funciona bien). Seque con un paño suave. Nota: Déjela en posición vertical por al menos 4 horas antes de enchufarla para evitar posibles daños en el compresor.
⑫.“ ” ON/OFF de la luz interior ENCIENDE o APAGA la luz interior. Si se utiliza este botón, ya no se puede controlar la luz con el interruptor de la puerta y permanece ENCENDIDA. (El botón de la luz se desactiva cuando el botón de ahorro de energía se enciende.) Ajuste de la temperatura Cuando presiona el botón o el sistema ingresará al modo set-up automáticamente en el compartimiento superior o inferior. El LED parpadeará y la pantalla mostrará la configuración de temperatura.
Ajuste de la temperatura Utilice los botones / para establecer la temperatura deseada del electrodoméstico. Cada vez que se presionan los botones / , la temperatura aumentará/disminuirá de a 1°F (o 1°C). La temperatura se puede establecer entre 39ºF y 64ºF (4 ºC a 18º C). Configuración de la temperatura- Función Memory Si se produce un corte de energía, la unidad guardará la temperatura establecida. Una vez que vuelva la energía, la unidad reanudará la misma temperatura de enfriamiento.
RW54N1SSD Para evitar que se dañe la puerta o el sello, asegúrese de abrir lo suficiente la puerta para sacar los estantes. Para agarrar las botellas, se necesita extender el estante al menos 1/3. Los laterales de los estantes están equipados con frenos protectores que evitan que las botellas se caigan de los estantes.
Sugerencias y consejos de ayuda Consejos para el ahorro de energía Le recomendamos que siga los siguientes consejos para ahorrar energía. • Evite tener la puerta abierta por largos períodos para conservar la energía. Compruebe que el electrodoméstico esté lejos de fuentes de calor (luz del sol directa, horno eléctrico o cocinas, etc.). •No ajuste la temperatura más frío de lo que sea necesario. •No almacene nada caliente en el electrodoméstico.
Solución de problemas Si experimenta algún problema en su aparato o si está preocupado de que el aparato no está funcionando correctamente, puede llevar a cabo algunas comprobaciones antes de solicitar el servicio, por favor véase más abajo. ¡Advertencia! No intente reparar el aparato por sí mismo.
Eliminación del electrodoméstico Está prohibido desechar el electrodoméstico como desperdicios domésticos. Materiales de empaque El material de empaque con el símbolo de reciclaje es reciclable. Elimine el material en el contenedor de deshechos adecuado para reciclarlo. Antes de la eliminación del electrodoméstico 1.Desenchufe la cava de vinos del toma. 2.Corte el cable de alimentación y descártelo con el enchufe principal. ¡Advertencia! Las cavas contienen refrigerantes y gases en el aislante.
Garantía SERVICIO DE GARANTÍA DEL FABRICANTE EN EL HOGAR LIMITADA DE DOS AÑOS Esta Garantía, brindada por Hisense U.S.A. Corporation (en adelante "Hisense") cubre al refrigerador estándar (en adelante "Producto") en Estados Unidos de América, Puerto Rico, Guam y las Islas Vírgenes de EE.UU., excluyendo cualquier accesorios y/o complementos de terceros comprados por separado.
Exclusiones y limitaciones:Esta garantía cubre los defectos de fábrica en los materiales y la mano de obra encontrado en el uso normal, no comercial del Producto, y no cubre los daños en la instrucción del consumidor, entrega, instalación, configuración, ajustes y estética o daños debido a causas naturales, accidentes, mal uso, abuso, negligencia, uso comercial o modificaciones de cualquier parte del Producto.
siga las siguientes instrucciones. Cuando llame, por favor recuerde la fecha de la compra y los datos completos del modelo y el número de serie del electrodoméstico. Esta información nos ayudará para responder mejor a su solicitud. Si necesita pedir piezas de reemplazo, le recomendamos que utilice sólo piezas específicas por el fabricante.
BZ1-478