
Operation Manual


Hisense Refrigerator
9
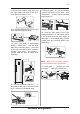
Note: Please hold the door by hand
during step 4 to prevent door dropping.
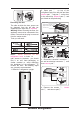
5. Remove the door and place it on a
smooth surface with its panel upwards.
Lever part① and part④ ,then
screws② , as shown in the picture.
Change handle③ to the left side, then
install screws② , part① and part④ in
turn. screws⑦ , detach part⑥
and part⑤, turn part ⑥ over and then
install part⑤and part⑥to the right side
with screws⑦.
loosen
Loosen
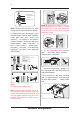
6. remove
part③ and then loose screws④ .
Remove part ② and part①.
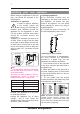
Tilt the refrigerator back,
Special flange
self-tapping screws
Earth wire
①
②
③
Upper hinge part
1
2
3
② Special self-tapping screws
③ Handle
① Handle covers
④ Screw hole covers
⑤ Door holder
⑥ Stop block
⑦ Self-tapping screws
1
2
3
4
washer
Note: washer may
stick to the door.
② Front foot fixed board
④ Self-tapping screws
③ Adjustable bottom feet part
① Lower hinge part(left)
Note 2:
Install the handle cover as
the following figure shows : locate
the buckle first, and then close the
cover from the inside until you hear
aclicking sound.
Note:
Please note the following
Note 1:Remove the handle cover as
the following figure shows :bend the
upper and lower wings outwards and
pull the upper buckle away from the
handle, then slide the handle cover
off the handle.
buckle
buckle
7. Screw out lower hinge, change it to
the near hole site, and then screw up
and mount washer.
8.Just remount to the step 6,change
part①to right and part②to left and then
fix them with screws④ . Finally install
part③.
Lower hinge part(right)