
Operation Manual


Hisense Refrigerator
10
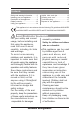
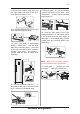
12. Connect electrical connector① in
accordance with step 3 and then install
part②(which is in the plastic bag).
13.Reverse part① by 180°and install it
onto the left corner of the door, then
mount part②. (both of which are taken
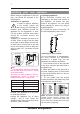
down in step 2)
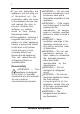
14. Take the reed switch out of the
coping block(part③in step 3)and mount
it on another block for use (which is
with mark “L” in the plastic bag). Put the
coping block just removed back to the
plastic bag.
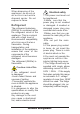
15. ,
connector② , and then install part③ .
Install part ① connect the wire
Note: Make sure the reed switch is
correctly fitted into the coping block.
①
②
③
①
②upper hinge cover(right)
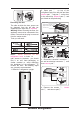
1
2
1
2
3
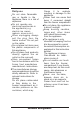
9. Screw out the upper hinge axis, turn
the upper hinge over and fix axis on it.
Then place it at side for use.
10. Exchange wires both in the left and
right slots of refrigerator body.
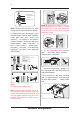
11. Move the door to appropriate
position, adjust part① and the door,
Move the connecting wire② in the slot
of the door from left to right,and then
fix part① and wire② by screws③ .
(Please hold the door by hand when
installing)