
Quick Start Guide

5
────────────────────────────────────────────────────
Display Screen and Setting Screen
────────────────────────────────────────────────────
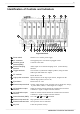
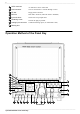
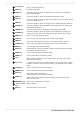
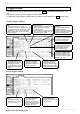
Waveform display screen
The screen shown below appears immediately after the power switch is turned on. The waveform
display screen can also be displayed by pressing the red
DISP
key. The following explains the
displayed items and the items that can be set in the waveform display screen.
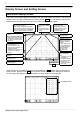
Indicates the measurement
function
(Memory/Recorder/R&M/FFT)
When the flashing cursor is
located here, the function
key can be used to switch
functions.
Indicates the time axis (horizontal axis)
and sampling frequency
The screen shows the time (/DIV)
per DIV (grid) and the sampling time
(/S). The function k ey or TIME/DIV
knob is used to switch the display.
Indicates the trigger
mode (single / repeat
/ auto)
The function key is
used to switch the
mode.
Indicates pre-trigger
Used to set the
percentage of the pre-
trigger waveform to be
acquired in the total
recording length.
Indicates the recording length
and recording time
Used to set the length
(time) to be recorded in a
single acquisition
operation. The function key
is used to change the
setting.
Indicates the displayed
channel.
Indicates time-axis
zoom (horizontal
axis)
A waveform can be
magnified or
compressed along
the time axis. The
function key is
used to change the
zoom rate.
Indicates the trigger
activation point.
Indicates the elapsed time
from the trigger.
Indicates the current
date and time.
Indicates operation
settings other than
those for waveform
loading
From the left, the
icons indicate the
following settings:
Calculation
Auto print
Auto save
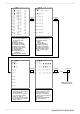
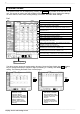
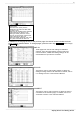
CH setting key
Other se ttings can be made by pressing the CH setting key (
F9
function key) in the waveform
display screen. Each time the
F9
key is pressed, the CH setting screen changes as shown on
the next page, and displays channel information or allows setting to be performed.
CH setting screen
F9
Display Screen and Setting Screen