
Quick Start Guide


35
────────────────────────────────────────────────────
External Memory Devices
────────────────────────────────────────────────────
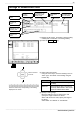
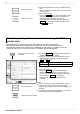
(9) When saving data in text form, set a data thinning
rate.
Move the flashing cursor to "Save Thin," and select
a thinning rate.
(10) Start measurement.
Press the START
key to start measurement. After
data of the set recording length is obtained, the
data is automatically saved. To stop the
measurement or auto-save operation, press the
STOP
key. To forcibly stop the operation, press
the STOP
key twice.
Starts measurement
Stops measurement
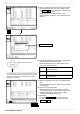
Real-time printing of measurement data (using the 8994
printer unit)
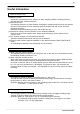
(1) Press the SYSTEM key several times and select
"PRINTER" in the menu screen.
(2) Using the cursor keys, move the flashing cursor to
"Realtime Print," and select a setting using the
F4
and F5 keys.
Real-time printing is possible only when "Recorder" is selected as the function
Measurement data can be continuously printed in real time. A measured waveform is
automatically printed at the same time it is displayed on the screen. For details, refer to 9.4
"Printer Screen" and 9.4.3 "Real Time Pr int" in the 8855 Quick Start Manual.
Press several times to select
"PRINTER."
OFF Does not print in real time
ON Prints in real time
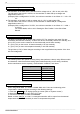
(3) Start measurement.
Press the START
key to start measurement.
When measurement starts, the printer prints as
soon as the screen begins displaying a waveform.
By pressing the PRINT
key during the
measurement, printing can be paused and
resumed.
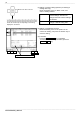
Note
For a long time-axis range of 200 ms/DIV or more,
there will be a delay in printing. If the recording
length is set to "Continuous," real-time printing is not
possible.
The printing density may vary depending on the time-
axis setting and ambient temperature.
Start measurement
Pauses and resumes printing