
Quick Start Guide


23
────────────────────────────────────────────────────
Measurement Method
────────────────────────────────────────────────────
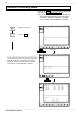
2. Channel setting
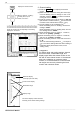
(1) Press the CHAN key to display the channel
screen.
(2) Make sure CH1 is selected. Using the cursor keys,
move the flashing cursor to "Range." If CH1 is not
selected, press the F3
key to select CH1 before
moving the cursor to "Range."
(3) Press the function key to set the range to "200 mV"
(200 mV/DIV x 20 DIV results in
2 V because the
full scale of the external sensor amp is
2 V).
(4) Convert voltage (V) to acceleration (G).
Move the flashing cursor to "Scaling," and set the
scaling to "ENG."
Move the flashing cursor to "Scaling Kind," and set
the "Scaling Kind" to "POINT."
(5) Move the flashing cursor to "Input P1 - Scale P1,"
and set it to "[2.0000] - [5.0000]."
(6) Move the flashing cursor to "Input P2 - Scale P2,"
and set it to "[-2.0000] - [-5.0000]."
(7) Move the flashing cursor to "Unit," and set the unit
to " G."
Since the external amp produces a
2 V output at
5 G, the above settings allow the direct reading of
measured values (level monitor value, cursor
reading value).
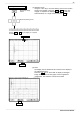
< Key point >
For easier range and scaling settings, observe
the level m onitor, measurable range, and
display upper-/lower-limit values shown on the
left side of each channel screen. If the external
amp has a calibration or maxi mum output
function, it is recommended to confirm that the
set ranges are correct by observing the level
monitor and numerical values.
Press the function key corresponding to the setting
displayed in the screen.
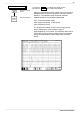
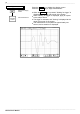
Channel screen
Display the channel screen.
Move to "Range," "Scaling,"
"Scaling kind," "Input/
Scale," and "Unit."
Numerical display
(currently input level value)
Level monitor display
Measurable range
Display range
This screen displays values and units
according to the entered scaling settings.