
User Manual


524
────────────────────────────────────────────────────
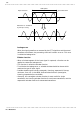
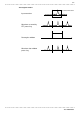
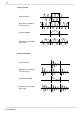
21.5 Waveform Viewer (Wv)
────────────────────────────────────────────────────
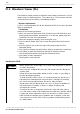
H
andling the CD-R
CAUTIO
N
・Always hold the disc by the edges, so as not to make fingerprints on the disc
or scratch the printing.
・Never touch the recorded side of the disc. Do not place the disc directly on
anything hard.
・Do not wet the disc with volatile alcohol or water, as there is a possibility of
the label printing disappearing.
・To write on the disc label surface, use a spirit-based felt pen. Do not use a
ball-point pen or hard-tipped pen, because there is a danger of scratching
the surface and corrupting the data. Do not use adhesive labels.
・Do not expose the disc directly to the sun’s rays, or keep it in conditions of
high temperature or humidity, as there is a danger of warping, with
consequent loss of data.
・To remove dirt, dust, or fingerprints from the disc, wipe with a dry cloth, or
use a CD cleaner. Always wipe radially from the inside to the outside, and do
no wipe with circular movements. Never use abrasives or solvent cleaners.
・Hioki shall not be held liable for any problems with a computer system that
arises from the use of this CD-R, or for any problem related to the purchase
of a Hioki product.
2
1.5 Waveform Viewer (Wv)
The waveform viewer provides a simplified view of data transferred to a PC by
remote control or data acquisition. The viewer has a CSV conversion function.
Converted files may be read by a spreadsheet program.
■System requirements
For a PC running Windows 95, 98, Me, Windows NT4.0 SP3 or later, Windows
2000, or Windows XP
■ Installation
Install by the following procedure:
1. When you insert the Application Disk (CD-R) into the CD-ROM drive, the
opening page should appear automatically. If it does not appear, open the
"index.htm" file with your Web browser.
2. Select the language to display (click the English icon).
3. Click the [Wave viewer (Wv)] icon to view Wv specifications and revision
history.
4. Click the [Install] icon at the top right of the page to open the [File
Download] dialog.
5. Click [Open] to display the confirmation dialog to proceed with installation.
6. Click [Next] to open the installation destination selection window.
Click the [Browse] button to change the installation folder.
7. Click [Next] to start installation.
The program is now installed.