
User Manual


75
────────────────────────────────────────────────────
5.3 STATUS Settings (REC)
────────────────────────────────────────────────────
1
2
3
4
5
6
7
8
9
10
11
12
13
14
A
5
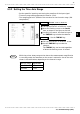
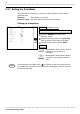
.3.2 Setting the Time Axis Range
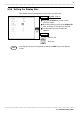
Screen: STATUS, DISPLAY
Call up the STATUS or DISPLAY screen.
Move the flashing cursor to the time/div
item, as shown in the figure on the left.
Use the JOG control, the function keys or
the TIME/DIV key to make the selection.
Method
Method-1
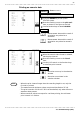
Method
Method-2
Call up the STATUS or DISPLAY screen.
Use the TIME/DIV key to make the
selection.
The TIME/DIV key can be used regardless
of where the flashing cursor is located.
:Use the TIME/DIV ke
y
NOTE
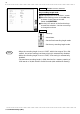
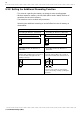
Time-axis range Magnification
50 ms/DIV ×1/2
20 ms/DIV ×1/10
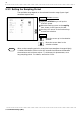
・Set the speed for inputting and storing the waveform of the input signal.
・Time axis range setting expresses the time for 1 DIV.
・The sampling period is 1/100th of the set value for the time axis range. (100
samples/DIV)
While the printer always outputs the data at the measurement magnification
in recording mode, the waveform on the screen is reduced in size at the ratio
shown in the table below, depending on the time-axis range.