
Operating Instruction AG 600-A36 (02)
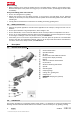


Table Of Contents
- Original operating instructions
- 1 Information about the documentation
- 2 Safety
- 3 Description
- 4 Technical data
- 5 Before use
- 6 Operation
- 7 Care, maintenance, transport and storage
- 8 Troubleshooting
- 9 Disposal
- 10 Manufacturer’s warranty
- Mode d'emploi original
- 1 Indications relatives à la documentation
- 2 Sécurité
- 2.1 Indications générales de sécurité pour les appareils électriques
- 2.2 Consignes de sécurité générales pour le meulage, le ponçage au papier abrasif, les travaux avec des brosses métalliques, le polissage et le tronçonnage :
- 2.3 Consignes de sécurité supplémentaires
- 2.4 Utilisation et emploi soigneux des batteries
- 3 Description
- 3.1 Vue d'ensemble du produit
- 3.2 Utilisation conforme à l'usage prévu
- 3.3 Éléments livrés
- 3.4 Système de protection thermique du moteur
- 3.5 Carter de protection avec cache avant
- 3.6 Capot dépoussiéreur compact pour travaux de tronçonnage DC-EX 125/5 C (accessoire)
- 3.7 Capot dépoussiéreur (meulage) DG-EX 125/5 (accessoire)
- 3.8 Consommables
- 3.9 Indicateur de l'état de charge de l'accu Li-Ion
- 4 Caractéristiques techniques
- 5 Mise en service
- 5.1 Introduction de l'accu
- 5.2 Retrait de l'accu
- 5.3 Montage de la poignée latérale
- 5.4 Montage ou démontage du carter de protection
- 5.5 Montage ou démontage du cache avant
- 5.6 Positionnement du capot dépoussiéreur compact DC-EX 125/5 C
- 5.7 Montage ou démontage des outil amovibles
- 5.7.1 Montage de l'outil amovible
- 5.7.2 Démontage de l'outil amovible
- 5.7.3 Montage de l'outil amovible avec écrou à serrage rapide Kwik lock
- 5.7.4 Démontage de l'outil amovible avec écrou à serrage rapide Kwik lock
- 5.7.5 Montage de l'outil amovible avec filetage intégré
- 5.7.6 Démontage de l'outil amovible
- 6 Utilisation
- 7 Nettoyage, entretien, transport et entreposage
- 8 Aide au dépannage
- 9 Recyclage
- 10 Garantie constructeur
- Manual de instrucciones original
- 1 Información sobre la documentación
- 2 Seguridad
- 2.1 Indicaciones generales de seguridad para herramientas eléctricas
- 2.2 Indicaciones de seguridad generales para las aplicaciones de lijado, lijado con papel de lija, trabajos con cepillos de alambre, pulido y tronzado con muelas:
- 2.3 Indicaciones de seguridad adicionales
- 2.4 Manipulación y utilización segura de las baterías
- 3 Descripción
- 3.1 Vista general del producto
- 3.2 Uso conforme a las prescripciones
- 3.3 Suministro
- 3.4 Protección de la herramienta en función de la temperatura
- 3.5 Cubierta protectora con tapa delantera
- 3.6 Protector antipolvo para trabajos de tronzado DC-EX 125/5 C cubierta compacta (accesorio)
- 3.7 Protector antipolvo (lijado) DG-EX 125/5 (accesorios)
- 3.8 Material de consumo
- 3.9 Indicador del estado de carga de la batería de Ion-Litio
- 4 Datos técnicos
- 5 Puesta en servicio
- 6 Manejo
- 7 Cuidado, mantenimiento, transporte y almacenamiento
- 8 Ayuda en caso de averías
- 9 Reciclaje
- 10 Garantía del fabricante
- Manual de instruções original
- 1 Indicações sobre a documentação
- 2 Segurança
- 3 Descrição
- 3.1 Vista geral do produto
- 3.2 Utilização conforme a finalidade projectada
- 3.3 Incluído no fornecimento
- 3.4 Protecção da ferramenta dependente da temperatura
- 3.5 Resguardo do disco com tampa dianteira
- 3.6 Dispositivo de extracção de pó para trabalhos de corte DC-EX 125/5 C (acessório)
- 3.7 Dispositivo de extracção de pó (rebarbar) DG-EX 125/5 (acessório)
- 3.8 Consumíveis
- 3.9 Indicador do estado de carga da bateria de iões de lítio
- 4 Características técnicas
- 5 Antes de iniciar a utilização
- 6 Utilização
- 7 Conservação, manutenção, transporte e armazenamento
- 8 Ajuda em caso de avarias
- 9 Reciclagem
- 10 Garantia do fabricante

*2106619*
2106619 English 11
5.7.3 Fitting an accessory tool secured with a Kwik lock nut 11
CAUTION
Risk of breakage. Heavy wear (abrasion) may cause the Kwik lock nut to break.
▶
When working with the power tool, make sure that the Kwik lock nut doesn’t come into contact with the
working surface.
▶
Do not use a damaged Kwik lock nut.
The optional Kwik lock nut can be used instead of the standard clamping nut. Accessory tools (discs
etc.) can then be changed without need for additional tools (keyless system).
1. Remove the battery. → page 9
2. Clean the clamping flange and the quick-release clamping nut.
3. Fit the clamping flange onto the drive spindle.
4. Fit the accessory tool.
5.
Screw on the Kwik lock nut until it is seated against the accessory tool.
◁
The name Kwik lock should be visible when the nut is screwed on.
6. Press the spindle lockbutton and hold it in this position.
7.
Turn the accessory tool firmly by hand in a clockwise direction until the Kwik lock nut is tightened
securely and then release the spindle lockbutton.
5.7.4 Removing an accessory tool secured with a Kwik lock nut
1. Remove the battery. → page 9
CAUTION
Risk of breakage and irreparable damage. If the spindle lockbutton is pressed while the spindle is rotating,
this may cause the accessory tool to work loose or detach from the power tool.
▶ Press the spindle lockbutton only when the spindle has stopped rotating.
2. Press the spindle lockbutton and hold it in this position.
3.
Release the Kwik lock nut by turning it counterclockwise by hand.
4.
If the Kwik lock nut cannot be released by turning it by hand, use a pin wrench to turn the nut in a
counterclockwise direction.
Never use a pipe wrench! A pipe wrench could damage the Kwik lock nut.
5. Release the spindle lockbutton and remove the accessory tool.
5.7.5 Fitting a threaded accessory tool
1. Remove the battery. → page 9
2. Screw the accessory tool onto the drive spindle.
3. Press the spindle lockbutton and hold it in this position.
4. Use an open-end wrench to tighten the accessory tool securely and then release the spindle lockbutton.
5.7.6 Removing the accessory tool
1. Remove the battery. → page 9
CAUTION
Risk of breakage and irreparable damage. If the spindle lockbutton is pressed while the spindle is rotating,
this may cause the accessory tool to work loose or detach from the power tool.
▶ Press the spindle lockbutton only when the spindle has stopped rotating.
2. Press the spindle lockbutton and hold it in this position.
3. Use an open-end wrench to release the accessory tool.
4. Release the spindle lockbutton and remove the accessory tool.
Printed: 07.03.2018 | Doc-Nr: PUB / 5246614 / 000 / 01