
Operating Instruction AG 600-A36 (02)
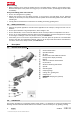
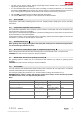


Table Of Contents
- Original operating instructions
- 1 Information about the documentation
- 2 Safety
- 3 Description
- 4 Technical data
- 5 Before use
- 6 Operation
- 7 Care, maintenance, transport and storage
- 8 Troubleshooting
- 9 Disposal
- 10 Manufacturer’s warranty
- Mode d'emploi original
- 1 Indications relatives à la documentation
- 2 Sécurité
- 2.1 Indications générales de sécurité pour les appareils électriques
- 2.2 Consignes de sécurité générales pour le meulage, le ponçage au papier abrasif, les travaux avec des brosses métalliques, le polissage et le tronçonnage :
- 2.3 Consignes de sécurité supplémentaires
- 2.4 Utilisation et emploi soigneux des batteries
- 3 Description
- 3.1 Vue d'ensemble du produit
- 3.2 Utilisation conforme à l'usage prévu
- 3.3 Éléments livrés
- 3.4 Système de protection thermique du moteur
- 3.5 Carter de protection avec cache avant
- 3.6 Capot dépoussiéreur compact pour travaux de tronçonnage DC-EX 125/5 C (accessoire)
- 3.7 Capot dépoussiéreur (meulage) DG-EX 125/5 (accessoire)
- 3.8 Consommables
- 3.9 Indicateur de l'état de charge de l'accu Li-Ion
- 4 Caractéristiques techniques
- 5 Mise en service
- 5.1 Introduction de l'accu
- 5.2 Retrait de l'accu
- 5.3 Montage de la poignée latérale
- 5.4 Montage ou démontage du carter de protection
- 5.5 Montage ou démontage du cache avant
- 5.6 Positionnement du capot dépoussiéreur compact DC-EX 125/5 C
- 5.7 Montage ou démontage des outil amovibles
- 5.7.1 Montage de l'outil amovible
- 5.7.2 Démontage de l'outil amovible
- 5.7.3 Montage de l'outil amovible avec écrou à serrage rapide Kwik lock
- 5.7.4 Démontage de l'outil amovible avec écrou à serrage rapide Kwik lock
- 5.7.5 Montage de l'outil amovible avec filetage intégré
- 5.7.6 Démontage de l'outil amovible
- 6 Utilisation
- 7 Nettoyage, entretien, transport et entreposage
- 8 Aide au dépannage
- 9 Recyclage
- 10 Garantie constructeur
- Manual de instrucciones original
- 1 Información sobre la documentación
- 2 Seguridad
- 2.1 Indicaciones generales de seguridad para herramientas eléctricas
- 2.2 Indicaciones de seguridad generales para las aplicaciones de lijado, lijado con papel de lija, trabajos con cepillos de alambre, pulido y tronzado con muelas:
- 2.3 Indicaciones de seguridad adicionales
- 2.4 Manipulación y utilización segura de las baterías
- 3 Descripción
- 3.1 Vista general del producto
- 3.2 Uso conforme a las prescripciones
- 3.3 Suministro
- 3.4 Protección de la herramienta en función de la temperatura
- 3.5 Cubierta protectora con tapa delantera
- 3.6 Protector antipolvo para trabajos de tronzado DC-EX 125/5 C cubierta compacta (accesorio)
- 3.7 Protector antipolvo (lijado) DG-EX 125/5 (accesorios)
- 3.8 Material de consumo
- 3.9 Indicador del estado de carga de la batería de Ion-Litio
- 4 Datos técnicos
- 5 Puesta en servicio
- 6 Manejo
- 7 Cuidado, mantenimiento, transporte y almacenamiento
- 8 Ayuda en caso de averías
- 9 Reciclaje
- 10 Garantía del fabricante
- Manual de instruções original
- 1 Indicações sobre a documentação
- 2 Segurança
- 3 Descrição
- 3.1 Vista geral do produto
- 3.2 Utilização conforme a finalidade projectada
- 3.3 Incluído no fornecimento
- 3.4 Protecção da ferramenta dependente da temperatura
- 3.5 Resguardo do disco com tampa dianteira
- 3.6 Dispositivo de extracção de pó para trabalhos de corte DC-EX 125/5 C (acessório)
- 3.7 Dispositivo de extracção de pó (rebarbar) DG-EX 125/5 (acessório)
- 3.8 Consumíveis
- 3.9 Indicador do estado de carga da bateria de iões de lítio
- 4 Características técnicas
- 5 Antes de iniciar a utilização
- 6 Utilização
- 7 Conservação, manutenção, transporte e armazenamento
- 8 Ajuda em caso de avarias
- 9 Reciclagem
- 10 Garantia do fabricante

10 English 2106619
*2106619*
1. Position the front cover with the closed side on the standard guard and push it on until it engages.
2. To remove it, release the catch for the front cover and then lift the front cover away from the standard
guard.
5.6 Positioning the DC-EX 125/5" C compact guard 9
▶ Position the compact guard so that the on/off switch remains easily accessible and operable at all times.
5.7 Fitting and removing accessory tools
WARNING
Risk of injury. The accessory tool may work loose due to the braking effect of the motor.
▶ Wait until the accessory tool has come to a standstill before touching or gripping the accessory tool or
the clamping nut.
▶ Secure the accessory tool by tightening the clamping flange and clamping nut firmly so that no parts
work loose from the spindle due to the braking effect of the motor.
CAUTION
Risk of injury. The accessory tool may be hot.
▶ Wear protective gloves when changing the accessory tool.
CAUTION
Danger if accessory tool with integrated thread works loose! Incorrect installation of the accessory tool
can result in serious injury.
▶ Always tighten the accessory tool with integrated thread until it is hand-tight.
Diamond discs must be replaced when their cutting or grinding performance drops significantly. This
generally is the case when the segments reach a height of less than 1/16".
Other discs must be replaced when their cutting performance drops significantly or other parts of the
angle grinder (not the disc) come into contact with the material you are working on.
Abrasive discs must be replaced when their expiry date has been reached.
5.7.1 Fitting an accessory tool 10
1. Remove the battery. → page 9
2. Clean the clamping flange and the clamping nut.
3. Fit the clamping flange onto the drive spindle.
4. Fit the accessory tool.
5. Screw on the clamping nut corresponding to the type of accessory tool fitted.
6. Press the spindle lockbutton and hold it in this position.
7. Use the pin wrench to tighten the clamping nut securely, then release the spindle lockbutton and remove
the wrench.
5.7.2 Removing the accessory tool
1. Remove the battery. → page 9
CAUTION
Risk of breakage and irreparable damage. If the spindle lockbutton is pressed while the spindle is rotating,
this may cause the accessory tool to work loose or detach from the power tool.
▶ Press the spindle lockbutton only when the spindle has stopped rotating.
2. Press the spindle lockbutton and hold it in this position.
3. Release the clamping nut by gripping it with the wrench and turning the nut counterclockwise.
4. Release the spindle lockbutton and remove the accessory tool.
Printed: 07.03.2018 | Doc-Nr: PUB / 5246614 / 000 / 01