
Use and Care Manual


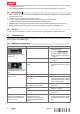

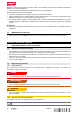
Table Of Contents
- Original operating instructions
- 1 Information about the documentation
- 2 Safety
- 3 Description
- 4 Technical data
- 5 Use of extension cords
- 6 Before use
- 7 Operation
- 7.1 Operation without use of the electric tool power outlet
- 7.2 Operation with use of the power outlet on the appliance
- 7.3 Picking up dry dust
- 7.4 Vacuuming up liquids
- 7.5 After use of the vacuum cleaner
- 7.6 Emptying dry dust from the waste material container
- 7.7 Emptying the waste material container when no dust bag is fitted (picking up liquids)
- 8 Care and maintenance
- 9 Transport and storage
- 10 Troubleshooting
- 11 Disposal
- 12 Manufacturer’s warranty
- Notice d'utilisation originale
- 1 Indications relatives à la documentation
- 2 Sécurité
- 3 Description
- 4 Caractéristiques techniques
- 5 Utilisation de rallonges électriques
- 6 Mise en service
- 7 Utilisation
- 7.1 Fonctionnement sans utilisation de la prise de l'appareil
- 7.2 Fonctionnement avec utilisation de la prise de l'appareil
- 7.3 Aspiration de poussières sèches
- 7.4 Aspiration de liquides
- 7.5 Après aspiration
- 7.6 Vidage de la cuve de récupération de saletés en cas de poussières sèches
- 7.7 Vidage de la cuve de récupération de saletés sans sac à poussières (en cas d'aspiration de liquides)
- 8 Nettoyage et entretien
- 9 Transport et stockage
- 10 Aide au dépannage
- 11 Recyclage
- 12 Garantie constructeur
- Manual de instrucciones original
- 1 Información sobre la documentación
- 2 Seguridad
- 3 Descripción
- 4 Datos técnicos
- 5 Uso de alargadores
- 6 Puesta en servicio
- 7 Manejo
- 7.1 Funcionamiento sin uso de la toma de corriente del aspirador
- 7.2 Funcionamiento con uso de la toma de corriente de la herramienta
- 7.3 Aspiración de polvo seco
- 7.4 Aspiración de líquidos
- 7.5 Después de aspirar
- 7.6 Vaciado del depósito de suciedad con polvo seco
- 7.7 Vaciado del depósito de suciedad sin saco para polvo (con líquidos)
- 8 Cuidado y mantenimiento
- 9 Transporte y almacenamiento
- 10 Ayuda en caso de averías
- 11 Reciclaje
- 12 Garantía del fabricante
- Manual de instruções original
- 1 Indicações sobre a documentação
- 2 Segurança
- 3 Descrição
- 4 Características técnicas
- 5 Utilização de extensões de cabo
- 6 Colocação em funcionamento
- 7 Utilização
- 7.1 Trabalhar sem o aparelho utilizando a tomada embutida no aparelho
- 7.2 Trabalhar com o aparelho utilizando a tomada embutida no aparelho
- 7.3 Aspirar pós secos
- 7.4 Aspirar líquidos
- 7.5 Após a aspiração
- 7.6 Esvaziar o contentor em caso de pós secos
- 7.7 Esvaziar o contentor sem saco colector do pó (no caso de líquidos)
- 8 Conservação e manutenção
- 9 Transporte e armazenamento
- 10 Ajuda em caso de avarias
- 11 Reciclagem
- 12 Garantia do fabricante

12 English 2268128
*2268128*
▶ After using it to vacuum up liquids, do not tilt the vacuum cleaner and transport the vacuum cleaner in
the upright position only.
▶ Use the tapered adapter to connect both ends of the hose together conveniently for transport.
9.2 Securing cases 4
1. Make sure that the vacuum cleaner is standing firmly and apply the holding brake. Pull the transport
handle all the way out.
2. Position one or more cases on the vacuum cleaner.
▶ It is not permissible for the case/cases to project above the transport handle.
▶ Do not exceed the maximum permissible weight for additional load.
3. Pull the lashing strap out of the holder and over the cases. Extend the lashing strap as necessary.
4. Engage the hook of the lashing strap on the transport handle and tighten the lashing strap.
9.3 Storage
▶ Store the vacuum cleaner in a secure, dry place where it is inaccessible to unauthorized users.
10 Troubleshooting
If the trouble you are experiencing is not listed in this table or you are unable to remedy the problem by
yourself, please contact Hilti Service.
10.1 Malfunction, vacuum cleaner
Malfunction Possible cause Action to be taken
Change filter service indica-
tor lights up.
Filter element is clogged or too old. ▶ Check the fill level in the waste
material container.
▶
Press the Manual cleaning
operating button. → page 6
▶ Change the filter, if necessary.
→ page 11
No filter element inserted. ▶ Insert a suitable filter element.
→ page 11
The appliance doesn’t start or
switches itself off after a short
time.
The water level cut-out is acti-
vated.
▶ Clean the sensors and the
area around the sensors with a
brush.
No suction power or reduced
suction power.
The dust bag is full. ▶ Change the dust bag.
The filter element is clogged with
dirt or dust.
▶ If the automatic filter cleaning
system is deactivated, activate
it and allow the vacuum cleaner
to run for 30 seconds.
The suction hose or dust hood on
the electric tool is blocked.
▶ Clean the suction hose and the
dust hood.
Dust is blown out of the appli-
ance.
The filter element is not fitted cor-
rectly.
▶ Correctly re-install the filter
element. → page 11
The filter element is damaged. ▶ Install a new filter element.
→ page 11
The appliance switches it-
self off or on inadvertently or
static electricity discharges
through the user.
Electrostatic charge is not
conducted away – the
appliance is connected to an
unearthed/ungrounded power
outlet.
▶ Connect the appliance to an
earthed/grounded power outlet
and use an anti-static suction
hose.