
Use and Care Manual
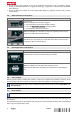


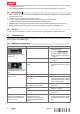

Table Of Contents
- Original operating instructions
- 1 Information about the documentation
- 2 Safety
- 3 Description
- 4 Technical data
- 5 Use of extension cords
- 6 Before use
- 7 Operation
- 7.1 Operation without use of the electric tool power outlet
- 7.2 Operation with use of the power outlet on the appliance
- 7.3 Picking up dry dust
- 7.4 Vacuuming up liquids
- 7.5 After use of the vacuum cleaner
- 7.6 Emptying dry dust from the waste material container
- 7.7 Emptying the waste material container when no dust bag is fitted (picking up liquids)
- 8 Care and maintenance
- 9 Transport and storage
- 10 Troubleshooting
- 11 Disposal
- 12 Manufacturer’s warranty
- Notice d'utilisation originale
- 1 Indications relatives à la documentation
- 2 Sécurité
- 3 Description
- 4 Caractéristiques techniques
- 5 Utilisation de rallonges électriques
- 6 Mise en service
- 7 Utilisation
- 7.1 Fonctionnement sans utilisation de la prise de l'appareil
- 7.2 Fonctionnement avec utilisation de la prise de l'appareil
- 7.3 Aspiration de poussières sèches
- 7.4 Aspiration de liquides
- 7.5 Après aspiration
- 7.6 Vidage de la cuve de récupération de saletés en cas de poussières sèches
- 7.7 Vidage de la cuve de récupération de saletés sans sac à poussières (en cas d'aspiration de liquides)
- 8 Nettoyage et entretien
- 9 Transport et stockage
- 10 Aide au dépannage
- 11 Recyclage
- 12 Garantie constructeur
- Manual de instrucciones original
- 1 Información sobre la documentación
- 2 Seguridad
- 3 Descripción
- 4 Datos técnicos
- 5 Uso de alargadores
- 6 Puesta en servicio
- 7 Manejo
- 7.1 Funcionamiento sin uso de la toma de corriente del aspirador
- 7.2 Funcionamiento con uso de la toma de corriente de la herramienta
- 7.3 Aspiración de polvo seco
- 7.4 Aspiración de líquidos
- 7.5 Después de aspirar
- 7.6 Vaciado del depósito de suciedad con polvo seco
- 7.7 Vaciado del depósito de suciedad sin saco para polvo (con líquidos)
- 8 Cuidado y mantenimiento
- 9 Transporte y almacenamiento
- 10 Ayuda en caso de averías
- 11 Reciclaje
- 12 Garantía del fabricante
- Manual de instruções original
- 1 Indicações sobre a documentação
- 2 Segurança
- 3 Descrição
- 4 Características técnicas
- 5 Utilização de extensões de cabo
- 6 Colocação em funcionamento
- 7 Utilização
- 7.1 Trabalhar sem o aparelho utilizando a tomada embutida no aparelho
- 7.2 Trabalhar com o aparelho utilizando a tomada embutida no aparelho
- 7.3 Aspirar pós secos
- 7.4 Aspirar líquidos
- 7.5 Após a aspiração
- 7.6 Esvaziar o contentor em caso de pós secos
- 7.7 Esvaziar o contentor sem saco colector do pó (no caso de líquidos)
- 8 Conservação e manutenção
- 9 Transporte e armazenamento
- 10 Ajuda em caso de avarias
- 11 Reciclagem
- 12 Garantia do fabricante

*2268128*
2268128 English 9
6. Check to ensure that the suction head is fitted correctly and secured.
7. Connect the suction hose.
6.2 Inserting a premium dust bag 2
Sharp pointed objects could pierce through the dust bag.
Check that no objects have pierced through the dust bag.
1. Disconnect the supply cord plug from the power outlet.
2. Open the two catches.
3. Lift the vacuum cleaner top section away from the waste material container.
4. Insert the premium dust bag into the waste material container.
5. Make sure that the adapter engages correctly and that the dust bag does not project past the edge of
the waste material container.
6. Fit the vacuum cleaner top section onto the waste material container.
7. Close the two catches.
8. Check to ensure that the vacuum cleaner top section is fitted correctly and secured.
9. Connect the suction hose.
6.3 Changing dust bag (plastic)
7 Operation
7.1 Operation without use of the electric tool power outlet
1. Check that the switch on the appliance is in the “OFF” position off before plugging the supply cord into
a power outlet.
2. Plug the vacuum cleaner’s supply cord into the power outlet.
3. Turn the control switch to the “ON” position.
7.2 Operation with use of the power outlet on the appliance
The power outlet on the appliance is to be used only for powering electric tools directly from the
vacuum cleaner.
The operating instructions and safety instructions for the electric tool plugged into the power outlet on
the vacuum cleaner must be observed.
1. Unplug the vacuum cleaner’s supply cord from the power outlet.
2. Check that the maximum power drawn by the electric tool is below the maximum permissible output of
the power outlet on the vacuum cleaner (please refer to the “Technical data” section of the operating
instructions and information printed at the power outlet on the appliance).
3. Check to ensure that the electric tool is switched off before plugging its supply cord into the power outlet.
4. Plug the electric tool’s supply cord into the power outlet on the vacuum cleaner.
5. Plug the vacuum cleaner’s supply cord into the power outlet.
6. Turn the control switch to the “Auto” position.
7. Switch on the power tool.
The vacuum cleaner will continue to run for a short time after switching off the electric tool in order
to ensure that all dust is removed from the suction hose.
7.3 Picking up dry dust
Before picking up dry dust, especially dust from mineral materials, always check to ensure that the
correct dust bag is fitted in the container. The material picked up by the vacuum cleaner can then be
disposed of cleanly and easily.