
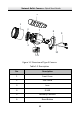
Instructions


Network Bullet Camera·Quick Start Guide
16
16
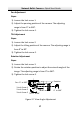
3. If you need to route the cables through the wall (or the ceiling),
dill a cable hole according to the drill template. Skip this step if
you want to route the cables on the surface of the wall (or the
ceiling).
4. Route the cables of the camera.
5. Secure the camera to the wall (or the ceiling) with the supplied
screws.
Drill Template
Drill Template
Secure the Camera Figure 2-6
Note:
● The supplied screw package contains self-tapping screws,
and expansion bolts.
● For cement wall (or ceiling), use expansion bolts to secure
the camera. For wooden wall (or ceiling), use self-tapping
screws.
6. Connect the corresponding cables, such as power cord and
network cable.
7. Power on the camera, and set the network configuration (for
details, refer to Set the Network Camera over the LAN and Access
via Web Browser) to check whether the image is gotten from the
optimum angle. If not, adjust the surveillance angle.