Hillstone StoneOS User Manual Hillstone Hardware Reference Guide www.hillstonenet.
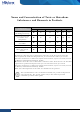
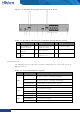
Hillstone Hardware Reference Guide Name and Concentration of Toxic or Hazardous Substances and Elements in Products Component Toxic or hazardous substances and elements Lead Mercury Cadmium Cr6+ PBB PDBE Metal parts (including fasteners) Χ O O O O O Printed circuit board assemblies and components Χ O O O O O Cables and cable assemblies Χ O O O O O Plastics and Polymers Χ O O O Χ Χ Electric components other than circuit boards Χ O O O O O O: Indicates that this toxi
Hillstone Hardware Reference Guide Preface About This Guide Thanks for choosing the network security products from Hillstone Networks, Inc. This document is an installation guide for Hillstone devices to help you install the Hillstone device properly. This guide includes the following chapters: ♦ Chapter 1. Introduction ♦ Chapter 2. Installation Preparations ♦ Chapter 3. Installation ♦ Chapter 4. Boot and Configuration ♦ Chapter 5. Hardware Maintenance and Replacement ♦ Chapter 6.
Hillstone Hardware Reference Guide Table of Contents CHAPTER 1 INTRODUCTION ........................................................................................................................................ 1 OVERVIEW ........................................................................................................................... ERROR! BOOKMARK NOT DEFINED. HARDWARE OVERVIEW ...................................................................................................................
Hillstone Hardware Reference Guide CHAPTER 5 TROUBLESHOOTING ................................................................................................................................. 4 INTRODUCTION ................................................................................................................................................................... 4 LOSING THE ADMINISTRATOR PASSWORD .........................................................................................................
Hillstone Hardware Reference Guide List of Figures Figure Figure Figure Figure Figure Figure Figure Figure Figure Figure Figure 6 1-1: 1-2: 3-1: 3-2: 3-3: 3-4: 3-5: 3-6: 3-7: 4-1: 4-2: Front Panel of SG-6000-E1100 (WLAN version) ........................................... 1 SG-6000-E1100 (WLAN version) Back Panel ............................................... 2 Installing the Rubber Pads ...................................................................... 11 Installing the Floating Nuts .............
Hillstone Hardware Reference Guide List of Tables Table 1-1: Front Panel Description of SG-6000-E1100 (WLAN version) ...................................................................... 1 Table 1-2: Back Panel Description of SG-6000-E1100 (WLAN version) ....................................................................... 2 Table 1-3: Front Panel LED Descriptions .....................................................................................................................
Hillstone Hardware Reference Guide Chapter 1 Introduction Hardware Overview A device can be installed in a cabinet/rack or placed on a workbench. Front Panel Figure 1-1: Front Panel of SG-6000-E1100 (WLAN version) Table 1-1: Front Panel Description of SG-6000-E1100 (WLAN version) No. Label No. Label No.
Hillstone Hardware Reference Guide Figure 1-2: SG-6000-E1100 (WLAN version) Back Panel Table 1-2: Back Panel Description of SG-6000-E1100 (WLAN version) No. Label No. Label No. Label 1 DC POWER: DC power interface 4 SMA connectors for WLAN antennas 7 Security keyhole 2 CLR: CLR button 5 USB: USB port - - 3 CON: Console port 6 e0/0 - e0/8: Gigabit Ethernet port - - LED Indicators The following table describes the meanings of LED indicators on the front panels of Hillstone devices.
Hillstone Hardware Reference Guide PS0 PS1 HA FAN VPN SD LNK ACT e0/0e0/8 3 Orange/Always on The trial license has expired and there is no legitimate license installed in the system. Off The system is running normally. Green/Always on Power Supply PS0 is running normally. Orange/Always on Power Supply PS0 is running normally, but its fan has failed. Change the power supply immediately. Off Power Supply PS0 is powered off or has failed.
Hillstone Hardware Reference Guide WLAN Off There is no connection between this port with the its peer device, or the link between this port and its peer device fails. Green/Always on The device discovers the built-in WLAN module. Green/Blinking The WLAN module is sending or receiving data. Notes: ♦ The STA and ALM LEDs will both turn red when there is a boot failure caused by OS software damage. Contact your sales representative if this occurs.
Hillstone Hardware Reference Guide Ports This section introduces attributes of interfaces (ports) on the Hillstone devices, including console port, auxiliary port, USB port, gigabit copper port, SFP port and XFP port. Console Port Hillstone device provides an RS-232C asynchronous serial console port for you to configure the device. Attributes for the console (CON) port are shown in the following table.
Hillstone Hardware Reference Guide Attribute Description Negotiation Mode 1.1/2.0 autosensing Gigabit Copper Port Hillstone device provides several fixed gigabit copper ports; the gigabit Combo port also supports the copper cable connection. Attributes for the gigabit copper port are shown in the following table.
Hillstone Hardware Reference Guide Hot-swappable: According to whether the power supply is hot-swappable or not, the power supply is classifies into three types: ♦ Hot-swappable power supplies are removable modules which can be replaced at any time; ♦ Fixed power supplies are irreplaceable and cannot be removed. ♦ External power adapter connects to the external AC power supply. For instructions on how to replace power supply modules, refer to Installing and Removing the Power Supply Module.
Hillstone Hardware Reference Guide Chapter 2 Installation Preparations Introduction To prevent personnel injury and equipment damage, please carefully read all the safety warnings and cautions in this chapter before the installation. Hillstone products are designed for indoor use.
Hillstone Hardware Reference Guide ♦ Use electromagnetic shielding when necessary. Grounding Requirements To use the device more safely: ♦ Ensure that the grounding screw of the chassis is well grounded via the grounding wire. ♦ Ensure that the grounding pin of the power plug is well grounded.
Hillstone Hardware Reference Guide ♦ Cables: Power cable, console cable and Ethernet cable.
Hillstone Hardware Reference Guide Chapter 3 Installation Before Installation A yellow seal with dark ink characters is stuck on a mounting screw of the chassis. Keep the seal intact. The sales representative will check this seal before maintenance operation. Please get the permission of your sales representative before opening the chassis yourself. Warranty will be void if you disassemble the chassis without authorization.
Hillstone Hardware Reference Guide ♦ Make sure the workbench is stable and well grounded. ♦ Make sure the intake and the exhaust vents are unblocked, and keep the device well ventilated. ♦ Do not place any heavy object on the top of the chassis. Installing the Device on a Rack Before mounting the device on a rack, ensure that the power is off, and the rack is stable enough and well grounded. Hillstone devices are designed for a 19-inch standard rack.
Hillstone Hardware Reference Guide Figure 3-3: Installing the Rack-mounting Ears (1U Chassis as example) Step 3: Take out screws from the accessory box and fasten the rack-mounting ears of the chassis in the rack with the screws. Keep the center of the rack-mounting ear and the center of the rack hole horizontally even, as shown in Figure 3-4. Figure 3-4: Installing the Device in a Rack (1U Chassis as example) Cautions: ♦ The rack-mounting ears cannot bear weight.
Hillstone Hardware Reference Guide Connecting the Ground Wire To meet safety requirements, you must correctly connect the grounding screw on the chassis to the earth ground by a grounding wire. The grounding resistance should be less than 5Ω. Figure 3-5: Connecting the Ground Wire (1U Chassis as example) Warning: The correct connection of the ground wire on the chassis is an essential safeguard against lightning shocks and interference.
Hillstone Hardware Reference Guide module connected by a single-mode or multi-mode cable. The XFP port uses singlemode or multi-mode cables to access Ethernet. All SFP Port and XFP Port optical modules of Hillstone products use LC-type optical connector; therefore, you should connect the optical modules using optical fiber ended with LC-type connector.
Hillstone Hardware Reference Guide Figure 3-7: Connecting the Ethernet Fiber Cable Warning: Laser danger! To protect your eyes from radiation harm, do not stare into a cable connector connected to a laser generator. Connecting a Power Adapter To provide the power supply, connect the power adapter of the devices with the external AC power supply as follows: 1. Insert the DC output plug of the power adapter into the AC power interface at the back panel of the device. 2.
Hillstone Hardware Reference Guide 17 Chapter 3 Installation | Hillstone
Hillstone Hardware Reference Guide Chapter 4 Boot and Configuration Introduction This chapter describes the initial system boot and basic configuration of Hillstone SG-6000 series, using a PC as the console terminal. Establishing a Configuration Environment Hillstone devices support both local and remote configuration. Administrators can use the following configuration methods.
Hillstone Hardware Reference Guide terminal session to 9600bps, 8 data bits, 1 stop bit, none parity, and none flow control, as shown in Figure 4-2: Figure 4-2: Setting Parameters for the Terminal Session 3. Switch on the power supply, and the device performs self-test and initializes the configuration automatically. If the booting succeeds, the system will display the command line prompt “login”.
Hillstone Hardware Reference Guide 3. Enter the default administrator name and password “hillstone” in both the Login and Password text boxes. 4. Click the Login button to enter WebUI main page. Then you can set other configurations to the device. Tenet and SSH You can also establish Telnet and SSH configuration environments. For more information, please see StoneOS User Manual. Basic Configuration Before you begin to use the device, you should be familiar with its features and your network deployment.
Hillstone Hardware Reference Guide Chapter 5 Troubleshooting Introduction This chapter provides solutions to some common problems of Hillstone devices. Losing the Administrator Password If you lose the administrator password, please contact your local sales representative. Troubleshooting Power System Check the PWR LED on the front panel of the device. If the power supply is functioning normally, the PWR LED lights steadily in green color.
Hillstone Hardware Reference Guide Copyright Information Copyright © 2014, Hillstone Networks, lnc. All rights reserved. Hillstone, Hillstone Networks logo, StoneOS, StoneManager, Hillstone PnPVPN, UTM Plus are trademarks of Hillstone Networks. All other trademarks or registered marks are the property of their respective owners. Hillstone Networks assumes no responsibility for any inaccuracies in this document.
Hillstone Hardware Reference Guide FCC Statement: This device complies with Part 15 of the FCC Rules. Operation is subject to the following two conditions: (1) this device may not cause harmful interference, and (2) this device must accept any interference received, including interference that may cause undesired operation. Caution: The user is cautioned that changes or modifications not expressly approved by the party responsible for compliance could void the user's authority to operate the equipment.
Hillstone Hardware Reference Guide Industry Canada Statement: This device complies with RSS-210 of the Industry Canada Rules. Operation is subject to the following two conditions: 1) this device may not cause interference and 2) this device must accept any interference, including interference that may cause undesired operation of the device.
Hillstone Hardware Reference Guide 8 FCC Statement: | Hillstone