
Installation Guide
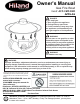
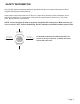
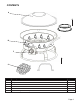
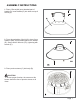
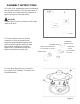
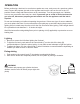
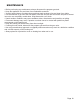
Table Of Contents
- Before you assemble or operate this unit, please carefully read this entire manual. Failure to do so may result in a fire, explosion, injury or death.
- NOTE: You must follow all steps to properly assemble this heating item. Make sure the gas valve is turned “OFF” before assembling. Do NOT attempt to assemble without proper tools.
- Combustible materials should not be within 72 inches of the top of the unit, or within 48 inches around the entire unit.
- 1. Place 2 Screw(AA) onto threaded part of handle (D). Insert handle (D) into holes on top of the lid (A).
- Propane tank must be a minimum of 60 inches away at all times.
- Do not use the heating unit without inspecting the gas hose. If there are signs of wear or abrasion you must replace the hose. Pumice stones/lava rocks could pop up and strike during the process of lighting this unit; stand away from the unit for the ...
- • Before performing any maintenance always disconnect the propane gas tank.
- • Harsh weather conditions may cause stubborn stains, discoloration and possibly rust pitting.

Page 9
OPERATION
Before performing a leak test, be sure that no sparks can occur, and you are in a spacious outdoor
area. Connect the propane gas tank to the regulator and turn the valve on the unit to the “off”
position. Brush a soap and water mixture on all connections. Turn the gas supply on; if bubbles
occur on any connection there may be a leak. If you smell gas or a leak is discovered turn the
gas valve off, disconnect propane gas tank and do not use the appliance until the leak is
repaired.
Do not use the heating unit without inspecting the gas hose. If there are signs of wear or abrasion
you must replace the hose. Pumice stones/lava rocks could pop up and strike during the process of
lighting this unit; stand away from the unit for the first 20 minutes after igniting. Flame height should
be a yellow/blue color between 2 - 10 inches in height.
Wait 30 minutes after extinguishing flame prior to placing a lid (if applicable) or protective cover on
heating item.
Lighting
1.
Be sure to remove the lid before lighting the fire bowl.
2 .
To light the fire bowl, push and turn the control knob (F) on the side of the body (B)
counterclockwise to ignite the piezo ignition. It may take several attempts to light the ignition.
3 .
To adjust the flame, turn the control knob (F) either clockwise or counterclockwise depending on
whether you want to lower or raise the flame.
Extinguishing
1.
Push and turn the control knob (F) clockwise to extinguish the flame.
2.
After the fire bowel has completely cooled, lock lid in place by turning it clockwise.
WARNING
Fire product and propane gas cylinder minimum
distance must be over 60 inches (as per right side
photo)
60"