
Installation Guide
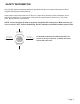
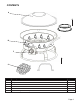
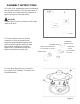
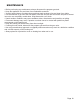
Table Of Contents
- Before you assemble or operate this unit, please carefully read this entire manual. Failure to do so may result in a fire, explosion, injury or death.
- NOTE: You must follow all steps to properly assemble this heating item. Make sure the gas valve is turned “OFF” before assembling. Do NOT attempt to assemble without proper tools.
- Combustible materials should not be within 72 inches of the top of the unit, or within 48 inches around the entire unit.
- 1. Place 2 Screw(AA) onto threaded part of handle (D). Insert handle (D) into holes on top of the lid (A).
- Propane tank must be a minimum of 60 inches away at all times.
- Do not use the heating unit without inspecting the gas hose. If there are signs of wear or abrasion you must replace the hose. Pumice stones/lava rocks could pop up and strike during the process of lighting this unit; stand away from the unit for the ...
- • Before performing any maintenance always disconnect the propane gas tank.
- • Harsh weather conditions may cause stubborn stains, discoloration and possibly rust pitting.

Page 8
ASSEMBLY INSTRUCTIONS
4.
Put the 20 lb. propane gas tank (not included)
into the tank holder (E). Turn the wing screw on
the outside of the tank holder (E) clockwise to
tighten the tank into the tank holder.
DANGER
Propane tank must be a minimum of 60 inches
away at all times.
5.
Turn the cylinder valve on the tank
clockwise to close the propane tank.
Attach the preassembled regulator from
the hose to the cylinder valve by turning
the regulator coupling nut clockwise.
Make sure it is fastened securely and
tighten connections by hand only.
6.
Cover body (B) with lid (A). To lock lid
(A) in place, turn clockwise. To unlock, turn
counterclockwise.
CYLINDER VALVE
BLACK COUPLING NUT
turn clockwise to connect
REGULATOR
PRESSURE
RELIEF VALVE
BLEED-OFF
VALVE
turn clockwise
to reseal
UNLOCK
LOCK
E