
User Manual

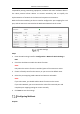


Table Of Contents
- Chapter 1 System Requirement
- Chapter 2 Network Connection
- Chapter 3 Access to the Network Camera
- Chapter 4 Wi-Fi Settings
- Chapter 5 Live View
- Chapter 6 Network Camera Configuration
- Chapter 7 Network Settings
- 7.1 Configuring Basic Settings
- 7.2 Configure Advanced Settings
- 7.2.1 Configuring SNMP Settings
- 7.2.2 Configuring FTP Settings
- 7.2.3 Configuring Email Settings
- 7.2.4 Platform Access
- 7.2.5 Wireless Dial
- 7.2.6 HTTPS Settings
- 7.2.7 Configuring QoS Settings
- 7.2.8 Configuring 802.1X Settings
- 7.2.9 Integration Protocol
- 7.2.10 Bandwidth Adaptation
- 7.2.11 Network Service
- 7.2.12 Smooth Streaming
- 7.2.13 Security Control Panel Configuration
- Chapter 8 Video/Audio Settings
- Chapter 9 Image Settings
- Chapter 10 Event Settings
- Chapter 11 Storage Settings
- Chapter 12 Playback
- Chapter 13 Picture
- Appendix
- Appendix 1 SADP Software Introduction
- Appendix 2 Port Mapping
- Appendix 3

Network Camera User Manual
75
4. Click Save to save and finish the settings.
Note:
To lower the risk of information leakage, you are suggested to enable SNMP v3 instead
of SNMP v1 or v2.
7.2.2 Configuring FTP Settings
Purpose:
You can configure the FTP/SFTP server related information to enable the uploading of
the captured pictures to the FTP/SFTP server. The captured pictures can be triggered
by events or a timing snapshot task.
Steps:
1. Enter the FTP Settings interface: Configuration > Network > Advanced Settings >
FTP.
FTP Settings
2. Select the FTP protocol.
3. Input the server address and port.
4. Configure the FTP/SFTP settings; and the user name and password are required
for the server login.