
User Manual
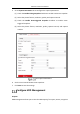


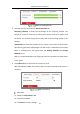


Table Of Contents
- Chapter 1 System Requirement
- Chapter 2 Network Connection
- Chapter 3 Access to the Network Camera
- Chapter 4 Wi-Fi Settings
- Chapter 5 Live View
- Chapter 6 Network Camera Configuration
- Chapter 7 Network Settings
- 7.1 Configuring Basic Settings
- 7.2 Configure Advanced Settings
- 7.2.1 Configuring SNMP Settings
- 7.2.2 Configuring FTP Settings
- 7.2.3 Configuring Email Settings
- 7.2.4 Platform Access
- 7.2.5 Wireless Dial
- 7.2.6 HTTPS Settings
- 7.2.7 Configuring QoS Settings
- 7.2.8 Configuring 802.1X Settings
- 7.2.9 Integration Protocol
- 7.2.10 Bandwidth Adaptation
- 7.2.11 Network Service
- 7.2.12 Smooth Streaming
- 7.2.13 Security Control Panel Configuration
- Chapter 8 Video/Audio Settings
- Chapter 9 Image Settings
- Chapter 10 Event Settings
- Chapter 11 Storage Settings
- Chapter 12 Playback
- Chapter 13 Picture
- Appendix
- Appendix 1 SADP Software Introduction
- Appendix 2 Port Mapping
- Appendix 3

Network Camera User Manual
142
is succeeded, its status changes to Encrypted.
3. (Optional) Define the quota for record and pictures.
(1) Input the quota percentage for picture and for record.
(2) Click Save and refresh the browser page to activate the settings.
Quota Settings
Configuring Net HDD
Before you start:
The network disk should be available within the network and properly configured to
store the recorded files, log files, pictures, etc.
Steps:
1. Enter the Net HDD settings interface, Configuration > Storage > Storage
Management > Net HDD.
Add Network Disk
2. Enter the IP address of the network disk, and enter the file path.
3. Select the mounting type. NFS and SMB/CIFS are selectable. And you can set the