
User Manual
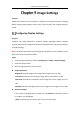


Table Of Contents
- Chapter 1 System Requirement
- Chapter 2 Network Connection
- Chapter 3 Access to the Network Camera
- Chapter 4 Wi-Fi Settings
- Chapter 5 Live View
- Chapter 6 Network Camera Configuration
- Chapter 7 Network Settings
- 7.1 Configuring Basic Settings
- 7.2 Configure Advanced Settings
- 7.2.1 Configuring SNMP Settings
- 7.2.2 Configuring FTP Settings
- 7.2.3 Configuring Email Settings
- 7.2.4 Platform Access
- 7.2.5 Wireless Dial
- 7.2.6 HTTPS Settings
- 7.2.7 Configuring QoS Settings
- 7.2.8 Configuring 802.1X Settings
- 7.2.9 Integration Protocol
- 7.2.10 Bandwidth Adaptation
- 7.2.11 Network Service
- 7.2.12 Smooth Streaming
- 7.2.13 Security Control Panel Configuration
- Chapter 8 Video/Audio Settings
- Chapter 9 Image Settings
- Chapter 10 Event Settings
- Chapter 11 Storage Settings
- Chapter 12 Playback
- Chapter 13 Picture
- Appendix
- Appendix 1 SADP Software Introduction
- Appendix 2 Port Mapping
- Appendix 3

Network Camera User Manual
104
Video Standard: 50 Hz and 60 Hz are selectable. Choose according to the different
video standards; normally 50 Hz for PAL standard and 60 Hz for NTSC standard.
Lens Distortion Correction: For cameras equipped with motor-driven lens, image
may appear distorted to some extent. Turn on this function to correct the
distortion.
Note: Video adjustment function varies according to different device model.
Others
Some camera models support CVBS, SDI, or HDMI output. Set the local output ON
or OFF according to the actual device.
Configuring OSD Settings
Purpose:
You can customize OSD information on the live view.
OSD Settings
Steps:
1. Enter the OSD Settings interface: Configuration > Image > OSD Settings.
2. Select the desired character set.
3. Check the corresponding checkbox to select the display of camera name, date or
week if required.